Going on the road again... after a year of life's transitions and pursuing other interests, I am privileged to have the opportunity to speak at MYGOSSCON 2011 next week.
The title of my paper is "Key Trends: Challenges, Opportunities and Leverage for Linux/OSS Ecosystem". I look forward to the discussions it will generate. :)
Personally, I am looking forward to this with excitement as I have been granted the latitude in content creation. I will be approaching the topic from another angle and with, what I hope to be, a fresh perspective.
Showing posts with label open source. Show all posts
Showing posts with label open source. Show all posts
Saturday, November 26, 2011

Tuesday, August 16, 2011
Wednesday, October 27, 2010
My Mac-SUSE Journey - Part 2
This is Part 2 of how I got openSUSE 11.3 (64-bit) working fully on a MacBook Pro 13" (2010 model). Here is the link to Part 1.
First, here are some shots of booting up MacBook Pro into openSUSE 11.3, taken from my old Nokia phone camera (and transferred via bluetooth to my MacSUSE) :
:
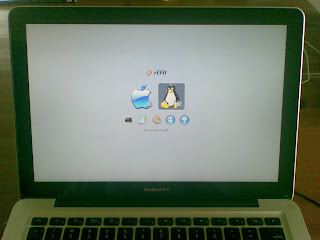
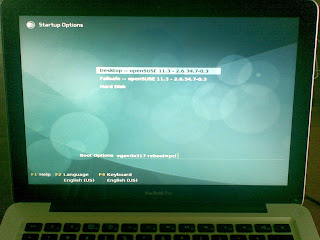
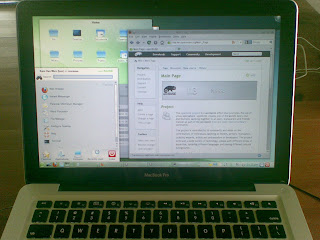
With openSUSE 11.3 installed and booted up, here are the configuration steps to get the most out of your MacBook Pro:
Wireless Driver
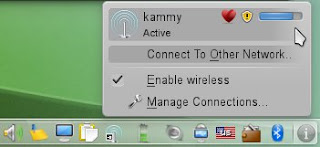
All that's required is the right Broadcom wifi driver. Start YaST, click on Software followed by Software Repositories.
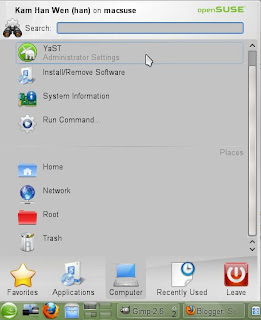
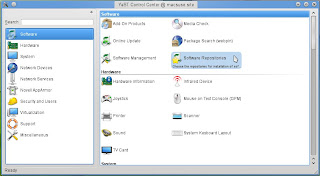
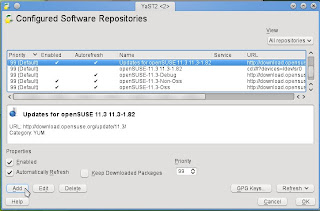
Click on the Add button and select Specify URL... and click Next. Enter "Packman" in the Repository Name field and this link in the URL field: http://packman.unixheads.com/suse/11.3/ and click Next to complete. Verify that Packman is now listed as a repository and click Ok to exit.
Click on Software Management, , enter "Broadcom" in the Search field and click Search. Select and click to install broadcom-wl and broadcom-wl-kmp-desktop followed by the Accept button.
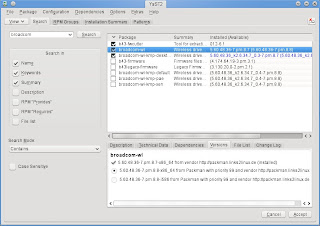
Reboot and you'll have Wifi up and running.
3D Desktop Effects with nVidia driver
This is optional since the default noveau driver works. However, if you want to turn on the fancy 3D Desktop Effects, you will need to install the proprietary nVidia driver.
With reference to steps above, in Software Repositories, you will need to add another software repository named nVidia and URL is ftp://download.nvidia.com/opensuse/11.3/
Next, in Software Management, search for "nvidia" and select and install nvidia-gfxG02-kmp-desktop package.
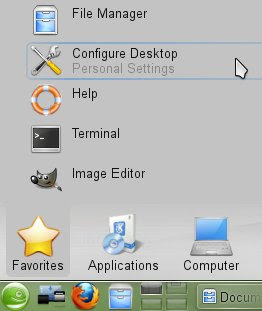
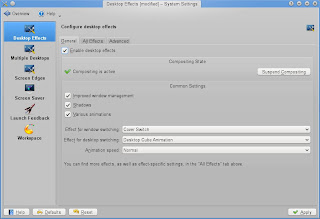
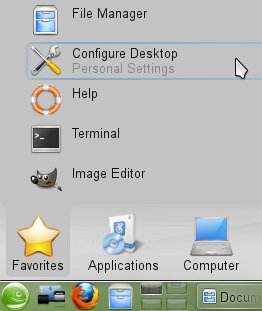
Either reboot or log out of your current session to start the newly installed nVidia drivers. To enable 3D Desktop Effects, start Configure Desktop and, under Look & Feel section, click Desktop and check the "Enable desktop effects". Don't forget to click the Apply button.
Configuring Audio
Audio is essential and all there is to make this work is to make 2 small configuration changes.
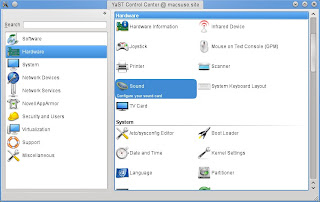
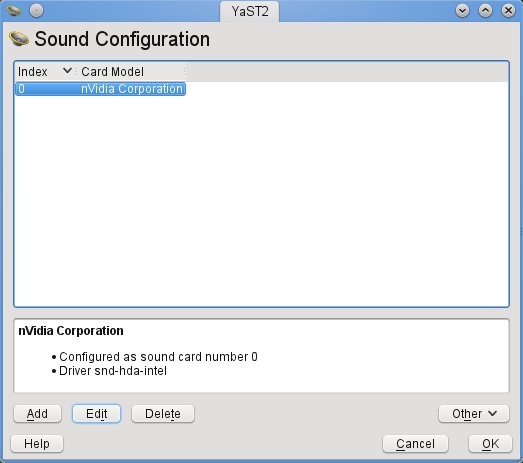
First, in YaST, select Hardware section followed by Sound. In Sound Configuration, select the default device (0, nVidia Corporation) and click Edit. In Sound Card Advanced Options, edit and add the value "mbp55" for the model. Click Next and Ok to complete.
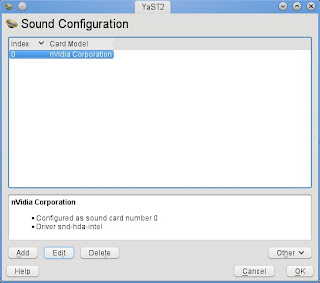
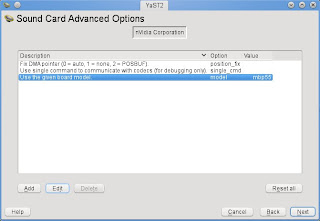
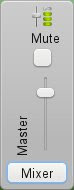
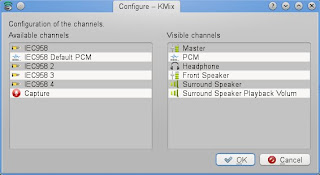
Second and final step is to click on the Volume icon and click Mixer. In Mixer window, from menu bar, click Settings followed by Configure Channels... Select and drag the Front Speaker channels from the left (Available channels) to the right (Visible channels). Click Ok.
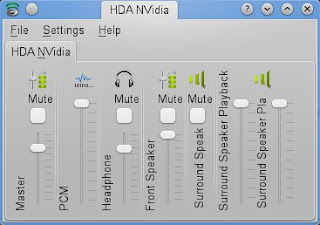
To test, start Firefox and surf to Youtube or any website with audio. You can use the Fn + F11 & Fn + F12 keys for volume control.
Keyboard Hotkeys
Fortunately, someone has written code to enable the MacBook Pro keyboard Hotkeys. This project is called pommed by Julien Blache. Even better than that, Alin Marin Elena has modified & compiled the latest version 1.34 (that supports this MacBook Pro model) specifically for openSUSE 11.3.
All that's required is to add another Software Repository called "Alin Marin Elena" and URL is http://download.opensuse.org/repositories/home:/ealin:/apple/openSUSE_11.3/
In Software Management, search for pommed and install pommed and gpommed. Ensure the pommed service is automatically started on boot, execute chkconfig -s pommed on as root at the Terminal.
To start pommed manually, execute /etc/init.d/pommed start as root and you should be able to control the Screen Brightness (Fn+F1 & Fn+F2) and Keyboard Backlight (Fn+F5 & Fn+ F6).
Reboot properly
Unfortunately, while you can shutdown properly, you will hang the system if you choose to reboot in openSUSE. With Thanks to Alin again, he showed how to make openSUSE reboot the machine correctly.
In short, you need to edit the /boot/grub/menu.lst file and add the flag reboot=pci to the kernel. Further, to prevent this flag from being removed when you upgrade your kernel, you will need to add this flag to the relevant variables in the /etc/sysconfig/bootloader file.
Thoughts & Conclusions
I have a working openSUSE 11.3 system running smoothly (well, you still can't beat Mac OS X since its tuned for this hardware) enough. The base openSUSE 11.3 took up 3.5-4.0Gb of disk space so I have plenty left over. Plus I can plug in a secondary USB/FireWire drive so its good.
I am using KVM to virtualize SLES and Windows. I refer to my other blog entry on getting started with KVM as a reference.
Finally, on the MacBook Pro, I use the Mac OS X more than openSUSE 11.3 because it meets most of my needs... except when I really need openSUSE. Besides, its always fun to see the look on them faces when they see openSUSE/KDE4 running on a MacBook Pro.
PS: Embedding this annoying clip introduced to me by Issac, my nephew.
First, here are some shots of booting up MacBook Pro into openSUSE 11.3, taken from my old Nokia phone camera (and transferred via bluetooth to my MacSUSE)
:


With openSUSE 11.3 installed and booted up, here are the configuration steps to get the most out of your MacBook Pro:
Wireless Driver
All that's required is the right Broadcom wifi driver. Start YaST, click on Software followed by Software Repositories.


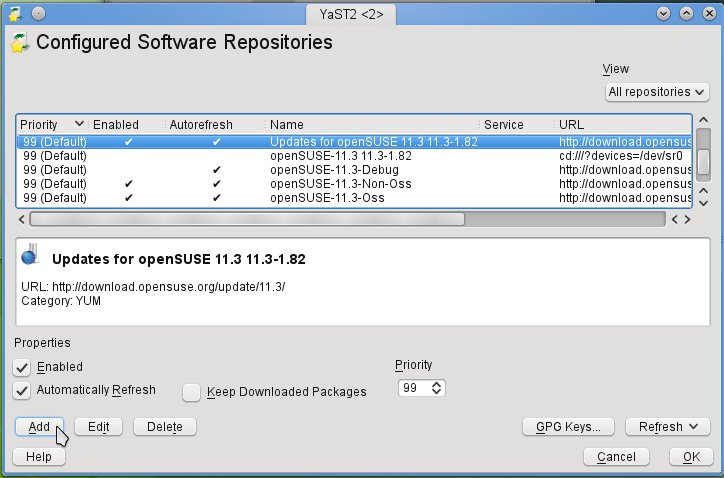
Click on the Add button and select Specify URL... and click Next. Enter "Packman" in the Repository Name field and this link in the URL field: http://packman.unixheads.com/suse/11.3/ and click Next to complete. Verify that Packman is now listed as a repository and click Ok to exit.
Click on Software Management,
 , enter "Broadcom" in the Search field and click Search. Select and click to install broadcom-wl and broadcom-wl-kmp-desktop followed by the Accept button.
Reboot and you'll have Wifi up and running.

3D Desktop Effects with nVidia driver
This is optional since the default noveau driver works. However, if you want to turn on the fancy 3D Desktop Effects, you will need to install the proprietary nVidia driver.
With reference to steps above, in Software Repositories, you will need to add another software repository named nVidia and URL is ftp://download.nvidia.com/opensuse/11.3/
Next, in Software Management, search for "nvidia" and select and install nvidia-gfxG02-kmp-desktop package.
Either reboot or log out of your current session to start the newly installed nVidia drivers. To enable 3D Desktop Effects, start Configure Desktop and, under Look & Feel section, click Desktop and check the "Enable desktop effects". Don't forget to click the Apply button.

Configuring Audio
Audio is essential and all there is to make this work is to make 2 small configuration changes.
First, in YaST, select Hardware section followed by Sound. In Sound Configuration, select the default device (0, nVidia Corporation) and click Edit. In Sound Card Advanced Options, edit and add the value "mbp55" for the model. Click Next and Ok to complete.


Second and final step is to click on the Volume icon and click Mixer. In Mixer window, from menu bar, click Settings followed by Configure Channels... Select and drag the Front Speaker channels from the left (Available channels) to the right (Visible channels). Click Ok.


To test, start Firefox and surf to Youtube or any website with audio. You can use the Fn + F11 & Fn + F12 keys for volume control.
Keyboard Hotkeys
Fortunately, someone has written code to enable the MacBook Pro keyboard Hotkeys. This project is called pommed by Julien Blache. Even better than that, Alin Marin Elena has modified & compiled the latest version 1.34 (that supports this MacBook Pro model) specifically for openSUSE 11.3.
All that's required is to add another Software Repository called "Alin Marin Elena" and URL is http://download.opensuse.org/repositories/home:/ealin:/apple/openSUSE_11.3/
In Software Management, search for pommed and install pommed and gpommed. Ensure the pommed service is automatically started on boot, execute chkconfig -s pommed on as root at the Terminal.
To start pommed manually, execute /etc/init.d/pommed start as root and you should be able to control the Screen Brightness (Fn+F1 & Fn+F2) and Keyboard Backlight (Fn+F5 & Fn+ F6).
Reboot properly
Unfortunately, while you can shutdown properly, you will hang the system if you choose to reboot in openSUSE. With Thanks to Alin again, he showed how to make openSUSE reboot the machine correctly.
In short, you need to edit the /boot/grub/menu.lst file and add the flag reboot=pci to the kernel. Further, to prevent this flag from being removed when you upgrade your kernel, you will need to add this flag to the relevant variables in the /etc/sysconfig/bootloader file.
Thoughts & Conclusions
I have a working openSUSE 11.3 system running smoothly (well, you still can't beat Mac OS X since its tuned for this hardware) enough. The base openSUSE 11.3 took up 3.5-4.0Gb of disk space so I have plenty left over. Plus I can plug in a secondary USB/FireWire drive so its good.
I am using KVM to virtualize SLES and Windows. I refer to my other blog entry on getting started with KVM as a reference.
Finally, on the MacBook Pro, I use the Mac OS X more than openSUSE 11.3 because it meets most of my needs... except when I really need openSUSE. Besides, its always fun to see the look on them faces when they see openSUSE/KDE4 running on a MacBook Pro.
PS: Embedding this annoying clip introduced to me by Issac, my nephew.
Wednesday, February 18, 2009
OSSPAC 2009
I was at the Open Source Singapore Pacific-Asia Conference (OSSPAC) and had the privilege to share the Novell SUSE story at their keynote event yesterday (17th Feb 2009).
In the afternoon, while walking through the various vendor and partner exhibits, I came across these two fellas and just had to take a picture with them... from left to right: The Duke, MySQL Dolphin and me with SUSE Geeko in tow.

SUSE Linux Enterprise with JAVA and MySQL ... nice
Oh, and here are a short snippet on the contents of my keynote:
In the afternoon, while walking through the various vendor and partner exhibits, I came across these two fellas and just had to take a picture with them...
from left to right: The Duke, MySQL Dolphin and me with SUSE Geeko in tow.
SUSE Linux Enterprise with JAVA and MySQL ... nice
Oh, and here are a short snippet on the contents of my keynote:
- The Novell SUSE history and how SUSE is gaining more than 5000 new customers for Novell in 2007 alone... and growing revenue at 38% from 2006 to 2007 and from 2007 to 2008. We are growing SUSE at a higher rate than the Linux market at 22% year on year
- All these are possible with the strong support from Novell partner ecosystem and it includes our strategic relationships with IBM, Microsoft, Dell, HP, Lenovo, Intel and AMD
- SUSE is important but not the only open source story at Novell. I picked Mono/Moonlight and SUSE Studio as some of the projects that Novell is investing in and hoping to yield fruits down the line
- Mono success at Unity3D and FusionFall MMORPG (other success stories)
- Moonlight bringing equality to Firefox users for President Obama's inauguration
- SUSE Studio and how partners can create custom Linux application appliances in multiple format (disk image, VMware and Xen)... and its still in Alpha!
Thursday, October 9, 2008
XEN Live Migration with iSCSI & OCFS2
Its been slow in coming but I've previously promised to blog about setting up iSCSI / OCFS2 as a means to share XEN domU images so as to facilitate Live Migration. Here we go...
Background:
Live migration in XEN is the moving of a running virtual machine (domU) from one physical machine to another. XEN will replicate the running domU's RAM across the wire between the source and target physical machine (both running XEN and having the right configurations, of course). It is up to us to ensure that the target machine has read/write access to the domU's virtual disks.
Hence, the most common way to do this is via NFS. For most, especially when setting up a demo system or in a class setting, this is sufficient. For larger scale deployments, customers usually have a SAN environment and that's that.
What about folks who are between the demo/class and larger-scale deployment scenarios? This is where this iSCSI / OCFS2 solution fits nicely. This is also commonly known as the poor man's SAN. There are quite a number of articles online that discuss this in detail (like pointing out the various SPOFs) so I'll not bother to blog about it here. Here's a good link for further reading though -> Build your own iSCSI SAN appliance, save money.
Solution:
SUSE Linux Enterprise Server 10 has both iSCSI and OCFS2 support. The following is based on SLES 10 SP2. iSCSI is a means to present a remote disk via TCP/IP to a local server just like its a local SCSI device. Hence, the little i stands for internet. OCFS2 is a proven cluster-aware filesystem and its the recommended filesystem when deploying Oracle RAC on Linux.
Here are the steps in general, you can find the details via online SLES documentation (or a one time 9Mb PDF download).
Link to documentation -> http://www.novell.com/documentation/sles10/index.html
Link to the specific section (12 & 14) -> http://www.novell.com/documentation/sles10/sles_admin/data/part_administration.html
Step 1: Setting aside a disk (or partition) to be shared via iSCSI
With reference to section 12.1, you will need to identity a disk or a disk partition to be used. Next, YaST -> Misc -> iSCSI Target to configure (if iSCSI is not installed, it will do so at this time).
Step 2: Configuring XEN servers as iSCSI clients to the shared disk
With reference to section 12.2, we configure the XEN servers to connect using YaST -> Network Services -> iSCSI Initiator so that the shared disk (or partition) will appear as local.
Step 3: Installing and Configuring OCFS2 on all servers
If you are not familiar with OCFS2, its recommended that you read section 14.0 through to 14.4.
From section 14.5, we install OCFS2 packages on all servers (storage and XEN servers). In section 14.6, we configure OCFS2 and format the disk (or partition) on the storage server.
In section 14.7, we configure OCFS2 to mount the shared storage on a common directory on the XEN servers (ie /mnt/xen/).
Step 5: Edit the domU configuration file
Copy the XEN domU configuration and virtual disk (eg disk0) into the mounted /mnt/xen/vm and /mnt/xen/images subdirectories respectively.
You will need to edit the domU VM configuration file to ensure that the disk parameter is not pointing to the new virtual disk (eg disk0) location in /mnt/xen/images/
Don't forget to propagate these changes via xm delete and xm new commands.
Step 6: Live Migrate!
Live migrate the running domU from one physical XEN server to another via:
xm migrate [domU ID/Name] [target server hostname/IP] --live
Good luck.
Background:
Live migration in XEN is the moving of a running virtual machine (domU) from one physical machine to another. XEN will replicate the running domU's RAM across the wire between the source and target physical machine (both running XEN and having the right configurations, of course). It is up to us to ensure that the target machine has read/write access to the domU's virtual disks.
Hence, the most common way to do this is via NFS. For most, especially when setting up a demo system or in a class setting, this is sufficient. For larger scale deployments, customers usually have a SAN environment and that's that.
What about folks who are between the demo/class and larger-scale deployment scenarios? This is where this iSCSI / OCFS2 solution fits nicely. This is also commonly known as the poor man's SAN. There are quite a number of articles online that discuss this in detail (like pointing out the various SPOFs) so I'll not bother to blog about it here. Here's a good link for further reading though -> Build your own iSCSI SAN appliance, save money.
Solution:
SUSE Linux Enterprise Server 10 has both iSCSI and OCFS2 support. The following is based on SLES 10 SP2. iSCSI is a means to present a remote disk via TCP/IP to a local server just like its a local SCSI device. Hence, the little i stands for internet. OCFS2 is a proven cluster-aware filesystem and its the recommended filesystem when deploying Oracle RAC on Linux.
Here are the steps in general, you can find the details via online SLES documentation (or a one time 9Mb PDF download).
Link to documentation -> http://www.novell.com/documentation/sles10/index.html
Link to the specific section (12 & 14) -> http://www.novell.com/documentation/sles10/sles_admin/data/part_administration.html
Step 1: Setting aside a disk (or partition) to be shared via iSCSI
With reference to section 12.1, you will need to identity a disk or a disk partition to be used. Next, YaST -> Misc -> iSCSI Target to configure (if iSCSI is not installed, it will do so at this time).
Step 2: Configuring XEN servers as iSCSI clients to the shared disk
With reference to section 12.2, we configure the XEN servers to connect using YaST -> Network Services -> iSCSI Initiator so that the shared disk (or partition) will appear as local.
Step 3: Installing and Configuring OCFS2 on all servers
If you are not familiar with OCFS2, its recommended that you read section 14.0 through to 14.4.
From section 14.5, we install OCFS2 packages on all servers (storage and XEN servers). In section 14.6, we configure OCFS2 and format the disk (or partition) on the storage server.
In section 14.7, we configure OCFS2 to mount the shared storage on a common directory on the XEN servers (ie /mnt/xen/).
Step 5: Edit the domU configuration file
Copy the XEN domU configuration and virtual disk (eg disk0) into the mounted /mnt/xen/vm and /mnt/xen/images subdirectories respectively.
You will need to edit the domU VM configuration file to ensure that the disk parameter is not pointing to the new virtual disk (eg disk0) location in /mnt/xen/images/
Don't forget to propagate these changes via xm delete and xm new commands.
Step 6: Live Migrate!
Live migrate the running domU from one physical XEN server to another via:
xm migrate [domU ID/Name] [target server hostname/IP] --live
Good luck.
Wednesday, September 24, 2008
Singapore Software Freedom Day 2008
Last Saturday (20 Sept) was Software Freedom Day 2008 worldwide. For Singapore, it was held at the Singapore Management University (SMU) School of Information Systems. The website for this event is at http://www.softwarefreedomday.sg
I had the privilege to present a topic at the Technology/Consumer Track. My topic titled "Road to Freedom: Practical Steps to Linux and Open Source Productivity". As this is a consumer track, I wanted to educate the public on the latest openSUSE 11 and how it can become a productive end-user desktop... using Windows analogies to bridge the gap in understanding Linux and Open Source tools.
Had a good time there. Looking forward to an even better one next year as the organizers are already enthusiastically talking of a bigger and more public venue.
I had the privilege to present a topic at the Technology/Consumer Track. My topic titled "Road to Freedom: Practical Steps to Linux and Open Source Productivity". As this is a consumer track, I wanted to educate the public on the latest openSUSE 11 and how it can become a productive end-user desktop... using Windows analogies to bridge the gap in understanding Linux and Open Source tools.
Had a good time there. Looking forward to an even better one next year as the organizers are already enthusiastically talking of a bigger and more public venue.
Friday, August 8, 2008
Remote Desktop in Linux - Part 2
In Part 1, we demonstrated how easy it was to administrate a system via a remote desktop session with openSUSE, SLED and SLES. Now, lets discuss how we can secure your remote desktop session by encrypting the data stream between the remote system and your local machine.
We will use Secure Shell (aka SSH) to encrypt the VNC (RFB) protocol via a technique called SSH Tunneling. More info on the subject of tunneling protocol at Wikipedia.
Pre-conditions:
1) You have SSH running (enabled) and you have a strong password on your remote system.
2) The Firewall is set to allow SSH traffic on your remote system.
On your local machine, we create a SSH tunnel to the remote machine, via the terminal as follows:
ssh -L 5900:localhost:5900 -f -N user@remoteIP
ssh is the secure shell program and the rest are parameters. -L will forward a particular port (ie 5900) on the local machine to another port (ie 5900) on the remote machine. -f requests ssh to go to the background. -N tells ssh not to execute remote command as we are just port forwarding. user is the user on the remote system. remoteIP is the reachable Internet address of the remote machine.
A successful SSH connection will prompt you for the user's password. Enter the password and you have a secure shell tunnel.
Next, execute the typical vncviewer command as follows:
vncviewer localhost:0
Noticed we point vncviewer to the local machine. If the SSH tunnel is setup corrrectly, it will intercept the vncviewer RFB protocol and forward it to the remote machine for execution. [localhost:0 translate to localhost and port 5900]
Now, we have the VNC (RFB) protocol leaving your local machine encrypted by the SSH protocol. Upon reaching the remote machine, the VNC (RFB) protocol will be delivered to port 5900 where the vncserver is running... and vice versa.
Do expect a hit on performance as we are wrapping a protocol (RFB) within another (SSH). I do not have a good user experience as the remote desktop feels sluggish. One workaround is to reduce the size of the remote desktop from the typical 1024x768 to 600x480 (or any other dimension as long as you're still productive). Another suggestion is to use the -deferUpdate flag to set a higher time (in milliseconds), default at 40, to wait before sending all the user interaction updates down the stream.
If you find the above too painful or performance hit unacceptable, there are other Remote Desktop alternatives with encryption. One very popular Remote Desktop software is from NoMachine.com. The underlying NX protocol is Free(as in speech) and open source(GPL). The client and server software for Linux are Free(as in beer/soda).
We will use Secure Shell (aka SSH) to encrypt the VNC (RFB) protocol via a technique called SSH Tunneling. More info on the subject of tunneling protocol at Wikipedia.
Pre-conditions:
1) You have SSH running (enabled) and you have a strong password on your remote system.
2) The Firewall is set to allow SSH traffic on your remote system.
On your local machine, we create a SSH tunnel to the remote machine, via the terminal as follows:
ssh -L 5900:localhost:5900 -f -N user@remoteIP
ssh is the secure shell program and the rest are parameters. -L will forward a particular port (ie 5900) on the local machine to another port (ie 5900) on the remote machine. -f requests ssh to go to the background. -N tells ssh not to execute remote command as we are just port forwarding. user is the user on the remote system. remoteIP is the reachable Internet address of the remote machine.
A successful SSH connection will prompt you for the user's password. Enter the password and you have a secure shell tunnel.
Next, execute the typical vncviewer command as follows:
vncviewer localhost:0
Noticed we point vncviewer to the local machine. If the SSH tunnel is setup corrrectly, it will intercept the vncviewer RFB protocol and forward it to the remote machine for execution. [localhost:0 translate to localhost and port 5900]
Now, we have the VNC (RFB) protocol leaving your local machine encrypted by the SSH protocol. Upon reaching the remote machine, the VNC (RFB) protocol will be delivered to port 5900 where the vncserver is running... and vice versa.
Do expect a hit on performance as we are wrapping a protocol (RFB) within another (SSH). I do not have a good user experience as the remote desktop feels sluggish. One workaround is to reduce the size of the remote desktop from the typical 1024x768 to 600x480 (or any other dimension as long as you're still productive). Another suggestion is to use the -deferUpdate flag to set a higher time (in milliseconds), default at 40, to wait before sending all the user interaction updates down the stream.
If you find the above too painful or performance hit unacceptable, there are other Remote Desktop alternatives with encryption. One very popular Remote Desktop software is from NoMachine.com. The underlying NX protocol is Free(as in speech) and open source(GPL). The client and server software for Linux are Free(as in beer/soda).
Monday, August 4, 2008
Remote Desktop in Linux - Part 1
Instead of running around working on a few machines, wouldn't it be nice to be able to remote-control all of them? Remote administration of Linux systems is not a new subject, there are many options but most of them involves the terminal (ie command prompt in Windows speak).
As an aside, the terminal in Linux is NOT an inferior mechanism for administrating systems. We need to remember that Linux is UNIX-like. The breadth and depth of functions available on a Linux terminal far exceed what you can imagine (if you're coming from a Windows/DOS world). I really must rant as some people think that working on a terminal is limiting, slow, un-cool and so behind the times. Personally, I use a combination of GUI and terminal, whichever that allows me to get things done quickly. Anyway...
What if you have the network bandwidth and the need to remotely administer via the desktop GUI? Again, there are a couple of options but I will focus on open source software that are readily available on most Linux distributions... in particular, openSUSE and the SUSE Linux Enterprise Desktop (SLED) and Server (SLES).
Method 1:
This applies to openSUSE 10.x-11, SLED and SLES 10. Will partially apply to any Linux distribution with the Vino (GNOME VNC Server).
1) This is disabled by default. To enable it, click Computer -> Control Center -> Remote Desktop.
2) In the dialog box, check off the "Allow other users to view your desktop" and "Allow other users to control your desktop" option.
3) Optionally, you may want to disable the "Ask you for confirmation" option since you won't be at your desktop to allow remote access (duh...) unless you are helping a friend/colleague to configure their system and they want to learn from observing your steps.
4) For security (not fullproof), you may want to enable a password before anyone can remotely control your desktop.
5) Don't forget to open a port in the Firewall. This is a common oversight. To open the port (5900) in the Firewall, use YaST -> Security & Users -> Firewall. In Firewall Configuration, select Allowed Services followed by Advanced... button. In the dialog box, enter 5900 in the TCP Ports field and click OK. Click Next and Accept to save the changes and restart the Firewall.
Finally, note the IP address of the machine (eg 10.0.0.1) either via the network manager icon on the bottom-right of the screen or just issue the command ip addr at the terminal.
On the client machine where you are going to remotely control the machine (eg 10.0.0.1), issue the following command at the terminal:
vncviewer 10.0.0.1:0
You may be prompted for a password (if you did step 4 above). DONE!
Note: Remember that the remote machine must be logged in before you can remote-control it. Also, all your actions on that desktop will be visible to anyone looking at its monitor. If this is not desirable, see Method 2.
Method 2
This method allows the same remote administration with GUI. However, the remote system does not have to be logged in and no one will see your actions as it will not show up on the remote machine's monitor.
This applies to opensuse, SLED 10 and SLES 10. Its applicable to any Linux distribution with vncserver package installed (see Manual/Standalone section of Method 2).
1) YaST -> Network Devices -> Remote Administration. In Remote Administration, select the Allow Remote Administration radio button. Also check the Open Port in Firewall checkbox. Click Finish.
2) You will need to log out to allow the display manager to be restarted. Or you can issue the following command at the terminal:
rcxdm restart
Just like in Method 1, note the IP address of the system (eg 10.0.0.2) via ip addr at the terminal.
On the client machine where you are going to remotely control the machine (eg 10.0.0.2), issue the following command at the terminal:
vncviewer 10.0.0.2:1
Ta-Da!
Note: This uses vncserver via the xinetd service. The remote system does not have to be logged in and no one can see your actions on the remote machine's monitor. However, once you log out or close the remote session, your session on the remote machine will close as well. This means you cannot have a GUI application running (ie Firefox downloading something) after closing the session. To workaround this particular limitation, use the Manual/Standalone method below.
Manual/Standalone
To invoke the vncserver command manually, issue the following command:
vncserver :1 -geometry 1024x768 -depth 16
you will be prompted for a session password. Don't forget this password.
On the client machine, issue the vncviewer command as follows:
vncviewer 10.0.0.3:1
where 10.0.0.3 is the IP address of the remote machine running vncserver
Try leaving a window or GUI application open and close the window. Now, issue the same vncviewer command again and you will see the same window and GUI application still running on the remote machine.
Good.
Now, all the above is well and good if your client machine and the remote machines are on the same (trusted) network. What if you are in an untrusted network (public wifi, hotel Internet port etc) and want to do a remote desktop to the machine back at home? You may want to secure the data stream as it travels over the Internet. Stay tuned for Part 2...
As an aside, the terminal in Linux is NOT an inferior mechanism for administrating systems. We need to remember that Linux is UNIX-like. The breadth and depth of functions available on a Linux terminal far exceed what you can imagine (if you're coming from a Windows/DOS world). I really must rant as some people think that working on a terminal is limiting, slow, un-cool and so behind the times. Personally, I use a combination of GUI and terminal, whichever that allows me to get things done quickly. Anyway...
What if you have the network bandwidth and the need to remotely administer via the desktop GUI? Again, there are a couple of options but I will focus on open source software that are readily available on most Linux distributions... in particular, openSUSE and the SUSE Linux Enterprise Desktop (SLED) and Server (SLES).
Method 1:
This applies to openSUSE 10.x-11, SLED and SLES 10. Will partially apply to any Linux distribution with the Vino (GNOME VNC Server).
1) This is disabled by default. To enable it, click Computer -> Control Center -> Remote Desktop.
2) In the dialog box, check off the "Allow other users to view your desktop" and "Allow other users to control your desktop" option.
3) Optionally, you may want to disable the "Ask you for confirmation" option since you won't be at your desktop to allow remote access (duh...) unless you are helping a friend/colleague to configure their system and they want to learn from observing your steps.
4) For security (not fullproof), you may want to enable a password before anyone can remotely control your desktop.
5) Don't forget to open a port in the Firewall. This is a common oversight. To open the port (5900) in the Firewall, use YaST -> Security & Users -> Firewall. In Firewall Configuration, select Allowed Services followed by Advanced... button. In the dialog box, enter 5900 in the TCP Ports field and click OK. Click Next and Accept to save the changes and restart the Firewall.
Finally, note the IP address of the machine (eg 10.0.0.1) either via the network manager icon on the bottom-right of the screen or just issue the command ip addr at the terminal.
On the client machine where you are going to remotely control the machine (eg 10.0.0.1), issue the following command at the terminal:
vncviewer 10.0.0.1:0
You may be prompted for a password (if you did step 4 above). DONE!
Note: Remember that the remote machine must be logged in before you can remote-control it. Also, all your actions on that desktop will be visible to anyone looking at its monitor. If this is not desirable, see Method 2.
Method 2
This method allows the same remote administration with GUI. However, the remote system does not have to be logged in and no one will see your actions as it will not show up on the remote machine's monitor.
This applies to opensuse, SLED 10 and SLES 10. Its applicable to any Linux distribution with vncserver package installed (see Manual/Standalone section of Method 2).
1) YaST -> Network Devices -> Remote Administration. In Remote Administration, select the Allow Remote Administration radio button. Also check the Open Port in Firewall checkbox. Click Finish.
2) You will need to log out to allow the display manager to be restarted. Or you can issue the following command at the terminal:
rcxdm restart
Just like in Method 1, note the IP address of the system (eg 10.0.0.2) via ip addr at the terminal.
On the client machine where you are going to remotely control the machine (eg 10.0.0.2), issue the following command at the terminal:
vncviewer 10.0.0.2:1
Ta-Da!
Note: This uses vncserver via the xinetd service. The remote system does not have to be logged in and no one can see your actions on the remote machine's monitor. However, once you log out or close the remote session, your session on the remote machine will close as well. This means you cannot have a GUI application running (ie Firefox downloading something) after closing the session. To workaround this particular limitation, use the Manual/Standalone method below.
Manual/Standalone
To invoke the vncserver command manually, issue the following command:
vncserver :1 -geometry 1024x768 -depth 16
you will be prompted for a session password. Don't forget this password.
On the client machine, issue the vncviewer command as follows:
vncviewer 10.0.0.3:1
where 10.0.0.3 is the IP address of the remote machine running vncserver
Try leaving a window or GUI application open and close the window. Now, issue the same vncviewer command again and you will see the same window and GUI application still running on the remote machine.
Good.
Now, all the above is well and good if your client machine and the remote machines are on the same (trusted) network. What if you are in an untrusted network (public wifi, hotel Internet port etc) and want to do a remote desktop to the machine back at home? You may want to secure the data stream as it travels over the Internet. Stay tuned for Part 2...
Tuesday, July 29, 2008
Big Buck Bunny...
Another BIG step (if not LEAP) for Open Source... if you have not heard about Big Buck Bunny... I'm so delighted you get to hear it from my blog... much Thanks goes to Lai Kuan for spreading this wonderful news...
See it at http://www.bigbuckbunny.org/
Big Buck Bunny is a 3D animation movie licensed under the Creative Commons Attribution 3.0 . This means that the entire movie is FREE for you to Share, to Remix as long as you Attribute the original authors of the work. Also worthy of mention is the 3D content creation software behind the movie... Yes, its an open source software and its called Blender (http://www.blender.org).
For high resolution copies, go to the Download section on Big Buck Bunny site. I'm embedding the smaller YouTube movie below. Enjoy, oh yeah, its wickedly funny too.
See it at http://www.bigbuckbunny.org/
Big Buck Bunny is a 3D animation movie licensed under the Creative Commons Attribution 3.0 . This means that the entire movie is FREE for you to Share, to Remix as long as you Attribute the original authors of the work. Also worthy of mention is the 3D content creation software behind the movie... Yes, its an open source software and its called Blender (http://www.blender.org).
For high resolution copies, go to the Download section on Big Buck Bunny site. I'm embedding the smaller YouTube movie below. Enjoy, oh yeah, its wickedly funny too.
Wednesday, July 9, 2008
Radical enough for ya?
Richard M Stallman. Who? Read Wikipedia's entry here to get up to speed.
A recent report from PC World on his views of Open Source, Microsoft, Bill Gates' semi-retirement and free software movement. Read it here. Is this radical enough for you? How much and to what extent would you agree?
Personally, I would advise to read his views in its entirety (over 2 web pages) and form your own independent thought. Why?
"All the problems of the world could be settled easily if men were only willing to think. The trouble is that men very often resort to all sorts of devices in order not to think, because thinking is such hard work."
"Whenever an individual or a business decides that success has been attained, progress stops"
Thomas J. Watson Jr of IBM
A recent report from PC World on his views of Open Source, Microsoft, Bill Gates' semi-retirement and free software movement. Read it here. Is this radical enough for you? How much and to what extent would you agree?
Personally, I would advise to read his views in its entirety (over 2 web pages) and form your own independent thought. Why?
"All the problems of the world could be settled easily if men were only willing to think. The trouble is that men very often resort to all sorts of devices in order not to think, because thinking is such hard work."
"Whenever an individual or a business decides that success has been attained, progress stops"
Thomas J. Watson Jr of IBM
Subscribe to:
Posts (Atom)