Showing posts with label Macintosh. Show all posts

Wednesday, October 27, 2010

My Mac-SUSE Journey - Part 2

This is Part 2 of how I got openSUSE 11.3 (64-bit) working fully on a MacBook Pro 13" (2010 model). Here is the link to Part 1.

First, here are some shots of booting up MacBook Pro into openSUSE 11.3, taken from my old Nokia phone camera (and transferred via bluetooth to my MacSUSE) senyum:


With openSUSE 11.3 installed and booted up, here are the configuration steps to get the most out of your MacBook Pro:

Wireless Driver

All that's required is the right Broadcom wifi driver. Start YaST, click on Software followed by Software Repositories.


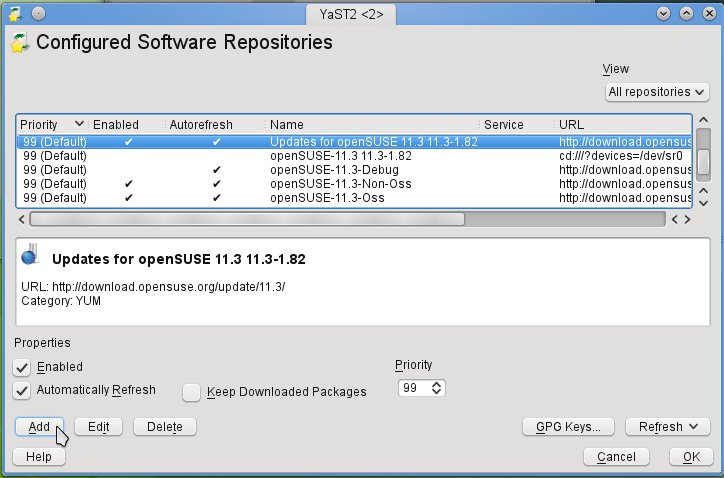
Click on the Add button and select Specify URL... and click Next. Enter "Packman" in the Repository Name field and this link in the URL field: http://packman.unixheads.com/suse/11.3/ and click Next to complete. Verify that Packman is now listed as a repository and click Ok to exit.

Click on Software Management, , enter "Broadcom" in the Search field and click Search. Select and click to install broadcom-wl and broadcom-wl-kmp-desktop followed by the Accept button.


Reboot and you'll have Wifi up and running.


3D Desktop Effects with nVidia driver

This is optional since the default noveau driver works. However, if you want to turn on the fancy 3D Desktop Effects, you will need to install the proprietary nVidia driver.

With reference to steps above, in Software Repositories, you will need to add another software repository named nVidia and URL is ftp://download.nvidia.com/opensuse/11.3/

Next, in Software Management, search for "nvidia" and select and install nvidia-gfxG02-kmp-desktop package.

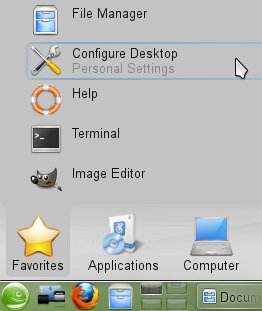
Either reboot or log out of your current session to start the newly installed nVidia drivers. To enable 3D Desktop Effects, start Configure Desktop and, under Look & Feel section, click Desktop and check the "Enable desktop effects". Don't forget to click the Apply button.


Configuring Audio

Audio is essential and all there is to make this work is to make 2 small configuration changes.

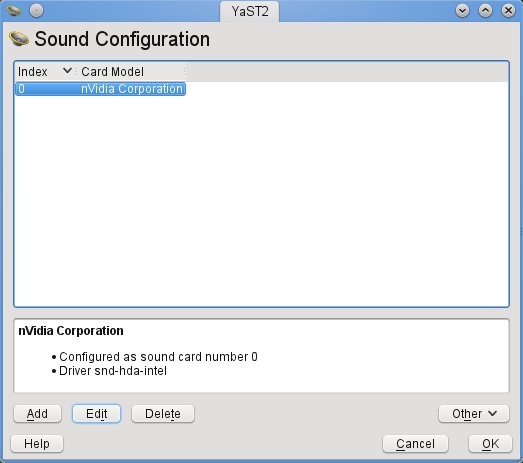
First, in YaST, select Hardware section followed by Sound. In Sound Configuration, select the default device (0, nVidia Corporation) and click Edit. In Sound Card Advanced Options, edit and add the value "mbp55" for the model. Click Next and Ok to complete.


Second and final step is to click on the Volume icon and click Mixer. In Mixer window, from menu bar, click Settings followed by Configure Channels... Select and drag the Front Speaker channels from the left (Available channels) to the right (Visible channels). Click Ok.


To test, start Firefox and surf to Youtube or any website with audio. You can use the Fn + F11 & Fn + F12 keys for volume control.


Keyboard Hotkeys

Fortunately, someone has written code to enable the MacBook Pro keyboard Hotkeys. This project is called pommed by Julien Blache. Even better than that, Alin Marin Elena has modified & compiled the latest version 1.34 (that supports this MacBook Pro model) specifically for openSUSE 11.3.

All that's required is to add another Software Repository called "Alin Marin Elena" and URL is http://download.opensuse.org/repositories/home:/ealin:/apple/openSUSE_11.3/

In Software Management, search for pommed and install pommed and gpommed. Ensure the pommed service is automatically started on boot, execute chkconfig -s pommed on as root at the Terminal.

To start pommed manually, execute /etc/init.d/pommed start as root and you should be able to control the Screen Brightness (Fn+F1 & Fn+F2) and Keyboard Backlight (Fn+F5 & Fn+ F6).


Reboot properly

Unfortunately, while you can shutdown properly, you will hang the system if you choose to reboot in openSUSE. With Thanks to Alin again, he showed how to make openSUSE reboot the machine correctly.

In short, you need to edit the /boot/grub/menu.lst file and add the flag reboot=pci to the kernel. Further, to prevent this flag from being removed when you upgrade your kernel, you will need to add this flag to the relevant variables in the /etc/sysconfig/bootloader file.

Thoughts & Conclusions

I have a working openSUSE 11.3 system running smoothly (well, you still can't beat Mac OS X since its tuned for this hardware) enough. The base openSUSE 11.3 took up 3.5-4.0Gb of disk space so I have plenty left over. Plus I can plug in a secondary USB/FireWire drive so its good.

I am using KVM to virtualize SLES and Windows. I refer to my other blog entry on getting started with KVM as a reference.

Finally, on the MacBook Pro, I use the Mac OS X more than openSUSE 11.3 because it meets most of my needs... except when I really need openSUSE. Besides, its always fun to see the look on them faces when they see openSUSE/KDE4 running on a MacBook Pro. peace

PS: Embedding this annoying clip introduced to me by Issac, my nephew. sengihnampakgigi

My Mac-SUSE Journey - Part 1

After many months of consideration and research, I bought a brand new MacBook Pro 13" in early October. I needed a handy appliance where I can do Photos, Movies, Music, browse the web... iPhone is too small, iPad is nice but not computationally powerful or mature/proven. After spending close to 4 weeks on my Macbook Pro (version 7,1), I'm a very happy customer. sengihnampakgigi

It wasn't long before, 2 days post-acquisition really, I started wondering about putting SUSE on it. Sure, I've discovered Terminal & X11 in Mac OS X and it works great. senyum I use VirtualBox to virtualize SLES & openSUSE. But I still wanna have SUSE run natively to do KVM, maybe Xen and just because I can... peace

I am not the first, nor the last, to do this so I will acknowledge the wealth of information & helpful folks out there on the Web (see reference section further below).

Before we begin, please indulge my trip down memory lane... my very first computer was the Apple PC-IIe and it looks like the picture below... and who could forget the timeless Karateka... filling my little mind with boundless fluid moves... that does very little in real life... well... it did get me into trouble a few times... only a few. gelakguling


My next brush with Apple was during my undergraduate days where I spent many hours doing tutorials and projects in the Mathematics/Statistics/Simulation labs filled with rows of Macintoshes (see pic below)... good times. pinokio


I graduated just as the technicolor iMac G3 invaded the campus. angkatkening

The Mac hardware and software has come a long way and I'm very impressed and pleased with my purchase. Despite my previous encounters with the Mac, about the only thing familiar was the good old Finder and that static menu bar at the top. As I use Mac OS X "Snow Leopard", I find good things/ideas that should be implemented in openSUSE/KDE... but I will blog about this in more detail another time.

Enough rambling, here are the steps to installing openSUSE 11.3 (64-bit) onto a Macbook Pro 13" (2010 edition) running Mac OS X 10.6.4:


Disk Partitioning

My hard disk was upgraded from 250Gb to 320Gb. I decided to take 25Gb away for openSUSE 11.3. I did not use the Boot Camp Assistant utility on Mac OS X but instead used the Disk Utility.


As shown in screenshot above, I shrunk my Mac OS X partition from 320Gb to 295Gb. Next, I split the remaining free space into 21Gb for my root partition and 4Gb for swap partition. You can format them as DOS/FAT and let openSUSE reformat them at installation.


Dual-boot Setup

Now that some disk space has been carved up for openSUSE 11.3, its time to make the MacBook Pro dual-boot. Unfortunately, the usual Grub bootloader doesn't work here. To spare you (and myself) the details, the way to dual-boot a MacBook Pro is to use rEFIt (pronounced Refit).

Download the freely available rEFIt, version 0.14 at the time, and install it. I followed the documentation and installed it via the "Automatic Installation with the Installer Package" section at http://refit.sourceforge.net/doc/c1s1_install.html

To verify you've installed this correctly, reboot your MacBook Pro and you should see a boot menu on startup where you use the arrow and Enter keys to select which OS to boot. You should only see one option at this time since you have not installed a second OS on the MacBook Pro yet.


Installation

Pop in the openSUSE 11.3 (64-bit) installation DVD into the drive and shutdown Mac OS X. Power-on the MacBook Pro and press and hold the "c" button so that it will boot from the DVD drive. I usually press and hold the "c" button till I hear the DVD drive spinning up the media before I let go.

You should see the usual stuff when installing openSUSE, the kernel and initrd will load, nice fancy splash screen shows up and you select Installation to start the process. Pretty straightforward.

The most important part of the installation is disk partitioning because you really do NOT want to install openSUSE over Mac OS X. Thanks to the simple partitioning scheme where rEFIt has the first partition and Mac OS X has the second partition of 295Gb, that's easy to spot. When you reach that part of the installation where openSUSE installer proposes a disk layout, do NOT accept the defaults but instead choose to do Custom Partitioning and ensure that you do NOT touch that first and second partition. Select the 21Gb partition, format it with your favourite filesystem (ext3 for me) and mount it as root /. Next select the 4Gb partition, format it as Swap.


The next equally important part of the installation is the Grub Boot Loader. Since we are relying on rEFIt to dual-boot, we need to ensure that Grub does not intrude and writes itself in the Master Boot Record (MBR). Instead, ensure that Grub is only installed to the Root partition (/dev/sda3 and NOT to MBR). Further, ensure the "Write generic Boot Code to MBR" is UNChecked so nothing gets written to the MBR.


The rest of the installation is a non-event.


Cannot boot up openSUSE without the DVD loaded?

There is a chance, post-installation, that you realized that you can boot into Mac OS X but when you select to boot into Linux, your openSUSE 11.3 does not boot up and some vague error message like no operating system found. However, you are able to boot from the openSUSE 11.3 installation DVD and choosing to boot from hard disk instead, you can successfully boot up the installed openSUSE 11.3.

If this is the case, its highly likely the GPT/MBR may be out of sync. To resolve this, boot into openSUSE 11.3 and first use fdisk -l to check that only the openSUSE partition is set to boot (see first screenshot below). Next, use parted to check that the boot flag only applies to the first partition (rEFIt) and nothing else (see second screenshot below).


Finally, double-check the Grub Boot Loader setup via YaST -> System -> Boot Loader and verify the settings are correct (compared to the screenshots in previous section above).


Conclusions (to be continued)

The vanilla openSUSE 11.3, will be 85-90% functional. Some important items that works out of the box:
  • Graphics card is detected and proper resolution rendered
  • Keyboard works (in general but you can specify Apple Macbook keyboard in the Control Panel to improve mappings)
  • Touchpad works (but I do find it a tad sensitive so you can adjust it under Control Panel) or plug in your favourite USB mouse
  • Disk and DVD drive works
  • iSight webcam works with Kopete
  • Ethernet (LAN port)
  • FireWire and USB ports
  • External display port
  • SD Card Reader
The following is a list of things that does not work right away but will require addition work (like installing additional software packages) to get going:
  • Wireless does not work as its a Broadcom chip. You will require a LAN cable (hey, at least networking works!) to retrieve and install the appropriate broadcom drivers.
  • Default open source nouveau driver works for the nVidia GeForce 320M graphics card but if you want 3D desktop effects, you will need to download and install the proprietary nVidia driver
  • Audio does not work but its more a configuration issue than driver issue
  • You cannot adjust the screen brightness or keyboard backlight. You will need to install additional drivers for this to work
I will be addressing these in Part 2 of my blog. Stay tuned. peace


On a Side Note

I'd like to share why I did not install SUSE Linux Enterprise Desktop (SLED) 11 SP1 or earlier version of openSUSE 11.2. I did attempt it and both SLED 11 SP1 and openSUSE 11.2 DVD boots up but fails to recognized the DVD drive after the installation kernel/initrd loads. It kinda hangs at loading udev. I'm too lazy to figure out which module I have to load by hand and since openSUSE 11.3 works, its good enough for me. senyum


Links/References to other related pages

General Guide & starting point - http://old-en.opensuse.org/OpenSUSE_on_a_Mac

star Alin Marin Elena's entry specific to my MacBook Pro (7,1) model and openSUSE 11.3 - http://alin.elenaworld.net/?p=921

Howto based on openSUSE 11.2 & older 2009 MacBook Pro model - http://forums.opensuse.org/english/information-new-users/unreviewed-how-faq/426413-how-install-opensuse-11-2-mid-2009-macbook-pro.html

Forum post on Grub & Booting issues - http://forums.opensuse.org/english/get-help-here/install-boot-login/430718-macbook-pro-grub-2.html#post2113355

openSUSE Forum is a great source of information and discussions - http://forums.opensuse.org/