This should be an interesting entry in light of the recent developments in the roadmap of both Fedora & openSUSE where MySQL is being ditched for MariaDB. This will affect new enterprise deployments in the next 18-24 months when the changes cascades into the next major release of RHEL & SLES.
At the heart of these changes is the perceived lack of openness & transparency of commercial juggernauts shepherding open source projects. Another example is LibreOffice, being a fork of OpenOffice a few years back, and is now the default in openSUSE distributions.
VirtualBox was originally from Innotek GmbH and they were acquired by Sun Microsystems Inc. in February 2008 which in turn got acquired by Oracle Corporation in January 2010. Virtualbox is not shipped as a default on openSUSE but you can install it very easily because the binaries are available in the default online repositories.
Personally, I think VirtualBox is the 'BEST' virtualization software for the desktop. I would go with KVM or even Xen for enterprise server virtualization. However, for virtualizing Windows or Linux on a desktop for quick testing purposes, I'll pick Virtualbox anytime for its ease of use & free of cost attributes.
Easy Install Method
Showing posts with label Virtualization. Show all posts
Showing posts with label Virtualization. Show all posts
Sunday, February 3, 2013

Monday, October 25, 2010
Using Apache2 to deploy & maintain SUSE
This entry is a little different because its open ended compared to my previous posts. The solution I'm about to share may or may not work for you and that's the nature of the enterprise IT environment. Nevertheless, I hope it will be a good reference for you.
Automation is an important aspect in enterprise IT. In this specific scenario, we are talking about the ability to scale deployment and maintenance of multiple SLES instances (or SLED or openSUSE). Unlike installing a single SLES instance for evaluation, the DVD media (or even USB sticks) is not going to cut it if you have 3, 5, 50 or 100s of SLES deployed in a data center. This also applies to setting up an IT training classroom of 25 machines.
To make things more interesting, if you have Blade servers, you'll noticed that each Blade server chasis/enclosure have only one shared physical DVD drive. Sure, its read-only and can be shared amongst all the blades but what if you need to install another software (requiring another DVD) on the first blade and the rest are still reading from your SLES DVD media? Oops.
The idea is to share the SLES binaries over the network and there are various mechanism like HTTP, FTP, NFS and even Samba (oh-boy). My preferred choice is HTTP via Apache2 webserver for 2 simple reasons. First, it works quite well from experience and as importantly, its really easy to setup (ie quick & painless setup).
Install Apache2
a) Command-line option: zypper in apache2
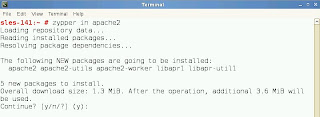
OR
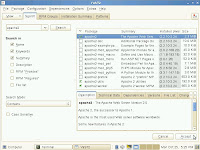
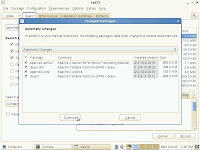
b) GUI option: YaST -> Software Management -> Search for the apache2 package and click Accept & continue for automatic changes with associated packages for installation.
Configure Apache2
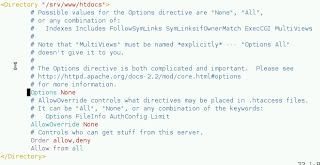
1) Edit the following configuration file at /etc/apache2/default-server.conf with your favourite text editor.
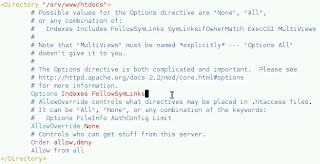
2) Under the Directory section (see screenshot), look for the line Options None and replace it with Options Indexes FollowSymLinks as shown in screenshot below. This allows apache2 webserver to list directories and also follow symbolic links.
Mounting ISOs under Apache2
1) The Document root for Apache2 is /srv/www/htdocs/ so I would suggest the following directory structure:
/srv/www/htdocs/software/SLES-11-SP1/i586
/srv/www/htdocs/software/SLES-11-SP1/x86_64
/srv/www/htdocs/software/SLES-11-SP1/s390x
By way of example above, you can see that I created a software sub-directory followed by directories for the product & version and, in turn, followed by the architecture.
2) Assuming you have the DVD ISO file somewhere on your filesystem (I usually put them in /media), you can mount them via:
mount -t iso9660 -o ro,loop /media/SLES-11-SP1-x86_64.iso /srv/www/htdocs/software/SLES-11-SP1/x86_64/
Starting Apache2
a) rcapache2 start
b) To make apache2 auto-start on boot, chkconfig -s apache2 on
Configure target SLES instances
1) On your target SLES instances, you can add a new repository via YaST.
For SLES 10: YaST -> Installation Source
For SLES 11: YaST -> Software Repositories
There is an equivalent zypper command but I find the GUI much more productive in this case.
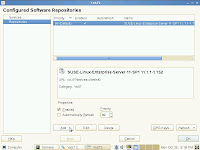
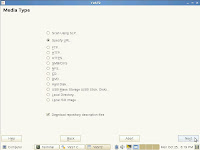
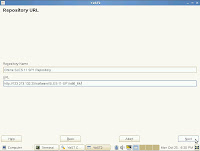
2) Click Add to add another source for YaST to query and retrieve software. Choose Specify URL... and enter the URL to the Apache2 server you've just setup.
As an example, assuming your target is SLES 11 SP1 & as shown in screenshots below, you enter http://[IP address to Apache2]/software/SLES-11-SP1/x86_64
Once this is setup, you may disable or remove other sources (like the one that points to your DVD media).
Conclusions
1) It works well and scales nicely to quite a degree.
2) You don't waste DVDs (or the time in creating them).
3) You get to keep all your ISO binaries in one place which is great from admin standpoint. Plus, you do not waste disk space storing duplicate ISOs spread all over your servers or SAN.
4) If you have virtualized SLES instances, this works just as well since its all network based. As long as your servers (physical or virtual) has a network path to your Apache2, its good. Heck, you can even virtualize this Apache2 server if you like.

What's not documented in this blog entry is how to setup a PXE-boot server (tftp & dhcpd) environment in SLES in addition to Apache2 (mentioned above) so you can provision new servers that are capable of booting up over the network and kick-start the installation process with Auto-YaST.
If you are interested, let me know in the comments section and I'll look into writing it... in the meantime, I can refer you to these helpful resources:
http://en.opensuse.org/SDB:PXE_boot_installation
http://www.novell.com/coolsolutions/feature/17719.html
Automation is an important aspect in enterprise IT. In this specific scenario, we are talking about the ability to scale deployment and maintenance of multiple SLES instances (or SLED or openSUSE). Unlike installing a single SLES instance for evaluation, the DVD media (or even USB sticks) is not going to cut it if you have 3, 5, 50 or 100s of SLES deployed in a data center. This also applies to setting up an IT training classroom of 25 machines.
To make things more interesting, if you have Blade servers, you'll noticed that each Blade server chasis/enclosure have only one shared physical DVD drive. Sure, its read-only and can be shared amongst all the blades but what if you need to install another software (requiring another DVD) on the first blade and the rest are still reading from your SLES DVD media? Oops.
The idea is to share the SLES binaries over the network and there are various mechanism like HTTP, FTP, NFS and even Samba (oh-boy). My preferred choice is HTTP via Apache2 webserver for 2 simple reasons. First, it works quite well from experience and as importantly, its really easy to setup (ie quick & painless setup).
Install Apache2
a) Command-line option: zypper in apache2

OR
b) GUI option: YaST -> Software Management -> Search for the apache2 package and click Accept & continue for automatic changes with associated packages for installation.


Configure Apache2
1) Edit the following configuration file at /etc/apache2/default-server.conf with your favourite text editor.
2) Under the Directory section (see screenshot), look for the line Options None and replace it with Options Indexes FollowSymLinks as shown in screenshot below. This allows apache2 webserver to list directories and also follow symbolic links.


Mounting ISOs under Apache2
1) The Document root for Apache2 is /srv/www/htdocs/ so I would suggest the following directory structure:
/srv/www/htdocs/software/SLES-11-SP1/i586
/srv/www/htdocs/software/SLES-11-SP1/x86_64
/srv/www/htdocs/software/SLES-11-SP1/s390x
By way of example above, you can see that I created a software sub-directory followed by directories for the product & version and, in turn, followed by the architecture.
2) Assuming you have the DVD ISO file somewhere on your filesystem (I usually put them in /media), you can mount them via:
mount -t iso9660 -o ro,loop /media/SLES-11-SP1-x86_64.iso /srv/www/htdocs/software/SLES-11-SP1/x86_64/
Starting Apache2
a) rcapache2 start
b) To make apache2 auto-start on boot, chkconfig -s apache2 on
Configure target SLES instances
1) On your target SLES instances, you can add a new repository via YaST.
For SLES 10: YaST -> Installation Source
For SLES 11: YaST -> Software Repositories
There is an equivalent zypper command but I find the GUI much more productive in this case.
2) Click Add to add another source for YaST to query and retrieve software. Choose Specify URL... and enter the URL to the Apache2 server you've just setup.
As an example, assuming your target is SLES 11 SP1 & as shown in screenshots below, you enter http://[IP address to Apache2]/software/SLES-11-SP1/x86_64


Once this is setup, you may disable or remove other sources (like the one that points to your DVD media).
Conclusions
1) It works well and scales nicely to quite a degree.
2) You don't waste DVDs (or the time in creating them).
3) You get to keep all your ISO binaries in one place which is great from admin standpoint. Plus, you do not waste disk space storing duplicate ISOs spread all over your servers or SAN.
4) If you have virtualized SLES instances, this works just as well since its all network based. As long as your servers (physical or virtual) has a network path to your Apache2, its good. Heck, you can even virtualize this Apache2 server if you like.
What's not documented in this blog entry is how to setup a PXE-boot server (tftp & dhcpd) environment in SLES in addition to Apache2 (mentioned above) so you can provision new servers that are capable of booting up over the network and kick-start the installation process with Auto-YaST.
If you are interested, let me know in the comments section and I'll look into writing it... in the meantime, I can refer you to these helpful resources:
http://en.opensuse.org/SDB:PXE_boot_installation
http://www.novell.com/coolsolutions/feature/17719.html
Saturday, October 23, 2010
Getting Started with KVM on SLES 11 SP1
This blog post is long overdued and I apologized to those who had encouraged me to do so earlier and I procrastinated.
With SLES 11 SP1, officially available earlier in June 2010, KVM (Kernel-based Virtual Machine) is officially supported in addition to the more mature Xen virtualization (since 2006). You can install both hypervisors on the same installation of SLES 11 SP1 but you can only choose to use one or the other and not both at the same time (reboot required to switch).
Pre-requisites:
This is an important and usually overlooked step, I'm guilty of this... twice (Ouch!), but KVM requires x86 CPUs that supports hardware level virtualization. For Intel chips, the Intel-VT feature and for AMD chips, the equivalent AMD-V feature must be available.
Question: How do I know my CPU supports hardware level virtualization?
Answer 1: If you have your CPU model number, you can google or just visit the support pages at Intel or AMD.
Answer 2: If you already have SLES 11 SP1 installed, execute this command as root via the Terminal: cat /proc/cpuinfo and your CPU Model name will show up.
More importantly, this feature must be turned ON. I've noticed that they (Intel-VT and AMD-V) are usually disabled by default. To turn them on, you'll need to go into the BIOS and, under some CPU configuration, toggle it ON.
Question: How do I know if Intel-VT or AMD-V is available with SLES 11 SP1 already booted up?
Answer: Execute egrep "vmx|svm" /proc/cpuinfo and if this command returns empty, you're out of luck. For Intel-VT, vmx is present under the CPU flag. For AMD-V, svm is present.
The consequence of not checking, while not catastrophic, does cause disappointments especially when that particular CPU does not support this feature and you'll have to find other means to virtualize. On such a machine and if you're only virtualizing SLES 10 or 11, you can install Xen and it will work since Xen supports para-virtualization. However, if you intend to virtualize other Linux and Windows, you'll need to look at VMWare (eg VMWare Server coz its free) and/or any other hypervisor that provides full hardware emulation for virtualization.
Installation:
SLES 11 SP1 does not install Xen or KVM by default (if you keep clicking Next and do not modify the Software Selection during installation). Fortunately, SUSE Engineering made it real easy to install either Xen or KVM (or both) via YaST.
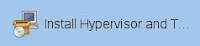
In YaST, under the Virtualization section, click on Install Hypervisor and Tools. You will be presented with a simple dialog with 2 checkboxes. You may checked both boxes to install both Xen and KVM or just the checkbox for KVM.
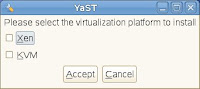
Click Accept and YaST will take care of installing all the required packages (including management tools) for KVM and/or Xen.
Its important that you know that, virt-manager, the GUI to manage virtual machines and configurations can be used to administer both Xen and KVM in SLES 11 SP1. This is a great feature because users who are already familiar with Xen on SLES can start using KVM quickly. Another great example of engineering thought put into releasing a quality Linux distribution for the enterprise.
Once installation is complete, you are ready to use KVM (without rebooting). Just to be sure that KVM is ready for action, you can execute (as root) lsmod | grep kvm and see if the kvm module has been loaded. You can find the KVM release notes/support statements under the /usr/share/doc/packages/kvm directory.
Using KVM for the first time:
Bring up the Virtual Machine Manager (aka virt-manager) either via YaST -> Virtualization -> Virtual Machine Manager OR the command (as root) virt-manager.
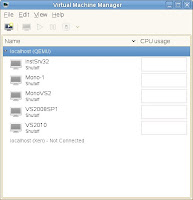
For the Virtual Machine Manager (VMM) GUI screenshot above, you should have an empty list of virtual machines under localhost(QEMU) since you're using KVM for the first time.
At this point, before you create your first virtual machine, I would advise you define the virtual network settings. By default, there is a "default" virtual network (it may not be activated however) that is configured to NAT (Network Address Translation). This means that your virtual machine will pick up, via DHCP, an IP address that is local to your machine but capable of accessing the Internet via your host network card (or WiFi). If this setting works for you, great. Otherwise, you have the option of creating other virtual network (host-only or bridged) via the VMM GUI.
To administer these virtual networks, double-click on localhost (QEMU) in the VMM. Alternatively, you can click on Edit -> Host Details on the VMM menubar. Click on the Virtual Networks Tab when another window appears. I won't bother going into details here because the GUI is rather straight-forward. Only thing that is worth pointing out is NOT to forget clicking on the "play" button to start your virtual network.
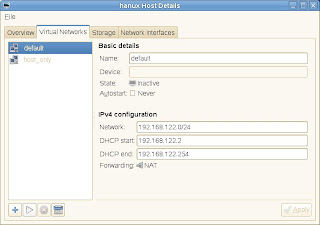
Good, you are all set to create your first virtual machine with KVM. If you are familiar with the virtual machine creation wizard for Xen since SLES 10 SP2, it will be plain sailing for you since SLES re-use the same GUI interfaces. For those who are not familiar, well, its really not that tough clicking Next, modifying preferences and clicking Finish to create a virtual machine and start it up.
Finally, for the more hardcore users reading this blog, here are the directories that will be of interests to you:
VM disk images - /var/lib/kvm/images/
VM meta-data - /etc/kvm/vm/
Logs - /var/log/kvm/ and /var/log/libvirt/
Configurations - /etc/libvirt/ and /etc/libvirt/qemu/networks/
Enjoy!
With SLES 11 SP1, officially available earlier in June 2010, KVM (Kernel-based Virtual Machine) is officially supported in addition to the more mature Xen virtualization (since 2006). You can install both hypervisors on the same installation of SLES 11 SP1 but you can only choose to use one or the other and not both at the same time (reboot required to switch).
Pre-requisites:
This is an important and usually overlooked step, I'm guilty of this... twice (Ouch!), but KVM requires x86 CPUs that supports hardware level virtualization. For Intel chips, the Intel-VT feature and for AMD chips, the equivalent AMD-V feature must be available.
Question: How do I know my CPU supports hardware level virtualization?
Answer 1: If you have your CPU model number, you can google or just visit the support pages at Intel or AMD.
Answer 2: If you already have SLES 11 SP1 installed, execute this command as root via the Terminal: cat /proc/cpuinfo and your CPU Model name will show up.
More importantly, this feature must be turned ON. I've noticed that they (Intel-VT and AMD-V) are usually disabled by default. To turn them on, you'll need to go into the BIOS and, under some CPU configuration, toggle it ON.
Question: How do I know if Intel-VT or AMD-V is available with SLES 11 SP1 already booted up?
Answer: Execute egrep "vmx|svm" /proc/cpuinfo and if this command returns empty, you're out of luck.
For Intel-VT, vmx is present under the CPU flag. For AMD-V, svm is present.The consequence of not checking, while not catastrophic, does cause disappointments especially when that particular CPU does not support this feature and you'll have to find other means to virtualize. On such a machine and if you're only virtualizing SLES 10 or 11, you can install Xen and it will work since Xen supports para-virtualization. However, if you intend to virtualize other Linux and Windows, you'll need to look at VMWare (eg VMWare Server coz its free) and/or any other hypervisor that provides full hardware emulation for virtualization.
Installation:
SLES 11 SP1 does not install Xen or KVM by default (if you keep clicking Next and do not modify the Software Selection during installation). Fortunately, SUSE Engineering made it real easy to install either Xen or KVM (or both) via YaST.
In YaST, under the Virtualization section, click on Install Hypervisor and Tools. You will be presented with a simple dialog with 2 checkboxes. You may checked both boxes to install both Xen and KVM or just the checkbox for KVM.


Click Accept and YaST will take care of installing all the required packages (including management tools) for KVM and/or Xen.
Its important that you know that, virt-manager, the GUI to manage virtual machines and configurations can be used to administer both Xen and KVM in SLES 11 SP1. This is a great feature because users who are already familiar with Xen on SLES can start using KVM quickly. Another great example of engineering thought put into releasing a quality Linux distribution for the enterprise.
Once installation is complete, you are ready to use KVM (without rebooting). Just to be sure that KVM is ready for action, you can execute (as root) lsmod | grep kvm and see if the kvm module has been loaded. You can find the KVM release notes/support statements under the /usr/share/doc/packages/kvm directory.
Using KVM for the first time:
Bring up the Virtual Machine Manager (aka virt-manager) either via YaST -> Virtualization -> Virtual Machine Manager OR the command (as root) virt-manager.


For the Virtual Machine Manager (VMM) GUI screenshot above, you should have an empty list of virtual machines under localhost(QEMU) since you're using KVM for the first time.
At this point, before you create your first virtual machine, I would advise you define the virtual network settings. By default, there is a "default" virtual network (it may not be activated however) that is configured to NAT (Network Address Translation). This means that your virtual machine will pick up, via DHCP, an IP address that is local to your machine but capable of accessing the Internet via your host network card (or WiFi). If this setting works for you, great. Otherwise, you have the option of creating other virtual network (host-only or bridged) via the VMM GUI.
To administer these virtual networks, double-click on localhost (QEMU) in the VMM. Alternatively, you can click on Edit -> Host Details on the VMM menubar. Click on the Virtual Networks Tab when another window appears. I won't bother going into details here because the GUI is rather straight-forward. Only thing that is worth pointing out is NOT to forget clicking on the "play" button to start your virtual network.

Good, you are all set to create your first virtual machine with KVM. If you are familiar with the virtual machine creation wizard for Xen since SLES 10 SP2, it will be plain sailing for you since SLES re-use the same GUI interfaces. For those who are not familiar, well, its really not that tough clicking Next, modifying preferences and clicking Finish to create a virtual machine and start it up.
Finally, for the more hardcore users reading this blog, here are the directories that will be of interests to you:
VM disk images - /var/lib/kvm/images/
VM meta-data - /etc/kvm/vm/
Logs - /var/log/kvm/ and /var/log/libvirt/
Configurations - /etc/libvirt/ and /etc/libvirt/qemu/networks/
Enjoy!
Thursday, May 27, 2010
KVM in SUSE Linux Enterprise Server 11 SP 1
At Novell BrainShare Amsterdam last week, the Geekos were handing out SUSE Linux Enterprise Server 11 SP1 (RC4) at IT Central. So off came my DVD drive and I installed it on a separate partition on my Thinkpad.
Since its a Release Candidate (RC4) and not the final GA version due on 2nd June, I wanted to have a quick look at how KVM works since its an officially supported hypervisor in SP1 (other than the very established Xen shipped and supported since SLES 10 back in 2006).
I've been using Xen and helping partners & customers implement it for a few years, without any knowledge of KVM, I wanted to dive right in and see how far I'd go. I am very impressed with the engineering and thought put into how KVM is packaged with SLES 11 SP1. This is truly a fine example of an "Enterprise" grade product. I was able to virtualize an instance of SLES 11 SP1 and MS Windows 7 with no assistance. The KEY is the tools (libvirt & virt-manager) for Xen, which I'm familiar since SLES 10, is now capable of managing both Xen and KVM in SLES 11 SP1. Depending if you boot into the Xen kernel or the default kernel with KVM module loaded, these same tools can be used, thus providing a consistent user interface. This is just brilliant!
For existing users of Xen, should they decide that KVM is a better alternative as it matures further down the road, they could easily switch without much hassle. More importantly, its conceivable that any custom scripts (automation, failover or whatever) developed for Xen can be easily applied to KVM. This is much better than RIP-n-REPLACE in so many other "Enterprise" grade products.
Here are a few screenshots:


Cheers!
Since its a Release Candidate (RC4) and not the final GA version due on 2nd June, I wanted to have a quick look at how KVM works since its an officially supported hypervisor in SP1 (other than the very established Xen shipped and supported since SLES 10 back in 2006).
I've been using Xen and helping partners & customers implement it for a few years, without any knowledge of KVM, I wanted to dive right in and see how far I'd go. I am very impressed with the engineering and thought put into how KVM is packaged with SLES 11 SP1. This is truly a fine example of an "Enterprise" grade product. I was able to virtualize an instance of SLES 11 SP1 and MS Windows 7 with no assistance. The KEY is the tools (libvirt & virt-manager) for Xen, which I'm familiar since SLES 10, is now capable of managing both Xen and KVM in SLES 11 SP1. Depending if you boot into the Xen kernel or the default kernel with KVM module loaded, these same tools can be used, thus providing a consistent user interface. This is just brilliant!
For existing users of Xen, should they decide that KVM is a better alternative as it matures further down the road, they could easily switch without much hassle. More importantly, its conceivable that any custom scripts (automation, failover or whatever) developed for Xen can be easily applied to KVM. This is much better than RIP-n-REPLACE in so many other "Enterprise" grade products.
Here are a few screenshots:


Cheers!
Sunday, May 16, 2010
Why is SUSE Studio so Addictive?
Simply put, its all about creativity and productivity. If you have never heard of SUSE Studio, please go and check it out at http://susestudio.com... and while you wait for your account creation to complete, check out the screencast and read the many credible IT information sources that have reported/blogged about it (via Google).
However, you will never truly appreciate it until you log in and try to create your first software appliance. As a famous chain of Indian restaurants here in Singapore says: "The proof is in the eating..."
This is my personal take on why I keep going back to SUSE Studio and leveraging its many features. A portion of time spent in my work goes into the creation and setting up of relevant product demos. This is both a repetitive and iterative process. Repetitive because I have to go and show this to multiple business partners and customers. Iterative because with each demonstration, with constructive feedback from my audience, I will enhance the demo (customization). Further, I have regional responsibilities across a few countries (across 5 timezones and many more languages).
Before SUSE Studio, we have tried a few strategies to varying degrees of success:
1. We could create a document that describes how to setup and showcase the demo, emailed it to all the local engineers to replicate.
2. Alternatively, if time is short, we create demos on hard disks and shipped them out.
3. We also tried creating demos in a virtual machine and either ship it or host it on an FTP site for download.
With method (1), there is a lot of duplication of work as each engineer in every country will spend time setting up the demo which consists of hardware, operating system, application and sample data. With method (2), it is slightly more productive because we create the demo once and clone it across 5-10 hard disks and ship them out. However, it is not cost-effective due to the need to purchase hard disk and courier charges... for the next iterative demo, we need the field engineers to ship the hard disk back for updates, and then shipping them off again...
With virtualization as described in method (3), we are able to create portable demos across a variety of hardware (laptop to servers). We overcome the time consuming & duplication of work in (1) and the resource & shipping costs in (2). The only challenge is the network download bandwidth available in different countries.
SUSE Studio is the next step in productivity in this direction, here are the key advantages:
a) We create/design the demo workload (software appliance) within a web browser! There are a decent amount of templates, online repositories with latest versions of software and Web 2.0 wizards that progressively advises you on software version compatibility and related hints.
b) We can simultaneously target different output formats (ie VMware, VirtualBox, Xen, Disk Image/USB key and live CD/DVD iso), all generated online on someone else's infrastructure.
c) We can "testdrive" the generated demo online via a web browser and eliminate the need to download the images until we are happy with our creation.
d) We can share these demos (software appliance) to a wider audience*
I do not need the constant availability of powerful machines with virtualization capabilities and loads of hard disk space for creating many different demos with even more snapshots. As long as I got a web browser and Internet access, I can use SUSE Studio to create new demos or improve on existing ones. Once I reach a milestone in my demo, I version it and make the link to download the image available to our engineers.
For (d), while not officially available at this time, I am fortunate to be eligible to beta-test the "marketplace" feature where you can share your appliance to all members (beta testers) of SUSE Studio. I can browse or search for software appliances, try them out, clone their configuration as a base template for additional work/customizations, rate them (5 star system) etc.
All these little things add up in improving productivity and giving me more time to engage my brain for creativity in designing the next iteration or new demo.
That is why SUSE Studio is so Addictive for me.
PS: For ISVs who signed up with Novell for the SUSE Appliance Toolkit, you get to deploy an enhanced SUSE Studio onsite, thus having a software appliance workbench service in your private network, I mean, Cloud.
However, you will never truly appreciate it until you log in and try to create your first software appliance. As a famous chain of Indian restaurants here in Singapore says: "The proof is in the eating..."
This is my personal take on why I keep going back to SUSE Studio and leveraging its many features. A portion of time spent in my work goes into the creation and setting up of relevant product demos. This is both a repetitive and iterative process. Repetitive because I have to go and show this to multiple business partners and customers. Iterative because with each demonstration, with constructive feedback from my audience, I will enhance the demo (customization). Further, I have regional responsibilities across a few countries (across 5 timezones and many more languages).
Before SUSE Studio, we have tried a few strategies to varying degrees of success:
1. We could create a document that describes how to setup and showcase the demo, emailed it to all the local engineers to replicate.
2. Alternatively, if time is short, we create demos on hard disks and shipped them out.
3. We also tried creating demos in a virtual machine and either ship it or host it on an FTP site for download.
With method (1), there is a lot of duplication of work as each engineer in every country will spend time setting up the demo which consists of hardware, operating system, application and sample data. With method (2), it is slightly more productive because we create the demo once and clone it across 5-10 hard disks and ship them out. However, it is not cost-effective due to the need to purchase hard disk and courier charges... for the next iterative demo, we need the field engineers to ship the hard disk back for updates, and then shipping them off again...
With virtualization as described in method (3), we are able to create portable demos across a variety of hardware (laptop to servers). We overcome the time consuming & duplication of work in (1) and the resource & shipping costs in (2). The only challenge is the network download bandwidth available in different countries.
SUSE Studio is the next step in productivity in this direction, here are the key advantages:
a) We create/design the demo workload (software appliance) within a web browser! There are a decent amount of templates, online repositories with latest versions of software and Web 2.0 wizards that progressively advises you on software version compatibility and related hints.
b) We can simultaneously target different output formats (ie VMware, VirtualBox, Xen, Disk Image/USB key and live CD/DVD iso), all generated online on someone else's infrastructure.
c) We can "testdrive" the generated demo online via a web browser and eliminate the need to download the images until we are happy with our creation.
d) We can share these demos (software appliance) to a wider audience*
I do not need the constant availability of powerful machines with virtualization capabilities and loads of hard disk space for creating many different demos with even more snapshots. As long as I got a web browser and Internet access, I can use SUSE Studio to create new demos or improve on existing ones. Once I reach a milestone in my demo, I version it and make the link to download the image available to our engineers.
For (d), while not officially available at this time, I am fortunate to be eligible to beta-test the "marketplace" feature where you can share your appliance to all members (beta testers) of SUSE Studio. I can browse or search for software appliances, try them out, clone their configuration as a base template for additional work/customizations, rate them (5 star system) etc.
All these little things add up in improving productivity and giving me more time to engage my brain for creativity in designing the next iteration or new demo.
That is why SUSE Studio is so Addictive for me.
PS: For ISVs who signed up with Novell for the SUSE Appliance Toolkit, you get to deploy an enhanced SUSE Studio onsite, thus having a software appliance workbench service in your private network, I mean, Cloud.
Monday, July 20, 2009
Converting VMWare image to SLES Xen
UPDATE (22 Jul '09): Ron Terry has uploaded his virt-tools RPM package online at http://download.opensuse.org/repositories/home:/roncterry/ . Hence, with regards to point 4 below in this entry, you could simply download and install the virt-tools-0.1.0-4.1.noarch.rpm and use the sparsify-disk script. Thanks Ron! 
I had to conduct a demo of a product that only works on Windows. I could spend time to setup a Windows 2003 environment in Xen and then install the product/s and perform the necessary demo configurations etc... but my colleague have it all setup and ready to rock in a VMWare image... heheheh... let the fun begin!
PS: Yes, I could simple reboot SLES 11 and use VMWare Server but I had all my other demos in Xen... besides, I really dig the fact that I can have virtualization capabilities using open source software.
1) Using the qemu-img-xen tool in SLES 11, I was able to convert the VMWare VMDK file (single file) into a raw sparse file. If your VMDK is split into multiple files (2GB each - gotta love FAT), you can use vdiskmanager (a VMWare tool) to combined all these little files into a file before using qemu-img-xen.
qemu-img-xen convert demo.vmdk -O raw disk0
That's all there is to it... EASY!... oh... unless of course, you have my luck and the original Windows VM is virtualized on VMWare using SCSI disk drivers. You can take a look at the VMX file to verify. Or you could attempt to boot up the Windows VM in Xen and have it hang with the all so familiar BSOD (Blue Screen of Death).
2) With many Thanks to Mr Ian Blenke and his blog entry, I managed to overcome the "Windows VM using SCSI disk drivers and will not boot up in Xen because the disk is now IDE" challenge. The trick is to simply copy the appropriate IDE drivers and merge additional registry entries into the Windows VM. Next, perform step 1 and that's it!
For Windows 2003, the IDE drivers can be found in C:\WINDOWS\Driver Cache\i386\driver.cab. I extracted pciide.sys and copied it to C:\WINDOWS\system32\drivers\ directory. Additionally, check and ensure that Atapi.sys, Intelide.sys and Pciidex.sys are also in C:\WINDOWS\system32\drivers\
The additional registry entries and instructions on merging with existing registry can be found at the latter half of the very long page at http://support.microsoft.com/kb/314082/
3) Optionally, probably a good idea, I downloaded the latest Virtual Machine Driver Pack for Windows from http://download.novell.com (search term "virtual machine driver pack"). Direct link for this at time of this writing is http://download.novell.com/Download?buildid=vscGA_iLH5k~
Download Windows driver directly into the Windows Xen VM and double-click to install. Done!
I did notice an improvement in overall speed during boot (I/O bound) and when copying files over the network (Network I/O).
4) Finally, I did some spring cleaning within the Windows Xen VM... managed to reclaim 6Gb of hard disk space. Now comes the next labourious bit, I need to re-sparsify the disk so as to translate this disk usage savings onto the physical hard disk drive. With much Thanks to Ron Terry, I managed to do just that by a wonderful script he provided.
Since I did not get his kind permission to put that script up in the public domain, I will describe the process (and commands) in sparsifying the disk.
a) Mount the Xen disk on dom0:
xm block-attach 0 file:/directory/disk0 xvde w
mount /dev/xvde1 /tmp/disk1
b) Use the dd command to fill up the rest of the empty spaces with zeros.
dd if=/dev/zero of=/tmp/disk1/zerofile bs=1M
rm /tmp/disk1/zerofile
c) Unmount and detach the Xen disk from dom0:
umount /tmp/disk1
xm block-detach 0 51776 -f
d) Make a copy of the Xen disk with the cp command and --sparse=always flag:
mv disk disk.tmp
cp -a --sparse=always disk.tmp disk
PS: Please ensure you have 1.5 to 2.0 times the disk image file (disk0) of free hard disk space on your system.
Life is good again.
I had to conduct a demo of a product that only works on Windows. I could spend time to setup a Windows 2003 environment in Xen and then install the product/s and perform the necessary demo configurations etc... but my colleague have it all setup and ready to rock in a VMWare image... heheheh... let the fun begin!
PS: Yes, I could simple reboot SLES 11 and use VMWare Server but I had all my other demos in Xen... besides, I really dig the fact that I can have virtualization capabilities using open source software.
1) Using the qemu-img-xen tool in SLES 11, I was able to convert the VMWare VMDK file (single file) into a raw sparse file. If your VMDK is split into multiple files (2GB each - gotta love FAT), you can use vdiskmanager (a VMWare tool) to combined all these little files into a file before using qemu-img-xen.
qemu-img-xen convert demo.vmdk -O raw disk0
That's all there is to it... EASY!... oh... unless of course, you have my luck and the original Windows VM is virtualized on VMWare using SCSI disk drivers. You can take a look at the VMX file to verify. Or you could attempt to boot up the Windows VM in Xen and have it hang with the all so familiar BSOD (Blue Screen of Death).
2) With many Thanks to Mr Ian Blenke and his blog entry, I managed to overcome the "Windows VM using SCSI disk drivers and will not boot up in Xen because the disk is now IDE" challenge. The trick is to simply copy the appropriate IDE drivers and merge additional registry entries into the Windows VM. Next, perform step 1 and that's it!
For Windows 2003, the IDE drivers can be found in C:\WINDOWS\Driver Cache\i386\driver.cab. I extracted pciide.sys and copied it to C:\WINDOWS\system32\drivers\ directory. Additionally, check and ensure that Atapi.sys, Intelide.sys and Pciidex.sys are also in C:\WINDOWS\system32\drivers\
The additional registry entries and instructions on merging with existing registry can be found at the latter half of the very long page at http://support.microsoft.com/kb/314082/
3) Optionally, probably a good idea, I downloaded the latest Virtual Machine Driver Pack for Windows from http://download.novell.com (search term "virtual machine driver pack"). Direct link for this at time of this writing is http://download.novell.com/Download?buildid=vscGA_iLH5k~
Download Windows driver directly into the Windows Xen VM and double-click to install. Done!
I did notice an improvement in overall speed during boot (I/O bound) and when copying files over the network (Network I/O).
4) Finally, I did some spring cleaning within the Windows Xen VM... managed to reclaim 6Gb of hard disk space. Now comes the next labourious bit, I need to re-sparsify the disk so as to translate this disk usage savings onto the physical hard disk drive. With much Thanks to Ron Terry, I managed to do just that by a wonderful script he provided.
Since I did not get his kind permission to put that script up in the public domain, I will describe the process (and commands) in sparsifying the disk.
a) Mount the Xen disk on dom0:
xm block-attach 0 file:/directory/disk0 xvde w
mount /dev/xvde1 /tmp/disk1
b) Use the dd command to fill up the rest of the empty spaces with zeros.
dd if=/dev/zero of=/tmp/disk1/zerofile bs=1M
rm /tmp/disk1/zerofile
c) Unmount and detach the Xen disk from dom0:
umount /tmp/disk1
xm block-detach 0 51776 -f
d) Make a copy of the Xen disk with the cp command and --sparse=always flag:
mv disk disk.tmp
cp -a --sparse=always disk.tmp disk
PS: Please ensure you have 1.5 to 2.0 times the disk image file (disk0) of free hard disk space on your system.
Life is good again.
Thursday, July 2, 2009
SUSE Meetup: SLES 11 on IBM System p
I attended the monthly SUSE meetup group here in Singapore last night. The highlight of the evening is a walkthrough and demo of installing SUSE Linux Enterprise Server 11 on IBM System p (POWER) by Mike Veltman, our SUSE meetup lead and our talent from Holland.


Antarius is an authorised IBM Training partner and has a number of IBM System p5 in their training centre. Mike is a SUSE and AIX consultant with Antarius.


Pictures of the very familiar IBM Hardware Management Console (aka HMC) managing a number of LPARs running AIX and SLES 11... and even openSUSE 11.1!! .... which requires a hack and not officially supported... but Mike does it because he can... as usual...
It was a good turn out despite the change in the usual venue... we had a good mix of geeks/experts from various fields and we had a good time exchanging views and information till 10pm.
Mike educates us with his usual enthusiasm about the design merits of the System p in how it handles virtualization, management and pooling of hardware resources. For those who were early (ahem, me included), he showed how we can dynamically assign virtual CPUs and RAM to a running SLES 11 and it works!
Looking forward to the next meetup.


Antarius is an authorised IBM Training partner and has a number of IBM System p5 in their training centre. Mike is a SUSE and AIX consultant with Antarius.


Pictures of the very familiar IBM Hardware Management Console (aka HMC) managing a number of LPARs running AIX and SLES 11... and even openSUSE 11.1!! .... which requires a hack and not officially supported... but Mike does it because he can... as usual...
It was a good turn out despite the change in the usual venue... we had a good mix of geeks/experts from various fields and we had a good time exchanging views and information till 10pm.
Mike educates us with his usual enthusiasm about the design merits of the System p in how it handles virtualization, management and pooling of hardware resources. For those who were early (ahem, me included), he showed how we can dynamically assign virtual CPUs and RAM to a running SLES 11 and it works!
Looking forward to the next meetup.
Wednesday, January 7, 2009
Field Notes: Installing Virtual Machine Driver Pack for RHEL 5
The SUSE Linux Enterprise Virtual Machine Driver Pack (or VMDP) is a set of drivers that enhances the disk and network I/O of a fully virtualized (FV) virtual machine.
I was installing VMDP on SLES 10 SP2 this week at a customer site. They have a fully-virtualized (FV) RHEL 5.2 (i386) domU. The documentation on how to install this is fairly straight forward and can be found at this LINK.
Here are some additional stuff I did to complete the task:
1. Mounting the virtual CD-ROM
I could use virt-manager (GUI) to mount the 2Mb ISO file for RHEL 5 32 bit from the /opt/novell/ directories. However, from within the RHEL domU, the CD-ROM icon appears on the desktop but double-clicking it launches the CD/DVD Creator software!!?? It appears that RHEL thinks the mounted virtual CD-ROM is blank. I had to use the terminal to figure out, with fdisk -l, that the mounted virtual CD-ROM is /dev/hdc. I then manually mounted this at /mnt/cdrom using the mount -t iso9660 -t ro,loop /dev/hdc /mnt/cdrom.
2. Installing the 2 rpms fails because the default RHEL install does not have the rpm-build package
Yep, installing the 2 VMDP RPMs will fail with the error "cannot create /usr/src/redhat/SOURCES". It appears that the rpm-build packages are not installed with a default install of RHEL. Easily resolved by mounting the RHEL 5.2 DVD and installed the rpm-build package.
Done.
I was installing VMDP on SLES 10 SP2 this week at a customer site. They have a fully-virtualized (FV) RHEL 5.2 (i386) domU. The documentation on how to install this is fairly straight forward and can be found at this LINK.
Here are some additional stuff I did to complete the task:
1. Mounting the virtual CD-ROM
I could use virt-manager (GUI) to mount the 2Mb ISO file for RHEL 5 32 bit from the /opt/novell/ directories. However, from within the RHEL domU, the CD-ROM icon appears on the desktop but double-clicking it launches the CD/DVD Creator software!!?? It appears that RHEL thinks the mounted virtual CD-ROM is blank.
I had to use the terminal to figure out, with fdisk -l, that the mounted virtual CD-ROM is /dev/hdc. I then manually mounted this at /mnt/cdrom using the mount -t iso9660 -t ro,loop /dev/hdc /mnt/cdrom.2. Installing the 2 rpms fails because the default RHEL install does not have the rpm-build package
Yep, installing the 2 VMDP RPMs will fail with the error "cannot create /usr/src/redhat/SOURCES". It appears that the rpm-build packages are not installed with a default install of RHEL. Easily resolved by mounting the RHEL 5.2 DVD and installed the rpm-build package.
Done.
Monday, December 1, 2008
A busy October and November
Looks like I did not manage to write a single entry for the 2nd half of October and the whole of November.
Here's a quick recap of the stuff I've been up to:
Here's a quick recap of the stuff I've been up to:
- HP-Intel EDA Seminar 2008 - It was a fruitful trip up to Penang. We were greatful for HP's invitation and we are happy to share the High-Performance Computing (HPC) capabilities and leading marketshare position with our target audience. Did you know that 6 out of the TOP 10 supercomputers in 2008 are using SUSE Linux Enterprise Server?
- VMware Virtualization Forum 2008 - Showed off Platespin products with our Platespin colleagues and business parter at Singapore's Suntec City Convention Centre.
- Dell APJ Enterprise Summit 2008 - Attended the one at Kuala Lumpur and it was a very fruitful trip. I had a good interactive time presenting the entire Novell Virtualization/Automation solution suite. The only challenging bit was to do this 1 hour session 6 times over 2 days.
It was worth it though as the audience understood Novell's value proposition and how we can GTM very well together.
- IBM NEDC Summit 2008 - Attended both the Kuala Lumpur and Singapore event. Spoke to IBMers and their customers on the value of SUSE Linux Enterprise and our ability to have a common code base across the commodity System x to the industry proven and very resilient System z (mainframe).

Friday, October 10, 2008
XEN/ZOS training for partners - Oct 2008
Finally have the opportunity to work with Jo De Baer on a 4.5 day XEN/ZOS training workshop for our Singapore and Malaysia business partners this week.
Wishing them all the best for the ZOS certification exam.

PS: ZOS is short for ZENworks Orchestrator
Wishing them all the best for the ZOS certification exam.

PS: ZOS is short for ZENworks Orchestrator
Subscribe to:
Posts (Atom)