Showing posts with label openSUSE. Show all posts

Saturday, May 26, 2018

Getting XMind 8 to work on openSUSE Leap 15

openSUSE Leap 15 was officially launched on 25th May 2018.  More at https://en.opensuse.org/Portal:15.0

XMind is my go-to mind mapping software for a few years now.  More at https://www.xmind.net/

Challenge:

Using the XMind 8 Linux package (zip file) and following the, albeit brief, instructions at http://support.xmind.net/customer/en/portal/articles/2639667-begin-to-use-xmind-8-on-linux, you will see XMind launch with the GUI Splash screen but the program will fail and exit.


Root-cause:

XMind is a Java-based application and it is sensitive to the version of Java.  The default Java runtime in openSUSE Leap 15 is OpenJDK version 10.0.1 (dated 2018-04-17).


Resolution:

Install the older OpenJDK version 1.8.0.  Instead of removing the default version 10.0.1, I elected to install the older version 1.8.0 alongside and switch the default path for Java to 1.8.0.

Here are my steps:

zypper in java-1_8_0-openjdk


update-alternatives --config java
(followed by picking the newly installed jre-1.8.0)


Validate:  java -version

That's it.  Now, when we execute the XMind program, it will work and launched successfully.  


Keep Calm & Carry On loving Linux!

Tuesday, May 1, 2018

openSUSE Leap 42.3 on Google Cloud Platform (GCP)

Blogging... I'm glad I started in 2008, it is like having a diary that you can never misplace... and reading some old entries can bring back wonderful memories, as I recall and review the course of my life from this, albeit narrow, technology perspective.

Anyway, its been a good 4+ years since my last entry and the longest hiatus... glad and grateful to say that I am now working for Google.  My personal Linux passion is still very much alive and personal bias towards all things SUSE (more openSUSE since 2011).

Problem Statement:

So, it is May 2018 and I am little disappointed that openSUSE Leap did not make it to the out-of-the-box public images on Google Cloud Platform (GCP).  However, it is listed in the "Community supported images" category.

PS:  I'm placing my vain hope that Leap 15 will make it though...

This blog entry describes the steps to create a vanilla openSUSE Leap 42.3 VM on GCP and thereafter, create a custom image from this said VM so you can easily/quickly create openSUSE Leap 42.3 VMs for other workloads in the future through the GCP Web Console.

From this point on, I will assume you have a GCP account and therefore access to GCP consoles etc.  It is not difficult to start with Google Cloud Platform, just go to https://cloud.google.com/free/ to get a Free Tier account.

Create an openSUSE Leap 42.3 VM on GCP:

  1. Login to your GCP console and your project (default or otherwise).
  2. From Menu (top-left),  Compute Engine -> VM instances
  3. Note that openSUSE is not listed as an Operating System image when you try to create a new VM.  This is well documented at the Images section of the Compute Engine topic.
  4. Launch the Cloud Shell within the console, on the top-right.
  5. Find the available community supported openSUSE Leap image with the following command input to the Cloud Shell. 
    • gcloud compute images list --project opensuse-cloud --no-standard-images 
  6. Create a VM with the openSUSE Leap 42.3 image in the Singapore datacenter (or any Zones that is closest to you)

  7. SSH into your newly created openSUSE Leap 42.3 VM to download and apply the latest updates/patches.  Click the SSH button (see screenshot above).
    • Once you SSH into your VM,  zypper up.
  8. Reboot the VM to test all updates are working.
    • Reboot:  sudo reboot.  You will lose SSH connection, naturally.
    • Sign back in via SSH button... it may take a few tries as the VM is rebooting.
    • Sign out of SSH:  exit
  9. Shutdown the VM.  Select the VM (checkbox) from the Console and Click STOP.

Create a custom image in your GCP Project for Re-use later:

  1. From the GCP console, navigate to Compute Engine -> Images
  2. Click [+] CREATE IMAGE 
  3. Put in the name of your new image (eg. my-opensuse-leap-423) and select Source as Disk and Source disk as the boot disk from the right VM (eg. osleap423).
    • (Optional) You can click the command line link at the bottom to note the equivalent Cloud Shell command.  This is useful if you want to script actions for future re-use and not use the web-console.
  4. Once your custom image is created, you will be able to select it for the next VM you wish to create.
Enjoy! :-)

Tuesday, January 28, 2014

My openSUSE 13 Journal 1: Getting IBM Notes 9.0.1 to work!

Its a new year (belated) and 13.1 has been out for quite a while now.  I had it running in a VM as an evaluation and did not really move my desktop setup from 12.3 up to 13.1 until last weekend.

In the meantime, a few readers has corresponded with me via comments in my previous post about getting IBM Lotus Notes 9 Social Edition to work on 13.1.  My initial favourable responses were based purely on a very quick install and startup tests (it all looked good).  Unfortunately, there appears to be a little bug with the combination of openSUSE 13.1 and IBM Notes 9.0.1 but it is a very small one and the resolution is ridiculously simple (but not immediately apparent).

I hope to blog more on 13.1 at a later date but will only focus on getting IBM Notes 9.0.1 working on 13.1 in this entry.  I have been having some difficulties in my personal health lately and that only takes time away from pursuing my hobbies (blogging here being one of them).

First, I would like to acknowledge Craig for bringing to my attention the challenge and so proactively providing the links to his discussions in the Lotus forum (here).  I would also like to Thank Ashu for his encouraging comments left on my previous blog entry and hope this entry will be just as useful to those out there who share the same fascination of using openSUSE and IBM Notes.

Installation - Easy as pie

As documented in previous blog entries, installation of IBM Notes 9.0.1 is really a piece of cake.  You download the binaries (NOTES_9.0.1_LINUX_RPM_EN.tar), untar it into an empty directory and you will find 5 RPMs (i586 - 32-bit) and a few other files.

As root, execute the following in the same directory:

zypper in *.rpm

Done!  You will find the IBM Notes icon in the Recently Installed Apps folder in KDE4.  Alternatively, the launch icon can also be found in the KDE::Applications::Office::More Programs::IBM Notes.  Right-click and Add to Favourites to easily find it the next time.

First sign of trouble

First sign of trouble, at least for me, only occurred after successfully launching IBM Notes and when I get into my mailbox, view calendar or log into SameTime.  The GUI would freeze and then IBM Notes would terminate and NSD runs.

Thursday, April 25, 2013

My openSUSE 12 Journal 14: IBM Notes 9 on 12.3

Syed Tassawur Hussain, this is for you.  Thank you for prodding and giving me the motivation to complete this blog entry on how to install the GA version of IBM Notes 9 Social Edition. :)

Back in the days of using 12.2, IBM Notes 9 was in Beta and I have blogged about how I installed and configured this combination here.

With my move to 12.3, I was going to install the now GA version of IBM Notes 9.  Given how impressed I was with 12.3, and all the additional software and customizations applied in 12.2 seems to transfer seemlessly to 12.3, I was naturally mildly surprised (and annoyed) that installation of IBM Notes 9 did not go quite as smoothly as Notes 9 Beta on 12.2.

Let me jump to the crux of the matter, one particular library (libjpeg62) has been removed from the media and default online repositories of 12.3.  This libjpeg62 was previously in 12.2 and earlier versions of openSUSE.  As such, IBM Notes 9 installer and even zypper were not able to install execute successfully.

Here's how I arrive at this conclusion and was able to successfully install IBM Notes 9 on openSUSE 12.3.  While I have not tried this on the enterprise flavour of openSUSE (ie SUSE Linux Enterprise Desktop 11), should you encounter the same challenges, the steps below may be of help.


Sunday, April 21, 2013

My openSUSE 12 Journal 13: NetworkManager Config for Cisco LEAP Wireless

This is my 100th blog entry!  :)

In short, I wasted a few days and a weekend to get my shiny new 12.3 to connect with my company's Cisco LEAP (henceforth referred to as just LEAP) wireless network.

For those who do not have a requirement to connect to wifi via LEAP but are curious anyways, please see this link for LEAP.

To save you the same grief, here is the answer (see screenshot below) on how to configure NetworkManager:

The one on the Left WORKED; the one on the Right did NOT work for me
Disclaimer: Your mileage may vary (YMMV) because I did not test this against another LEAP wifi network outside of my company's implementation.

Saturday, April 20, 2013

My openSUSE 12 Journal 12: Hello 12.3!


Hello openSUSE 12.3!  You were released into the big bad world on 13 March 2013 and you are fantastic!
:)

Two weeks back, I installed 12.3 onto a new partition on my primary workstation/laptop in one hour.  By the hour thereafter, and I do need to install quite a handful of additional software, I was working on my day job without skipping a beat.  One of the software that is critical to my job is IBM Notes 9 Social Edition. As covered in my previous blog entry on the beta, IBM Notes 9 has been officially released on 2 March 2013.  Look out for my next blog entry on installing the Generally Available(GA) version of IBM Notes 9 Social Edition on openSUSE 12.3.

Hand on my heart, 12.3 is a very worthy successor to 12.2.  I am very happy with it, and if you know me, that says alot... BUT... there is one little usage/design point with the GUI of NetworkManager that got me confused and I was unable to get onto my office's Cisco LEAP wireless network.  This was resolved eventually (after 3 days and a weekend) and it turns out to be a non-issue... or a usage issue... or... anyway, look out for this in my next entry. :)

Installation and Partitioning

Sunday, February 3, 2013

My openSUSE 12 Journal 11: VirtualBox

This should be an interesting entry in light of the recent developments in the roadmap of both Fedora & openSUSE where MySQL is being ditched for MariaDB.  This will affect new enterprise deployments in the next 18-24 months when the changes cascades into the next major release of RHEL & SLES.

At the heart of these changes is the perceived lack of openness & transparency of commercial juggernauts shepherding open source projects.  Another example is LibreOffice, being a fork of OpenOffice a few years back, and is now the default in openSUSE distributions.

VirtualBox was originally from Innotek GmbH and they were acquired by  Sun Microsystems Inc. in February 2008 which in turn got acquired by  Oracle Corporation in January 2010.  Virtualbox is not shipped as a default on openSUSE but you can install it very easily because the binaries are available in the default online repositories.

Personally, I think VirtualBox is the 'BEST' virtualization software for the desktop. I would go with KVM or even Xen for enterprise server virtualization. However, for virtualizing Windows or Linux on a desktop for quick testing purposes,  I'll pick Virtualbox anytime for its ease of use & free of cost attributes.

Easy Install Method

Saturday, January 26, 2013

My openSUSE 12 Journal - 10: Chinese text input (fcitx)

I need Simplified Chinese text input capability for my desktop.  Back in openSUSE 12.1 and prior versions, it was SCIM that provided that functionality.  In openSUSE 12.2, FCITX replaces SCIM.

How do you add secondary language input capabilities?

This section applies to all openSUSE and SUSE Linux Enterprise versions.  Thanks to YaST, the way to enable this functionality has remained consistent over the years.

In YaST, find and select Language (under System).


In the Secondary Languages section, select and put a check mark next to Simplified Chinese... and any other language of your choice.
Click Ok button and YaST will install the proper software and language package to enable this functionality.

(Optional):  You might want to log out and log back in to your account, just to be sure there is a new language input icon in your System Tray.  In my experience, the icon shows up without a need to log out and back in again.


Frustration #1:  Where is the configuration panel?

Friday, January 25, 2013

My openSUSE 12 Journal - 9: Upgrading to Stable Kernel 3.7.4

I took every step and every precaution, with fear and trembling, but I finally took the plunge to upgraded my default kernel (3.4.11) in openSUSE 12.2 to the latest stable kernel (3.7.4).

You know what?  This is the best thing I could have ever done for my laptop!!!

Special Thanks to Mike Veltman, appreciate your guidance and encouragement.

What made me do it?
I have been using openSUSE 12.2 for over 3+ weeks and have noticed some performance issues from a desktop productivity perspective.  This was confirmed when speaking with Mike and also confirmed by a comment from Jack Bauer on my previous blog entry.

Scenario:  Try copying a large amount of files (total file size of say over 1Gb) from your hard disk to an external USB drive.  During the file transfer (doesn't matter if you initiate the transfer via commandline or GUI), the rest of the desktop (except the mouse pointer) is practically dead and unresponsive.  At best, a simple task of opening a new tab on Firefox to surf will take over 10 seconds.  If you want to open LibreOffice to read a doc/spreadsheet, you can forget-about-it.

This was initially tolerated because I would schedule large file backups in the evening after work.  However, it is starting to get to me because I don't recall earlier openSUSE 11.3, 11.4 and 12.1 ever giving me such issues.  The final straw came this week and its my Windows VM... it was running well but I have to put PGP whole disk encryption on the VM.  As expected the Windows VM slowed down but I also noticed its slowing my host as well.

How I did it?

Saturday, January 19, 2013

My openSUSE 12 Journal - 8: IBM Notes 9.0 public beta

I was going to install Lotus Notes 8.5.3 on openSUSE 12.2... but a good friend of mine (Lotus geek) informed me that the next great version IBM Notes 9.0 is ready as an open beta.  He challenged me to live life on the edge again and, I accepted! L-)

Link to download IBM Notes/Domino 9.0 public beta
Link to the public beta forum.

I would like to draw your attention to the fact that IBM has dropped the Lotus brand and name this new major version IBM Notes 9.0 Social Edition.  This is a great statement of intent and direction for this product/solution.

Installation:

Pre-requisite:  You will need to uninstall previous versions of Lotus Notes (if any).  Note that installing both 8.5.x and 9.0b is not supported (officially).

After you have downloaded the tarball for Notes 9.0b, untar it.  You will notice a bunch of RPMs and a smartupgrade.sh script.  Run/execute the script as root.  Its really that simple. :)

[Update on 23 Jan 2013]:  If running smartupgrade.sh script did not work for you, don't fret.  In the same directory where all the ibm_* rpms reside.  Execute, as root, zypper in ibm_*.rpm and let zypper figure out all the dependencies for you.  All good. :)

The Notes 9.0b icon can be found via Application Launcher -> Applications -> Office -> More Programs -> IBM Notes.  You can right-click and select Add to Favourites so that you don't have to navigate that much just to start it later.

Note that in your very first startup, it will launch a text console for you to accept the license... just in case you miss it and wonder why you are stuck at the splash screen and nothing happens.

Tuesday, January 15, 2013

My openSUSE 12 Journal - 6: Hello 12.2!

More than a year (12+ months) since my last entry... obviously lots have happened... BUT

Its a new year (2013), a new job, a new Laptop and a new openSUSE 12.2!  I'll stop right there before I go off on a tangent, seeing & proclaiming trends where none existed previously.:P

Details:
  • openSUSE 12.2 x86_64 (64-bit) - KDE desktop (default)
  • Toshiba Tecra R840 (Intel i5, 4Gb RAM, 320Gb Hdd, Intel HD integrated graphics)
  • Dual-boot with Windows 7 (/dev/sda1) and openSUSE (/dev/sda2)

Installation:
Smooth as silk is all I can say and something that has come to be expected. :)

Given the dual-boot setup, I created my own disk partitioning scheme.  So this step deviated from the otherwise straight-forward install (ie click next till the end).

Disk partition scheme:
  • /dev/sda1 - 100Gb - original factory installed Windows 7 (size shrunk to 100Gb)
  • /dev/sda2 - 100Gb - root partition of openSUSE 12.2 ('/') formatted to ext4
  • /dev/sda3 - 98Gb - extended partition
  • /dev/sda5 - 6Gb - SWAP partition
  • /dev/sda6 - 92Gb - common data partition formatted to NTFS (read/write for both Win7 & openSUSE 12.2)
At install time, I did not format the common data partition.  Instead, I left it blank (unformatted) and used Windows 7 to format it much later.  Once formatted, this common data partition will be known as D:\ drive on Windows 7.

Reboot into openSUSE 12.2 and use YaST Partitioner to set a mount point.  I usually mount this under /mnt/common.  Now, openSUSE 12.2 will automatically mount the common data partition in /mnt/common on boot.

The only outstanding part is that /mnt/common is accessible by root (super-user) but normal users access is troublesome.  To make /mnt/common read-writeable by normal user, I edit the mount options of /mnt/common in the /etc/fstab file.  Example, changed the options in bold from original (first line below) to the second:

/dev/disk/by-id/ata-xxxxxx-part6 /mnt/common          ntfs-3g    user,users,gid=users,fmask=133,dmask=022,locale=en_US.UTF-8 0 0

/dev/disk/by-id/ata-xxxxxx-part6 /mnt/common          ntfs-3g    uid=han,gid=users,fmask=133,dmask=022,locale=en_US.UTF-8 0 0

where han in uid=han is my normal user account on openSUSE 12.2.

There might be a more user-friendly way to do this but I did not explore since I'm comfortable editing the /etc/fstab. Readers who knows how this can be done, please feel free to leave a comment.  Thanks.


Grub vs Grub2:
I chose to stick with Grub instead of the newer Grub2 boot loader.  The reason is simple, I could easily edit the boot options via /boot/grub/menu.lst because its a text file.  In Grub2, this is non-trivial and until they have an easier editing interface, I'll stick with Grub.


Additional Software

Saturday, December 10, 2011

My openSUSE 12 Journal - 5: Desktop Bits & Bytes

This is week 3 of using 12.1 and still lovin' it.  This journal entry covers a few disparate topics, from wifi to graphics cards, as I go about my daily routine in the office (stuff I actually get paid doing) with openSUSE 12.1 on my Lenovo Thinkpad.


Can't locate your hidden Wifi access point?
Here is a neat command (as root) that you can execute to help NetworkManager connect to a hidden wireless access point OR when NetworkManager is unable to detect your desired wireless point fast enough in a wifi-saturated environment.

iwlist wlan0 scanning essid MyWifi

where wlan0 is usually your default wifi device, if you are unsure, execute ip add to verify.
MyWifi is the name of your desired/hidden wireless access point.  For ease of use, you could wrap this into a nice little script.

Saturday, December 3, 2011

My openSUSE 12 Journal - 4: Minor Frustrations

This is my fourth journal entry for openSUSE 12.1 and it has been two weeks of operational use on both my Thinkpad and home PC.  Here are some additional minor frustrations and some workarounds... and yes, I have posted on the openSUSE forums (just in case you'd ask).

Boot 12.1 using the old System V init
In my first journal entry, I complained the lack of "chattiness" during boot since the adoption of Systemd.  You can easily switch to the old System V init on boot.  At the grub boot loader screen (usual 8 seconds delay) and before you hit Enter to boot, press the F5 button to switch from default to System V.  Now, press Enter to boot and press the Esc key during the splash screen to see the familiar System V init messages.

[Update on 6 Dec 2011]: Tired of pressing F5 every time on boot? Append the following to the end of the line:
init=/sbin/sysvinit
For example, in /boot/grub/menu.lst, at the end of the line starting with "kernel /boot/vmlinuz-3.1.0-1.2-desktop...", append the line above and save the file.  On the next boot, you can verify the change in the Boot Options field.  Press Enter and you will boot up 12.1 under the old System V init.

Friday, December 2, 2011

Air Video Server on openSUSE 12.1

In short, Air Video is a client-server product that streams, via live conversion, videos of many formats to any iOS device (eg iPhone, iPad etc).  The server software is free-of-charge but only runs on Mac OSX and Windows.  The client is also free-of-charge for iOS devices but "crippled".  If you like the solution, you pay for the client.

Since the Air Video Server is written in Java and uses a customized version of FFMPEG, it would be possible to run it on Linux.  The folks behind Air Video though supportive but are NOT offering official support for Linux. 

I have been successful in making Air Video Server (AVS) work on openSUSE 11.3, 11.4 and 12.1.  Here are the steps:

Friday, November 25, 2011

My openSUSE 12 Journal - 3: Lotus Notes 8.5.3

Lotus Notes is what I use at work and the latest v8.5.3 works well on openSUSE 11.4.  Although it installed without a hitch on 12.1, things goes awry when I start using it.  Here are my observations and how I managed to get it working again.  :)

For starters, Lotus Notes 8.5.3 only managed to render about half of its interface.  For example, I could see my inbox but email preview pane is blank.  Integrated SameTime worked but workspaces and replication tabs were blank too.  I suspect it could be some incompatibility or confusion with the GTK libs and I was right...  Google is my friend and I discovered a brilliant soul who had the same challenge, created a bug report against openSUSE and even created a workaround/fix.

[Update on 27 Nov 2011]: Oops, it occurred to me that Lotus Notes 8.5.3 is actually 32-bit running on 64-bit openSUSE 12.1.  That means the RPM created by Stefan Lijewski should have worked.  I cannot recall why I came to the previous conclusion.  I have just tried the 32-bit RPM and it worked for me.  Therefore, I am correcting my entry below. 

Unfortunately for me, I could not use his nicely packaged RPM and online repository because I am using 64-bit openSUSE 12.1. 

The easy way is to use a 1-click install via Stefan Lijewski's online repository.

The easy but manual way is to download the RPM before you manually execute a zypper in lotus-notes-gnome3-1-1.1.i586.rpm

In both cases, you will need to verify that your Lotus Notes launch icon has been updated to use the new notes-wrapper script instead of the original notes script in /opt/ibm/lotus/notes/ directory.

Finally, the hard way (if you're so inclined to experience compiling your own code) is the original method I used below.

Below is how I got Lotus Notes 8.5.3 working on openSUSE 12.1 (64-bit).

1.  Download the workaround fix from https://github.com/sgh/lotus-notes_gtk2.23.3/downloads

2.  Un-tar the fix, tar zxvf sgh-lotus-notes_gtk2.23.3-2028e8e.tar.gz

3.  You will need to install additional packages before you can compile the fix.  As root, zypper in make gcc gtk2-devel glibc-devel-32bit gcc-32bit

4.  In the sgh-lotus-notes_gtk2.23.3-2028e8e subdirectory, compile the fix with make

5.  If make completed with success, you should have a new file libnotesgtkfix.so in the directory.  Copy it and notes-wrapper to installed Lotus Notes directory /opt/ibm/lotus/notes/.

6.  Last and final step, edit your Lotus Notes icons (kmenuedit if using KDE4) and change the default launch script to execute notes-wrapper instead.

That's it.  Lotus Notes 8.5.3 should function normally... and its all good for the last 3 days for me.

I hear this would not be a challenge with the newer Lotus Notes 8.5.4 (yet to be officially released).  We shall see when we get there.  :)

Thursday, November 24, 2011

openSUSE 12.1 gets positive review on LAS

Nice and positive review of openSUSE 12.1 on the Linux Action Show on 20th Nov 2011.  The YouTube video is embedded below... you may fast-forward to 30:10 where they finally got down to the review of openSUSE 12.1.

Most interesting (the best) comment on that YouTube page was from Jos Poortvliet (our openSUSE Community Manager), "VERY nice review guys! Fun to see how opinions on openSUSE have changed in the last year - from 'meh, yeah, is that distro still alive?' to the awesomeness now :D
If you ever wanna talk about it with me - I'd be happy to be on the show..."

As with most things in life, its all about perception and goodwill.  openSUSE 12.1 is polished and enjoyable but a number of the great features mentioned, including SUSE Studio and openSUSE Build Service, have been around for a while... anyway, I'm just happy & enjoying the goodwill towards openSUSE.  :)


Sunday, November 20, 2011

My openSUSE 12 Journal - 2

Installed openSUSE 12.1 (64-bit) on both my home PC and my Thinkpad W520. The best part was I did not have to burn any installation DVDs and speed of installation was at Gigabit speed on my home local network. peace

Here is what I did in a nutshell:
  1. Download openSUSE 12.1 64-bit ISO and verified integrity with md5sum
  2. Configured my Thinkpad, running openSUSE 11.4, as the network installation server.
  3. Boot up my home PC in PXE-boot mode and installed openSUSE 12.1 from my Thinkpad.
  4. Once my PC is installed and running openSUSE 12.1, I configured it as the network installation server and boot up my Thinkpad in PXE-boot mode and installed openSUSE 12.1 onto it.
Simple and sweet!

For more details, please refer to my older posts:
  1. Network Installation of openSUSE [Link]
  2. Using Apache2 to deploy and maintain SUSE [Link]
  3. Install and configure TFTP server for PXE boot environment [Link]
  4. Install and configure DHCP Server [Link]
Happy to report the steps I documented in the posts above worked for openSUSE 12.1. There were some minor differences, mainly to do with Systemd and how it changes the console output a little. The previously observed SuSEFirewall bug for TFTP server is still present, so remember to add port 69 to UDP as previously documented.

My openSUSE 12 Journal - 1

openSUSE 12.1 was released earlier this week. Although I had to wait more than 24 hours before I got my hands on the the ISO binaries (4.4Gb of both 32-bit and 64-bit), it was well worth it. The lesson learnt was to use more than one download method concurrently in the event something fails. More importantly, its imperative to verify (ie md5sum) the downloaded binaries or risks having to abort an installation when the integrity of the packages are in question. tension

For this release of openSUSE, everything has been incredibly smooth from installation to productive use of my home system. In fact, I have just completed another installation on my Thinkpad W520. I am sure there are some who have encountered challenges (no software is perfect); however, at least for me, this has been the smoothest experience ever since the days of SLES 8!

To all involved with openSUSE 12.1, please accept my congratulations on a job well done! tepuktangan

One little quirk, minor annoyance
From a usage scenario, I have to report something that made me panic on the first-boot of openSUSE 12.1, to the extent that I voluntarily hit the physical reset button on my PC.

The cause, as it turns out, is the new Systemd that replaces the old System-V init. Whenever I boot up a newly installed Linux for the first time, I always hit the ESC key on boot to see the boot messages. This helps me identify any problems early and gives me an indication of how quickly and smoothly Linux boots up. When I did the same with openSUSE 12.1 on first-boot, I observed some initial messages but suddenly everything seems to just stop. I panicked after 20 seconds and hit the physical reset button (thinking I may have messed up).

Apparently, the new Systemd is not very "chatty". I only had to wait 40 seconds more and the entire system booted up and I am automatically logged into KDE4. malu

If anyone could share how one might re-enable the same level of "chattiness" when the system boots up, appreciate if you could use the comments section below.

Gnome 3.2

Post-installation, I used YaST - Software Management and installed both the "Gnome Base System" and the "Gnome Desktop Environment" patterns. Finally, I got to try out Gnome 3 for the first time ever.

I have been a Gnome 2.x user for quite a number of years until I switched over to KDE4 when it became the default in openSUSE 11.2. KDE4 is great but I do miss the simplicity of Gnome 2.x from time to time.

Happy to report I'm using Gnome 3.2 rather productively on my home PC. However, I am not fully convinced it would be my default environment just yet. Gnome 3.2 is major re-design and it's as different to Gnome 2.32 as KDE4 is to KDE3. Here are some of my thoughts at this time:
  • I liked the idea of integrating my online identity (Google & Twitter only at this time) into my desktop; but, this means I have to use Evolution... not something I liked due to past experiences (3 years ago).
  • I really liked the concept of workspace on demand. I can drag an app & move it to the next available workspace & a new empty one is created. I am ready to move on from the 4-sided (or n-sided) cube paradigm.
  • The font size and window title-bars takes up too much screen estate. It seems to run contrary to my initial impression that Gnome Shell gives me lots of screen estate since there is only one bar at the top.
  • A good buddy of mine explained that its design was geared towards mobile devices (ie tablets with touchscreens) and I start to appreciate it more; however, I think this approach seems a tad too early at best? Given how mobile devices are dominated by Apple, Android & others, I don't see any hardware vendor officially supporting (hard-bundling) Gnome as the de-facto GUI. Feels more like a spill over from Meego & netbook UI era (only 2-3 years ago).
I will be blogging more on my experiences with openSUSE 12.1 ... looking back at my blog posts, I realized it was 3 years ago that I started a similar series of posts on my experiences with openSUSE 11... how time flies...senyum

Monday, November 7, 2011

Network Installation of openSUSE

This will be my main blog entry discussing the best practices (mine anyway) on setting up a network installation server.

What is the Motivation for this setup?

1) Local Area Networks (LANs) are ubiquitous... even in homes where, chances are, you have a modem to the Internet and next to it is a wireless/ethernet router for multiple wifi and ethernet capable devices (PCs, Laptops, Smartphones, Tablets etc) to connect and surf the web.

2) If you are a Linux/OSS enthusiast, you would be constantly downloading the latest ISOs from the web, burning them onto a DVDs and installing them on physical/virtual machines. This is time/resource intensive... time to download, time to burn a DVD, time/money spent on blank DVDs etc. Of course, if you install openSUSE on virtual machines, you avoid the DVD part of the process but you would still have lots of ISOs on your filesystem... if you have a classroom of 20 machines... well, you get the idea.

3) Almost all PCs and Laptops these days have an ethernet port and are capable of booting up from the network (ie PXE-boot). This means you physically power them on, tell it to go into PXE-boot mode and it will go onto the network and seek out an installation server to download and install the openSUSE binaries.

4) This is an efficient way to install openSUSE onto both physical and virtual machines in a LAN environment where there is only one central place for your software binaries.

Pre-requisites:

i) You have a LAN environment connecting a few machines via the network cable. Although booting from wifi is possible but it is out of the scope of this discussion.

ii) You have a physical machine (preferably*) with openSUSE installed and this will be the designated network installation server.
*It is possible to set this up on a virtual machine but you need to ensure it is connected to the physical LAN in a Bridge networking mode and not the usual NAT networking mode for typical virtual machines.

3 Simple^ Steps to Success:
^Simple - it will become more simple as you do this more frequently.

Step 1: Install and configure Apache2 webserver to host and distribute openSUSE binaries.
Please refer to my other blog entry on this subject - Using Apache2 to deploy & maintain SUSE

Step 2: Install and configure tftpboot server to enable initial boot of target machines over the network.
Please refer to my other blog entry on this subject - Install and configure TFTP server for PXE boot environment

Step 3: Install and configure dhcpd server to provide an IP address for target machines and redirect them to the tftpboot server.
Please refer to my other blog entry on this subject - Install and configure DHCP server

Step 4: On the target physical machines, on boot and depending on the BIOS, activate the boot from LAN option and watch it get an IP address from the Installation Server (via Step 3), followed by connecting to the TFTP server and presenting an installation menu (via Step 2). Enter the choice of OS to install and your installation will commence over the LAN (via Step 1).

Additional points of note:

a) Everything discussed here applies to SLES, SLED and openSUSE. The steps documented are based on openSUSE 11.x and should work on older versions and even the enterprise editions of SUSE.

b) Software installation (apache2, tftpboot, syslinux, dhcpd etc) assumes your SLE or openSUSE server have access to their respective binaries, either in DVD (also ISO) or software repository on the web.
References:

Enjoy!

Install and configure TFTP server for PXE boot environment

This blog entry describes how you would install and configure the TFTP (Trivial File Transfer Protocol) server for the purpose of building a PXE boot environment. The tftp server would transfer the syslinux binaries to boot up your physical machine. It will also present a text-based menu for the user to select what operating system to install.

Link to main entry on Network Installation of openSUSE.

1) Install SysLinux (Bootloader for Linux)

Command-line (as root): zypper in syslinux


2) Install tftp

Command-line (as root): zypper in tftp yast2-tftp-server


3) Enable tftp

Command-line (as root): yast2 tftp-server


In TFTP Server Configuration dialog, check to Enable the service. Ensure the Boot Image Directory is set to /srv/tftpboot. Finally, check the Open Port in Firewall and click Ok.

Note: Its been observed that the SUSE Firewall may still block incoming traffic to the TFTP boot server despite the Open Port in Firewall setting.


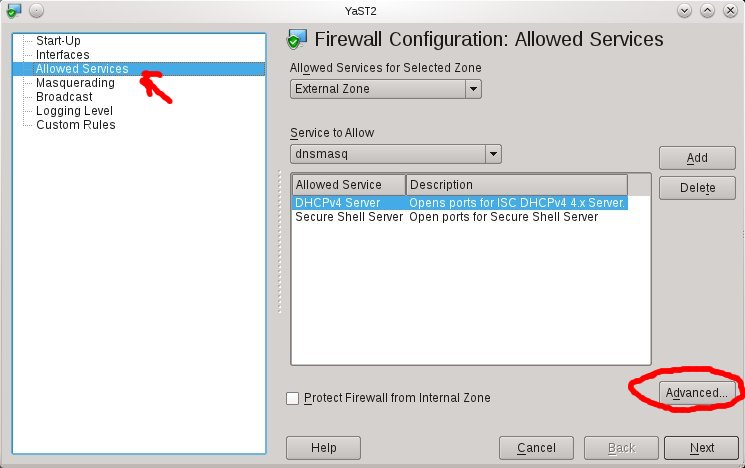
To ensure the Firewall is not blocking incoming TFTP traffic, open the Firewall setting via YaST (or command-line yast2 firewall). Navigate to the Allow Services section (left-hand pane) and click on Advanced button. Ensure that port 69 is listed in the UDP section and click OK to accept. Click Next and complete the settings change.

Next, create the sub-directory /srv/tftpboot/pxelinux.cfg via the command-line: mkdir -p /srv/tftpboot/pxelinux.cfg

4) Populating the /srv/tftpboot directory

Copy pxelinux.0 file (part of syslinux package installed earlier) to the /srv/tftpboot directory. Command-line: cp /usr/share/syslinux/pxelinux.0 /srv/tftpboot/

Copy the relevant Linux kernel and initrd boot files to /srv/tftpboot and provide meaning names (to avoid confusion later). This is best described by way of an example. Let's say I want to enable my installation server to provide an option to install both the 32-bit and 64-bit of openSUSE 11.4. Therefore, I would do the following:

a) Mount both 32-bit and 64-bit of openSUSE 11.4 ISO on the filesystem:

mount -t iso9660 -o ro,loop /directory/to/openSUSE-32-bit.iso /mnt/openSUSE-11.4-i586

mount -t iso9660 -o ro,loop /directory/to/openSUSE-64-bit.iso /mnt/openSUSE-11.4-x86_64/


b) Copy the relevant Linux kernel and initrd files to /srv/tftpboot and rename them with more meaning names:

cp /mnt/openSUSE-11.4-i586/boot/i386/loader/linux /srv/tftpboot/openSUSE-114-32bit.krnl

cp /mnt/openSUSE-11.4-i586/boot/i386/loader/initrd /srv/tftpboot/openSUSE-114-32bit.initrd

cp /mnt/openSUSE-11.4-x86_64/boot/x86_64/loader/linux /srv/tftpboot/openSUSE-114-64bit.krnl

cp /mnt/openSUSE-11.4-x86_64/boot/x86_64/loader/initrd /srv/tftpboot/openSUSE-114-64bit.initrd


c) Copy the message file from any openSUSE ISO to /srv/tftpboot:

cp /mnt/openSUSE-11.4-x86_64/boot/x86_64/loader/message /srv/tftpboot/

*You may unmount the ISOs as these copy are a one-time operation.


5) Prepare the text-based menu

[Update on 3 Dec 2011: added the directory where the file default should reside below]

Create a text-file (via your favourite editor as root), named default in the /srv/tftpboot/pxelinux.cfg directory with the following contents:

default harddisk
display message
prompt 1
timeout 600

# Install openSUSE 11.4 (32-bit)
label openSUSE-114-32
kernel openSUSE-114-32bit.krnl
append initrd=openSUSE-114-32bit.initrd splash=silent vga=0x314 showopts install=http://IP_ADDRESS_OF_SERVER/software/openSUSE-11.4-i586/
# Install openSUSE 11.4 (64-bit)
label openSUSE-114-64
kernel openSUSE-114-64bit.krnl
append initrd=openSUSE-114-64bit.initrd splash=silent vga=0x314 showopts install=http://IP_ADDRESS_OF_SERVER/software/openSUSE-11.4-x86_64/

Everything is self-explanatory above except for the install=http://IP_ADDRESS_OF_SERVER portion. Please refer to my other blog entry on using Apache2 webserver to host and serve up software binaries.

Finally, edit the message file in step 4c earlier to correspond with the example default file entries.

Welcome to openSUSE!


To start the installation, type one of the options below and press .


Available boot options:

openSUSE-114-32 - Installation of 11.4 32bit
openSUSE-114-64 - Installation of 11.4 64bit

Have a lot of fun...


Done.