Showing posts with label opinions. Show all posts

Saturday, December 10, 2011

My openSUSE 12 Journal - 5: Desktop Bits & Bytes

This is week 3 of using 12.1 and still lovin' it.  This journal entry covers a few disparate topics, from wifi to graphics cards, as I go about my daily routine in the office (stuff I actually get paid doing) with openSUSE 12.1 on my Lenovo Thinkpad.


Can't locate your hidden Wifi access point?
Here is a neat command (as root) that you can execute to help NetworkManager connect to a hidden wireless access point OR when NetworkManager is unable to detect your desired wireless point fast enough in a wifi-saturated environment.

iwlist wlan0 scanning essid MyWifi

where wlan0 is usually your default wifi device, if you are unsure, execute ip add to verify.
MyWifi is the name of your desired/hidden wireless access point.  For ease of use, you could wrap this into a nice little script.

Saturday, December 3, 2011

My openSUSE 12 Journal - 4: Minor Frustrations

This is my fourth journal entry for openSUSE 12.1 and it has been two weeks of operational use on both my Thinkpad and home PC.  Here are some additional minor frustrations and some workarounds... and yes, I have posted on the openSUSE forums (just in case you'd ask).

Boot 12.1 using the old System V init
In my first journal entry, I complained the lack of "chattiness" during boot since the adoption of Systemd.  You can easily switch to the old System V init on boot.  At the grub boot loader screen (usual 8 seconds delay) and before you hit Enter to boot, press the F5 button to switch from default to System V.  Now, press Enter to boot and press the Esc key during the splash screen to see the familiar System V init messages.

[Update on 6 Dec 2011]: Tired of pressing F5 every time on boot? Append the following to the end of the line:
init=/sbin/sysvinit
For example, in /boot/grub/menu.lst, at the end of the line starting with "kernel /boot/vmlinuz-3.1.0-1.2-desktop...", append the line above and save the file.  On the next boot, you can verify the change in the Boot Options field.  Press Enter and you will boot up 12.1 under the old System V init.

Thursday, November 24, 2011

openSUSE 12.1 gets positive review on LAS

Nice and positive review of openSUSE 12.1 on the Linux Action Show on 20th Nov 2011.  The YouTube video is embedded below... you may fast-forward to 30:10 where they finally got down to the review of openSUSE 12.1.

Most interesting (the best) comment on that YouTube page was from Jos Poortvliet (our openSUSE Community Manager), "VERY nice review guys! Fun to see how opinions on openSUSE have changed in the last year - from 'meh, yeah, is that distro still alive?' to the awesomeness now :D
If you ever wanna talk about it with me - I'd be happy to be on the show..."

As with most things in life, its all about perception and goodwill.  openSUSE 12.1 is polished and enjoyable but a number of the great features mentioned, including SUSE Studio and openSUSE Build Service, have been around for a while... anyway, I'm just happy & enjoying the goodwill towards openSUSE.  :)


Sunday, November 20, 2011

My openSUSE 12 Journal - 2

Installed openSUSE 12.1 (64-bit) on both my home PC and my Thinkpad W520. The best part was I did not have to burn any installation DVDs and speed of installation was at Gigabit speed on my home local network. peace

Here is what I did in a nutshell:
  1. Download openSUSE 12.1 64-bit ISO and verified integrity with md5sum
  2. Configured my Thinkpad, running openSUSE 11.4, as the network installation server.
  3. Boot up my home PC in PXE-boot mode and installed openSUSE 12.1 from my Thinkpad.
  4. Once my PC is installed and running openSUSE 12.1, I configured it as the network installation server and boot up my Thinkpad in PXE-boot mode and installed openSUSE 12.1 onto it.
Simple and sweet!

For more details, please refer to my older posts:
  1. Network Installation of openSUSE [Link]
  2. Using Apache2 to deploy and maintain SUSE [Link]
  3. Install and configure TFTP server for PXE boot environment [Link]
  4. Install and configure DHCP Server [Link]
Happy to report the steps I documented in the posts above worked for openSUSE 12.1. There were some minor differences, mainly to do with Systemd and how it changes the console output a little. The previously observed SuSEFirewall bug for TFTP server is still present, so remember to add port 69 to UDP as previously documented.

My openSUSE 12 Journal - 1

openSUSE 12.1 was released earlier this week. Although I had to wait more than 24 hours before I got my hands on the the ISO binaries (4.4Gb of both 32-bit and 64-bit), it was well worth it. The lesson learnt was to use more than one download method concurrently in the event something fails. More importantly, its imperative to verify (ie md5sum) the downloaded binaries or risks having to abort an installation when the integrity of the packages are in question. tension

For this release of openSUSE, everything has been incredibly smooth from installation to productive use of my home system. In fact, I have just completed another installation on my Thinkpad W520. I am sure there are some who have encountered challenges (no software is perfect); however, at least for me, this has been the smoothest experience ever since the days of SLES 8!

To all involved with openSUSE 12.1, please accept my congratulations on a job well done! tepuktangan

One little quirk, minor annoyance
From a usage scenario, I have to report something that made me panic on the first-boot of openSUSE 12.1, to the extent that I voluntarily hit the physical reset button on my PC.

The cause, as it turns out, is the new Systemd that replaces the old System-V init. Whenever I boot up a newly installed Linux for the first time, I always hit the ESC key on boot to see the boot messages. This helps me identify any problems early and gives me an indication of how quickly and smoothly Linux boots up. When I did the same with openSUSE 12.1 on first-boot, I observed some initial messages but suddenly everything seems to just stop. I panicked after 20 seconds and hit the physical reset button (thinking I may have messed up).

Apparently, the new Systemd is not very "chatty". I only had to wait 40 seconds more and the entire system booted up and I am automatically logged into KDE4. malu

If anyone could share how one might re-enable the same level of "chattiness" when the system boots up, appreciate if you could use the comments section below.

Gnome 3.2

Post-installation, I used YaST - Software Management and installed both the "Gnome Base System" and the "Gnome Desktop Environment" patterns. Finally, I got to try out Gnome 3 for the first time ever.

I have been a Gnome 2.x user for quite a number of years until I switched over to KDE4 when it became the default in openSUSE 11.2. KDE4 is great but I do miss the simplicity of Gnome 2.x from time to time.

Happy to report I'm using Gnome 3.2 rather productively on my home PC. However, I am not fully convinced it would be my default environment just yet. Gnome 3.2 is major re-design and it's as different to Gnome 2.32 as KDE4 is to KDE3. Here are some of my thoughts at this time:
  • I liked the idea of integrating my online identity (Google & Twitter only at this time) into my desktop; but, this means I have to use Evolution... not something I liked due to past experiences (3 years ago).
  • I really liked the concept of workspace on demand. I can drag an app & move it to the next available workspace & a new empty one is created. I am ready to move on from the 4-sided (or n-sided) cube paradigm.
  • The font size and window title-bars takes up too much screen estate. It seems to run contrary to my initial impression that Gnome Shell gives me lots of screen estate since there is only one bar at the top.
  • A good buddy of mine explained that its design was geared towards mobile devices (ie tablets with touchscreens) and I start to appreciate it more; however, I think this approach seems a tad too early at best? Given how mobile devices are dominated by Apple, Android & others, I don't see any hardware vendor officially supporting (hard-bundling) Gnome as the de-facto GUI. Feels more like a spill over from Meego & netbook UI era (only 2-3 years ago).
I will be blogging more on my experiences with openSUSE 12.1 ... looking back at my blog posts, I realized it was 3 years ago that I started a similar series of posts on my experiences with openSUSE 11... how time flies...senyum

Monday, November 7, 2011

Network Installation of openSUSE

This will be my main blog entry discussing the best practices (mine anyway) on setting up a network installation server.

What is the Motivation for this setup?

1) Local Area Networks (LANs) are ubiquitous... even in homes where, chances are, you have a modem to the Internet and next to it is a wireless/ethernet router for multiple wifi and ethernet capable devices (PCs, Laptops, Smartphones, Tablets etc) to connect and surf the web.

2) If you are a Linux/OSS enthusiast, you would be constantly downloading the latest ISOs from the web, burning them onto a DVDs and installing them on physical/virtual machines. This is time/resource intensive... time to download, time to burn a DVD, time/money spent on blank DVDs etc. Of course, if you install openSUSE on virtual machines, you avoid the DVD part of the process but you would still have lots of ISOs on your filesystem... if you have a classroom of 20 machines... well, you get the idea.

3) Almost all PCs and Laptops these days have an ethernet port and are capable of booting up from the network (ie PXE-boot). This means you physically power them on, tell it to go into PXE-boot mode and it will go onto the network and seek out an installation server to download and install the openSUSE binaries.

4) This is an efficient way to install openSUSE onto both physical and virtual machines in a LAN environment where there is only one central place for your software binaries.

Pre-requisites:

i) You have a LAN environment connecting a few machines via the network cable. Although booting from wifi is possible but it is out of the scope of this discussion.

ii) You have a physical machine (preferably*) with openSUSE installed and this will be the designated network installation server.
*It is possible to set this up on a virtual machine but you need to ensure it is connected to the physical LAN in a Bridge networking mode and not the usual NAT networking mode for typical virtual machines.

3 Simple^ Steps to Success:
^Simple - it will become more simple as you do this more frequently.

Step 1: Install and configure Apache2 webserver to host and distribute openSUSE binaries.
Please refer to my other blog entry on this subject - Using Apache2 to deploy & maintain SUSE

Step 2: Install and configure tftpboot server to enable initial boot of target machines over the network.
Please refer to my other blog entry on this subject - Install and configure TFTP server for PXE boot environment

Step 3: Install and configure dhcpd server to provide an IP address for target machines and redirect them to the tftpboot server.
Please refer to my other blog entry on this subject - Install and configure DHCP server

Step 4: On the target physical machines, on boot and depending on the BIOS, activate the boot from LAN option and watch it get an IP address from the Installation Server (via Step 3), followed by connecting to the TFTP server and presenting an installation menu (via Step 2). Enter the choice of OS to install and your installation will commence over the LAN (via Step 1).

Additional points of note:

a) Everything discussed here applies to SLES, SLED and openSUSE. The steps documented are based on openSUSE 11.x and should work on older versions and even the enterprise editions of SUSE.

b) Software installation (apache2, tftpboot, syslinux, dhcpd etc) assumes your SLE or openSUSE server have access to their respective binaries, either in DVD (also ISO) or software repository on the web.

References:

Enjoy!

Thursday, October 28, 2010

Focus! User is King

As mentioned briefly in my previous post, I noted an interesting yet subtle HCI feature in Mac OS X and wondering how to have this in openSUSE? If not possible, is someone out there looking at this?

When I boot up and log onto a system (Mac OS X or any SUSE), my typical first move is to quickly launch all the applications that I need to start my day. This means clicking and launching a few web browsers (Firefox, Chrome, Opera/Safari), chat apps Adium/Pidgin/Kopete, mail clients etc.

The system will get severely loaded due to multiple, concurrent startup of applications vying for resources. That's acceptable and normal. However, here's the subtle feature/difference of Mac OS X:

Whichever application that appears first, being the impatient user, I will start interacting with it. If one of my web browsers appears first, I will start surfing and typing away. Mac OS X seems to know this and when other applications starts, they DO NOT steal focus away but instead will be rendered behind the current browser. Further, to inform me that my other applications has started and awaiting my attention, a hyperactive jumping icon of those apps will be dancing away on the dock.

On all variants of SUSE, the behaviour is different in that the next application that starts and is ready for user input will steal focus away from the first application. Using the same example above, as I'm surfing and typing away in Firefox, and the next application that starts is my mail client. It will appear on top of Firefox and asks for my password, thus focus is given to the mail client. While entering my password for the mail client, more often than not, the next (third) application starts and it steals focus away from my mail client while I'm still typing my password. As you can imagine, or even have experienced this yourselves, this can be rather frustrating... not to mention half of your password now appears as plaintext in another application. xpasti

Would appreciate anyone out there reading this point me in the right direction and some answers. Thank you. senyum

Wednesday, October 27, 2010

My Mac-SUSE Journey - Part 2

This is Part 2 of how I got openSUSE 11.3 (64-bit) working fully on a MacBook Pro 13" (2010 model). Here is the link to Part 1.

First, here are some shots of booting up MacBook Pro into openSUSE 11.3, taken from my old Nokia phone camera (and transferred via bluetooth to my MacSUSE) senyum:


With openSUSE 11.3 installed and booted up, here are the configuration steps to get the most out of your MacBook Pro:

Wireless Driver

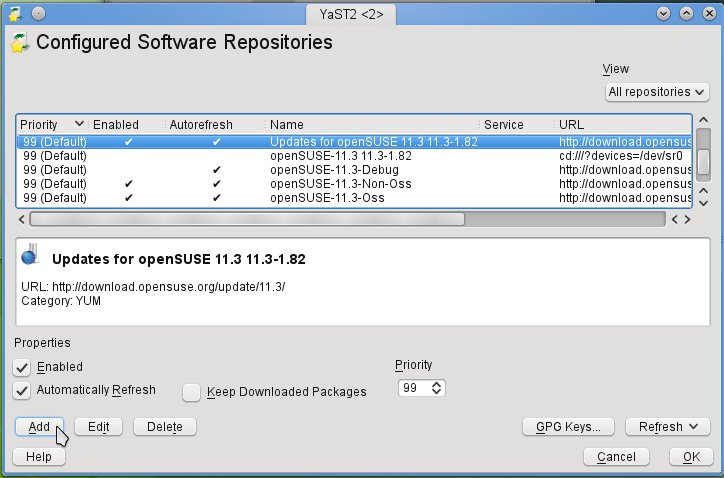
All that's required is the right Broadcom wifi driver. Start YaST, click on Software followed by Software Repositories.


Click on the Add button and select Specify URL... and click Next. Enter "Packman" in the Repository Name field and this link in the URL field: http://packman.unixheads.com/suse/11.3/ and click Next to complete. Verify that Packman is now listed as a repository and click Ok to exit.

Click on Software Management, , enter "Broadcom" in the Search field and click Search. Select and click to install broadcom-wl and broadcom-wl-kmp-desktop followed by the Accept button.


Reboot and you'll have Wifi up and running.


3D Desktop Effects with nVidia driver

This is optional since the default noveau driver works. However, if you want to turn on the fancy 3D Desktop Effects, you will need to install the proprietary nVidia driver.

With reference to steps above, in Software Repositories, you will need to add another software repository named nVidia and URL is ftp://download.nvidia.com/opensuse/11.3/

Next, in Software Management, search for "nvidia" and select and install nvidia-gfxG02-kmp-desktop package.

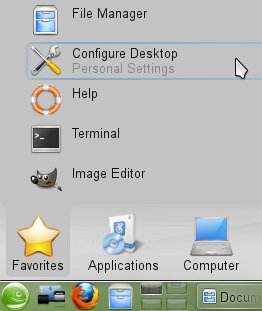
Either reboot or log out of your current session to start the newly installed nVidia drivers. To enable 3D Desktop Effects, start Configure Desktop and, under Look & Feel section, click Desktop and check the "Enable desktop effects". Don't forget to click the Apply button.


Configuring Audio

Audio is essential and all there is to make this work is to make 2 small configuration changes.

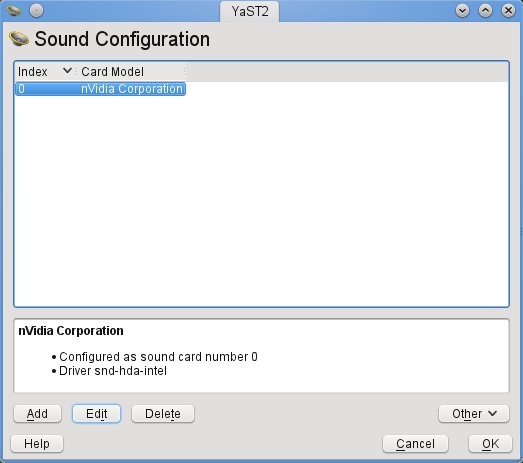
First, in YaST, select Hardware section followed by Sound. In Sound Configuration, select the default device (0, nVidia Corporation) and click Edit. In Sound Card Advanced Options, edit and add the value "mbp55" for the model. Click Next and Ok to complete.


Second and final step is to click on the Volume icon and click Mixer. In Mixer window, from menu bar, click Settings followed by Configure Channels... Select and drag the Front Speaker channels from the left (Available channels) to the right (Visible channels). Click Ok.


To test, start Firefox and surf to Youtube or any website with audio. You can use the Fn + F11 & Fn + F12 keys for volume control.


Keyboard Hotkeys

Fortunately, someone has written code to enable the MacBook Pro keyboard Hotkeys. This project is called pommed by Julien Blache. Even better than that, Alin Marin Elena has modified & compiled the latest version 1.34 (that supports this MacBook Pro model) specifically for openSUSE 11.3.

All that's required is to add another Software Repository called "Alin Marin Elena" and URL is http://download.opensuse.org/repositories/home:/ealin:/apple/openSUSE_11.3/

In Software Management, search for pommed and install pommed and gpommed. Ensure the pommed service is automatically started on boot, execute chkconfig -s pommed on as root at the Terminal.

To start pommed manually, execute /etc/init.d/pommed start as root and you should be able to control the Screen Brightness (Fn+F1 & Fn+F2) and Keyboard Backlight (Fn+F5 & Fn+ F6).


Reboot properly

Unfortunately, while you can shutdown properly, you will hang the system if you choose to reboot in openSUSE. With Thanks to Alin again, he showed how to make openSUSE reboot the machine correctly.

In short, you need to edit the /boot/grub/menu.lst file and add the flag reboot=pci to the kernel. Further, to prevent this flag from being removed when you upgrade your kernel, you will need to add this flag to the relevant variables in the /etc/sysconfig/bootloader file.

Thoughts & Conclusions

I have a working openSUSE 11.3 system running smoothly (well, you still can't beat Mac OS X since its tuned for this hardware) enough. The base openSUSE 11.3 took up 3.5-4.0Gb of disk space so I have plenty left over. Plus I can plug in a secondary USB/FireWire drive so its good.

I am using KVM to virtualize SLES and Windows. I refer to my other blog entry on getting started with KVM as a reference.

Finally, on the MacBook Pro, I use the Mac OS X more than openSUSE 11.3 because it meets most of my needs... except when I really need openSUSE. Besides, its always fun to see the look on them faces when they see openSUSE/KDE4 running on a MacBook Pro. peace

PS: Embedding this annoying clip introduced to me by Issac, my nephew. sengihnampakgigi

My Mac-SUSE Journey - Part 1

After many months of consideration and research, I bought a brand new MacBook Pro 13" in early October. I needed a handy appliance where I can do Photos, Movies, Music, browse the web... iPhone is too small, iPad is nice but not computationally powerful or mature/proven. After spending close to 4 weeks on my Macbook Pro (version 7,1), I'm a very happy customer. sengihnampakgigi

It wasn't long before, 2 days post-acquisition really, I started wondering about putting SUSE on it. Sure, I've discovered Terminal & X11 in Mac OS X and it works great. senyum I use VirtualBox to virtualize SLES & openSUSE. But I still wanna have SUSE run natively to do KVM, maybe Xen and just because I can... peace

I am not the first, nor the last, to do this so I will acknowledge the wealth of information & helpful folks out there on the Web (see reference section further below).

Before we begin, please indulge my trip down memory lane... my very first computer was the Apple PC-IIe and it looks like the picture below... and who could forget the timeless Karateka... filling my little mind with boundless fluid moves... that does very little in real life... well... it did get me into trouble a few times... only a few. gelakguling


My next brush with Apple was during my undergraduate days where I spent many hours doing tutorials and projects in the Mathematics/Statistics/Simulation labs filled with rows of Macintoshes (see pic below)... good times. pinokio


I graduated just as the technicolor iMac G3 invaded the campus. angkatkening

The Mac hardware and software has come a long way and I'm very impressed and pleased with my purchase. Despite my previous encounters with the Mac, about the only thing familiar was the good old Finder and that static menu bar at the top. As I use Mac OS X "Snow Leopard", I find good things/ideas that should be implemented in openSUSE/KDE... but I will blog about this in more detail another time.

Enough rambling, here are the steps to installing openSUSE 11.3 (64-bit) onto a Macbook Pro 13" (2010 edition) running Mac OS X 10.6.4:


Disk Partitioning

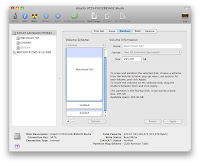
My hard disk was upgraded from 250Gb to 320Gb. I decided to take 25Gb away for openSUSE 11.3. I did not use the Boot Camp Assistant utility on Mac OS X but instead used the Disk Utility.



As shown in screenshot above, I shrunk my Mac OS X partition from 320Gb to 295Gb. Next, I split the remaining free space into 21Gb for my root partition and 4Gb for swap partition. You can format them as DOS/FAT and let openSUSE reformat them at installation.


Dual-boot Setup

Now that some disk space has been carved up for openSUSE 11.3, its time to make the MacBook Pro dual-boot. Unfortunately, the usual Grub bootloader doesn't work here. To spare you (and myself) the details, the way to dual-boot a MacBook Pro is to use rEFIt (pronounced Refit).

Download the freely available rEFIt, version 0.14 at the time, and install it. I followed the documentation and installed it via the "Automatic Installation with the Installer Package" section at http://refit.sourceforge.net/doc/c1s1_install.html

To verify you've installed this correctly, reboot your MacBook Pro and you should see a boot menu on startup where you use the arrow and Enter keys to select which OS to boot. You should only see one option at this time since you have not installed a second OS on the MacBook Pro yet.


Installation

Pop in the openSUSE 11.3 (64-bit) installation DVD into the drive and shutdown Mac OS X. Power-on the MacBook Pro and press and hold the "c" button so that it will boot from the DVD drive. I usually press and hold the "c" button till I hear the DVD drive spinning up the media before I let go.

You should see the usual stuff when installing openSUSE, the kernel and initrd will load, nice fancy splash screen shows up and you select Installation to start the process. Pretty straightforward.

The most important part of the installation is disk partitioning because you really do NOT want to install openSUSE over Mac OS X. Thanks to the simple partitioning scheme where rEFIt has the first partition and Mac OS X has the second partition of 295Gb, that's easy to spot. When you reach that part of the installation where openSUSE installer proposes a disk layout, do NOT accept the defaults but instead choose to do Custom Partitioning and ensure that you do NOT touch that first and second partition. Select the 21Gb partition, format it with your favourite filesystem (ext3 for me) and mount it as root /. Next select the 4Gb partition, format it as Swap.
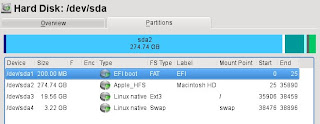


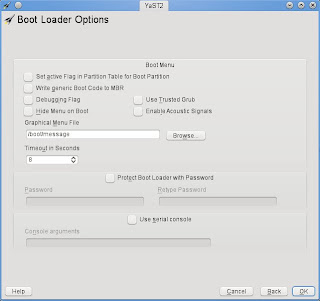
The next equally important part of the installation is the Grub Boot Loader. Since we are relying on rEFIt to dual-boot, we need to ensure that Grub does not intrude and writes itself in the Master Boot Record (MBR). Instead, ensure that Grub is only installed to the Root partition (/dev/sda3 and NOT to MBR). Further, ensure the "Write generic Boot Code to MBR" is UNChecked so nothing gets written to the MBR.


The rest of the installation is a non-event.


Cannot boot up openSUSE without the DVD loaded?

There is a chance, post-installation, that you realized that you can boot into Mac OS X but when you select to boot into Linux, your openSUSE 11.3 does not boot up and some vague error message like no operating system found. However, you are able to boot from the openSUSE 11.3 installation DVD and choosing to boot from hard disk instead, you can successfully boot up the installed openSUSE 11.3.

If this is the case, its highly likely the GPT/MBR may be out of sync. To resolve this, boot into openSUSE 11.3 and first use fdisk -l to check that only the openSUSE partition is set to boot (see first screenshot below). Next, use parted to check that the boot flag only applies to the first partition (rEFIt) and nothing else (see second screenshot below).

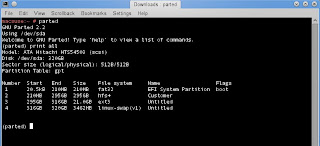

Finally, double-check the Grub Boot Loader setup via YaST -> System -> Boot Loader and verify the settings are correct (compared to the screenshots in previous section above).


Conclusions (to be continued)

The vanilla openSUSE 11.3, will be 85-90% functional. Some important items that works out of the box:
  • Graphics card is detected and proper resolution rendered
  • Keyboard works (in general but you can specify Apple Macbook keyboard in the Control Panel to improve mappings)
  • Touchpad works (but I do find it a tad sensitive so you can adjust it under Control Panel) or plug in your favourite USB mouse
  • Disk and DVD drive works
  • iSight webcam works with Kopete
  • Ethernet (LAN port)
  • FireWire and USB ports
  • External display port
  • SD Card Reader
The following is a list of things that does not work right away but will require addition work (like installing additional software packages) to get going:
  • Wireless does not work as its a Broadcom chip. You will require a LAN cable (hey, at least networking works!) to retrieve and install the appropriate broadcom drivers.
  • Default open source nouveau driver works for the nVidia GeForce 320M graphics card but if you want 3D desktop effects, you will need to download and install the proprietary nVidia driver
  • Audio does not work but its more a configuration issue than driver issue
  • You cannot adjust the screen brightness or keyboard backlight. You will need to install additional drivers for this to work
I will be addressing these in Part 2 of my blog. Stay tuned. peace


On a Side Note

I'd like to share why I did not install SUSE Linux Enterprise Desktop (SLED) 11 SP1 or earlier version of openSUSE 11.2. I did attempt it and both SLED 11 SP1 and openSUSE 11.2 DVD boots up but fails to recognized the DVD drive after the installation kernel/initrd loads. It kinda hangs at loading udev. I'm too lazy to figure out which module I have to load by hand and since openSUSE 11.3 works, its good enough for me. senyum


Links/References to other related pages

General Guide & starting point - http://old-en.opensuse.org/OpenSUSE_on_a_Mac

star Alin Marin Elena's entry specific to my MacBook Pro (7,1) model and openSUSE 11.3 - http://alin.elenaworld.net/?p=921

Howto based on openSUSE 11.2 & older 2009 MacBook Pro model - http://forums.opensuse.org/english/information-new-users/unreviewed-how-faq/426413-how-install-opensuse-11-2-mid-2009-macbook-pro.html

Forum post on Grub & Booting issues - http://forums.opensuse.org/english/get-help-here/install-boot-login/430718-macbook-pro-grub-2.html#post2113355

openSUSE Forum is a great source of information and discussions - http://forums.opensuse.org/

Monday, October 25, 2010

Using Apache2 to deploy & maintain SUSE

This entry is a little different because its open ended compared to my previous posts. The solution I'm about to share may or may not work for you and that's the nature of the enterprise IT environment. Nevertheless, I hope it will be a good reference for you.

Automation is an important aspect in enterprise IT. In this specific scenario, we are talking about the ability to scale deployment and maintenance of multiple SLES instances (or SLED or openSUSE). Unlike installing a single SLES instance for evaluation, the DVD media (or even USB sticks) is not going to cut it if you have 3, 5, 50 or 100s of SLES deployed in a data center. This also applies to setting up an IT training classroom of 25 machines.

To make things more interesting, if you have Blade servers, you'll noticed that each Blade server chasis/enclosure have only one shared physical DVD drive. Sure, its read-only and can be shared amongst all the blades but what if you need to install another software (requiring another DVD) on the first blade and the rest are still reading from your SLES DVD media? Oops.

The idea is to share the SLES binaries over the network and there are various mechanism like HTTP, FTP, NFS and even Samba (oh-boy). My preferred choice is HTTP via Apache2 webserver for 2 simple reasons. First, it works quite well from experience and as importantly, its really easy to setup (ie quick & painless setup).

Install Apache2

a) Command-line option: zypper in apache2


OR

b) GUI option: YaST -> Software Management -> Search for the apache2 package and click Accept & continue for automatic changes with associated packages for installation.


Configure Apache2

1) Edit the following configuration file at /etc/apache2/default-server.conf with your favourite text editor.

2) Under the Directory section (see screenshot), look for the line Options None and replace it with Options Indexes FollowSymLinks as shown in screenshot below. This allows apache2 webserver to list directories and also follow symbolic links.


Mounting ISOs under Apache2

1) The Document root for Apache2 is /srv/www/htdocs/ so I would suggest the following directory structure:

/srv/www/htdocs/software/SLES-11-SP1/i586
/srv/www/htdocs/software/SLES-11-SP1/x86_64

/srv/www/htdocs/software/SLES-11-SP1/s390x


By way of example above, you can see that I created a software sub-directory followed by directories for the product & version and, in turn, followed by the architecture.

2) Assuming you have the DVD ISO file somewhere on your filesystem (I usually put them in /media), you can mount them via:

mount -t iso9660 -o ro,loop /media/SLES-11-SP1-x86_64.iso /srv/www/htdocs/software/SLES-11-SP1/x86_64/


Starting Apache2

a) rcapache2 start

b) To make apache2 auto-start on boot, chkconfig -s apache2 on


Configure target SLES instances

1) On your target SLES instances, you can add a new repository via YaST.

For SLES 10: YaST -> Installation Source
For SLES 11: YaST -> Software Repositories

There is an equivalent zypper command but I find the GUI much more productive in this case. senyum

2) Click Add to add another source for YaST to query and retrieve software. Choose Specify URL... and enter the URL to the Apache2 server you've just setup.

As an example, assuming your target is SLES 11 SP1 & as shown in screenshots below, you enter http://[IP address to Apache2]/software/SLES-11-SP1/x86_64


Once this is setup, you may disable or remove other sources (like the one that points to your DVD media).


Conclusions

1) It works well and scales nicely to quite a degree.

2) You don't waste DVDs (or the time in creating them).

3) You get to keep all your ISO binaries in one place which is great from admin standpoint. Plus, you do not waste disk space storing duplicate ISOs spread all over your servers or SAN.

4) If you have virtualized SLES instances, this works just as well since its all network based. As long as your servers (physical or virtual) has a network path to your Apache2, its good. Heck, you can even virtualize this Apache2 server if you like.

peace


What's not documented in this blog entry is how to setup a PXE-boot server (tftp & dhcpd) environment in SLES in addition to Apache2 (mentioned above) so you can provision new servers that are capable of booting up over the network and kick-start the installation process with Auto-YaST.

If you are interested, let me know in the comments section and I'll look into writing it... in the meantime, I can refer you to these helpful resources:

http://en.opensuse.org/SDB:PXE_boot_installation
http://www.novell.com/coolsolutions/feature/17719.html

senyum