Showing posts with label SUSE Linux Enterprise. Show all posts

Monday, November 7, 2011

Network Installation of openSUSE

This will be my main blog entry discussing the best practices (mine anyway) on setting up a network installation server.

What is the Motivation for this setup?

1) Local Area Networks (LANs) are ubiquitous... even in homes where, chances are, you have a modem to the Internet and next to it is a wireless/ethernet router for multiple wifi and ethernet capable devices (PCs, Laptops, Smartphones, Tablets etc) to connect and surf the web.

2) If you are a Linux/OSS enthusiast, you would be constantly downloading the latest ISOs from the web, burning them onto a DVDs and installing them on physical/virtual machines. This is time/resource intensive... time to download, time to burn a DVD, time/money spent on blank DVDs etc. Of course, if you install openSUSE on virtual machines, you avoid the DVD part of the process but you would still have lots of ISOs on your filesystem... if you have a classroom of 20 machines... well, you get the idea.

3) Almost all PCs and Laptops these days have an ethernet port and are capable of booting up from the network (ie PXE-boot). This means you physically power them on, tell it to go into PXE-boot mode and it will go onto the network and seek out an installation server to download and install the openSUSE binaries.

4) This is an efficient way to install openSUSE onto both physical and virtual machines in a LAN environment where there is only one central place for your software binaries.

Pre-requisites:

i) You have a LAN environment connecting a few machines via the network cable. Although booting from wifi is possible but it is out of the scope of this discussion.

ii) You have a physical machine (preferably*) with openSUSE installed and this will be the designated network installation server.
*It is possible to set this up on a virtual machine but you need to ensure it is connected to the physical LAN in a Bridge networking mode and not the usual NAT networking mode for typical virtual machines.

3 Simple^ Steps to Success:
^Simple - it will become more simple as you do this more frequently.

Step 1: Install and configure Apache2 webserver to host and distribute openSUSE binaries.
Please refer to my other blog entry on this subject - Using Apache2 to deploy & maintain SUSE

Step 2: Install and configure tftpboot server to enable initial boot of target machines over the network.
Please refer to my other blog entry on this subject - Install and configure TFTP server for PXE boot environment

Step 3: Install and configure dhcpd server to provide an IP address for target machines and redirect them to the tftpboot server.
Please refer to my other blog entry on this subject - Install and configure DHCP server

Step 4: On the target physical machines, on boot and depending on the BIOS, activate the boot from LAN option and watch it get an IP address from the Installation Server (via Step 3), followed by connecting to the TFTP server and presenting an installation menu (via Step 2). Enter the choice of OS to install and your installation will commence over the LAN (via Step 1).

Additional points of note:

a) Everything discussed here applies to SLES, SLED and openSUSE. The steps documented are based on openSUSE 11.x and should work on older versions and even the enterprise editions of SUSE.

b) Software installation (apache2, tftpboot, syslinux, dhcpd etc) assumes your SLE or openSUSE server have access to their respective binaries, either in DVD (also ISO) or software repository on the web.

References:

Enjoy!

Wednesday, December 29, 2010

SUSE Linux Enterprise Wins Readers' Choice Award 2010

Apologies for this late report, we won this back in October 2010... better late than never! :)

On 15th October 2010, Novell was presented a Readers' Choice Award from ComputerWorld Singapore for winning in the Open Source Platforms/Operating Systems category. It was a very proud moment for us in Novell Singapore and I'm sure it will pleased all SUSE supporters everywhere.

Unfortunately for me, I was called away to be in Malaysia for a business trip and was unable to attend the ceremony. After hearing it from my friends, made me wish there was a way for me to return to Singapore for that evening's presentation.


Above is a photo of the trophy presented and its now sitting in a prominent place in the Novell Singapore office. :)

Tuesday, November 2, 2010

Focus stealing settings in KDE and Gnome on SUSE

This is an update from my previous post "Focus! User is King". Thanks to comments posted by 13thSlayer and JosP pointing me in the right direction, I found what I was looking for and I'd like to share it in this entry.

Specifically, I've tried this with KDE/openSUSE 11.3 and Gnome/SLES 11 SP1. I'm fairly certain that this should apply to other variants like Gnome/openSUSE and KDE/SLED.

KDE

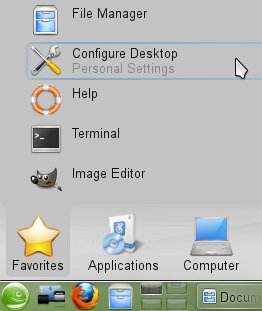
If you are using KDE, start Configure Desktop and select Window Behavior. Next, select Window Behavior in the panel on the left and find the Focus Stealing prevention level field. The default is Low. I changed it to Medium. You may choose to go more aggressive with High or Extreme.


Gnome

If you are using Gnome, you will need to bring up gconf-editor from the Terminal. With the Gnome Configuration Editor window opened, from the left-hand panel, navigate / -> apps -> metacity -> general. In the right-hand panel, scroll to look for the variable focus_new_window.

The default value for focus_new_window is smart. You only have the option to change this to strict.


To wrap up, in typical YMMV fashion, changing these settings may or may not suit you personally but at least you now have an option to experiment. I have found the Medium setting in KDE worked for me compared to the default Low setting. I have not fully tested this for Gnome just yet.

Enjoy!

PS: I'm going on vacation for a week and will not be monitoring/moderating the comments (if any).

Monday, October 25, 2010

Using Apache2 to deploy & maintain SUSE

This entry is a little different because its open ended compared to my previous posts. The solution I'm about to share may or may not work for you and that's the nature of the enterprise IT environment. Nevertheless, I hope it will be a good reference for you.

Automation is an important aspect in enterprise IT. In this specific scenario, we are talking about the ability to scale deployment and maintenance of multiple SLES instances (or SLED or openSUSE). Unlike installing a single SLES instance for evaluation, the DVD media (or even USB sticks) is not going to cut it if you have 3, 5, 50 or 100s of SLES deployed in a data center. This also applies to setting up an IT training classroom of 25 machines.

To make things more interesting, if you have Blade servers, you'll noticed that each Blade server chasis/enclosure have only one shared physical DVD drive. Sure, its read-only and can be shared amongst all the blades but what if you need to install another software (requiring another DVD) on the first blade and the rest are still reading from your SLES DVD media? Oops.

The idea is to share the SLES binaries over the network and there are various mechanism like HTTP, FTP, NFS and even Samba (oh-boy). My preferred choice is HTTP via Apache2 webserver for 2 simple reasons. First, it works quite well from experience and as importantly, its really easy to setup (ie quick & painless setup).

Install Apache2

a) Command-line option: zypper in apache2


OR

b) GUI option: YaST -> Software Management -> Search for the apache2 package and click Accept & continue for automatic changes with associated packages for installation.


Configure Apache2

1) Edit the following configuration file at /etc/apache2/default-server.conf with your favourite text editor.

2) Under the Directory section (see screenshot), look for the line Options None and replace it with Options Indexes FollowSymLinks as shown in screenshot below. This allows apache2 webserver to list directories and also follow symbolic links.


Mounting ISOs under Apache2

1) The Document root for Apache2 is /srv/www/htdocs/ so I would suggest the following directory structure:

/srv/www/htdocs/software/SLES-11-SP1/i586
/srv/www/htdocs/software/SLES-11-SP1/x86_64

/srv/www/htdocs/software/SLES-11-SP1/s390x


By way of example above, you can see that I created a software sub-directory followed by directories for the product & version and, in turn, followed by the architecture.

2) Assuming you have the DVD ISO file somewhere on your filesystem (I usually put them in /media), you can mount them via:

mount -t iso9660 -o ro,loop /media/SLES-11-SP1-x86_64.iso /srv/www/htdocs/software/SLES-11-SP1/x86_64/


Starting Apache2

a) rcapache2 start

b) To make apache2 auto-start on boot, chkconfig -s apache2 on


Configure target SLES instances

1) On your target SLES instances, you can add a new repository via YaST.

For SLES 10: YaST -> Installation Source
For SLES 11: YaST -> Software Repositories

There is an equivalent zypper command but I find the GUI much more productive in this case. senyum

2) Click Add to add another source for YaST to query and retrieve software. Choose Specify URL... and enter the URL to the Apache2 server you've just setup.

As an example, assuming your target is SLES 11 SP1 & as shown in screenshots below, you enter http://[IP address to Apache2]/software/SLES-11-SP1/x86_64


Once this is setup, you may disable or remove other sources (like the one that points to your DVD media).


Conclusions

1) It works well and scales nicely to quite a degree.

2) You don't waste DVDs (or the time in creating them).

3) You get to keep all your ISO binaries in one place which is great from admin standpoint. Plus, you do not waste disk space storing duplicate ISOs spread all over your servers or SAN.

4) If you have virtualized SLES instances, this works just as well since its all network based. As long as your servers (physical or virtual) has a network path to your Apache2, its good. Heck, you can even virtualize this Apache2 server if you like.

peace


What's not documented in this blog entry is how to setup a PXE-boot server (tftp & dhcpd) environment in SLES in addition to Apache2 (mentioned above) so you can provision new servers that are capable of booting up over the network and kick-start the installation process with Auto-YaST.

If you are interested, let me know in the comments section and I'll look into writing it... in the meantime, I can refer you to these helpful resources:

http://en.opensuse.org/SDB:PXE_boot_installation
http://www.novell.com/coolsolutions/feature/17719.html

senyum

Saturday, October 23, 2010

Getting Started with KVM on SLES 11 SP1

This blog post is long overdued and I apologized to those who had encouraged me to do so earlier and I procrastinated.

With SLES 11 SP1, officially available earlier in June 2010, KVM (Kernel-based Virtual Machine) is officially supported in addition to the more mature Xen virtualization (since 2006). You can install both hypervisors on the same installation of SLES 11 SP1 but you can only choose to use one or the other and not both at the same time (reboot required to switch).

Pre-requisites:

This is an important and usually overlooked step, I'm guilty of this... twice (Ouch!), but KVM requires x86 CPUs that supports hardware level virtualization. For Intel chips, the Intel-VT feature and for AMD chips, the equivalent AMD-V feature must be available.

Question: How do I know my CPU supports hardware level virtualization?
Answer 1: If you have your CPU model number, you can google or just visit the support pages at Intel or AMD.
Answer 2: If you already have SLES 11 SP1 installed, execute this command as root via the Terminal: cat /proc/cpuinfo and your CPU Model name will show up.

More importantly, this feature must be turned ON. I've noticed that they (Intel-VT and AMD-V) are usually disabled by default. To turn them on, you'll need to go into the BIOS and, under some CPU configuration, toggle it ON.

Question: How do I know if Intel-VT or AMD-V is available with SLES 11 SP1 already booted up?
Answer: Execute egrep "vmx|svm" /proc/cpuinfo and if this command returns empty, you're out of luck. xpasti For Intel-VT, vmx is present under the CPU flag. For AMD-V, svm is present.

The consequence of not checking, while not catastrophic, does cause disappointments especially when that particular CPU does not support this feature and you'll have to find other means to virtualize. On such a machine and if you're only virtualizing SLES 10 or 11, you can install Xen and it will work since Xen supports para-virtualization. However, if you intend to virtualize other Linux and Windows, you'll need to look at VMWare (eg VMWare Server coz its free) and/or any other hypervisor that provides full hardware emulation for virtualization.

Installation:

SLES 11 SP1 does not install Xen or KVM by default (if you keep clicking Next and do not modify the Software Selection during installation). Fortunately, SUSE Engineering made it real easy to install either Xen or KVM (or both) via YaST.

In YaST, under the Virtualization section, click on Install Hypervisor and Tools. You will be presented with a simple dialog with 2 checkboxes. You may checked both boxes to install both Xen and KVM or just the checkbox for KVM.


Click Accept and YaST will take care of installing all the required packages (including management tools) for KVM and/or Xen.

Its important that you know that, virt-manager, the GUI to manage virtual machines and configurations can be used to administer both Xen and KVM in SLES 11 SP1. This is a great feature because users who are already familiar with Xen on SLES can start using KVM quickly. Another great example of engineering thought put into releasing a quality Linux distribution for the enterprise. peace

Once installation is complete, you are ready to use KVM (without rebooting). Just to be sure that KVM is ready for action, you can execute (as root) lsmod | grep kvm and see if the kvm module has been loaded. You can find the KVM release notes/support statements under the /usr/share/doc/packages/kvm directory.

Using KVM for the first time:

Bring up the Virtual Machine Manager (aka virt-manager) either via YaST -> Virtualization -> Virtual Machine Manager OR the command (as root) virt-manager.


For the Virtual Machine Manager (VMM) GUI screenshot above, you should have an empty list of virtual machines under localhost(QEMU) since you're using KVM for the first time.

At this point, before you create your first virtual machine, I would advise you define the virtual network settings. By default, there is a "default" virtual network (it may not be activated however) that is configured to NAT (Network Address Translation). This means that your virtual machine will pick up, via DHCP, an IP address that is local to your machine but capable of accessing the Internet via your host network card (or WiFi). If this setting works for you, great. Otherwise, you have the option of creating other virtual network (host-only or bridged) via the VMM GUI.

To administer these virtual networks, double-click on localhost (QEMU) in the VMM. Alternatively, you can click on Edit -> Host Details on the VMM menubar. Click on the Virtual Networks Tab when another window appears. I won't bother going into details here because the GUI is rather straight-forward. Only thing that is worth pointing out is NOT to forget clicking on the "play" button to start your virtual network.


Good, you are all set to create your first virtual machine with KVM. If you are familiar with the virtual machine creation wizard for Xen since SLES 10 SP2, it will be plain sailing for you since SLES re-use the same GUI interfaces. For those who are not familiar, well, its really not that tough clicking Next, modifying preferences and clicking Finish to create a virtual machine and start it up.

Finally, for the more hardcore users reading this blog, here are the directories that will be of interests to you:

VM disk images - /var/lib/kvm/images/
VM meta-data - /etc/kvm/vm/
Logs - /var/log/kvm/ and /var/log/libvirt/
Configurations - /etc/libvirt/ and /etc/libvirt/qemu/networks/

Enjoy! senyum

Friday, October 15, 2010

The winding road to a straight-forward solution

Update(26 Oct 2010): Please read comments section for this entry for more useful information. My gratitude & Thanks to all who contributed. Cheers!

This is a rant... and I will admit to not thoroughly investigating this topic... but really, why does it have to be this hard to install SUSE on a Laptop? Curious? Read on...

First, the scenario, I was on the road 3 weeks ago and needed to install SUSE Linux Enterprise Desktop 11 SP1 onto a Thinkpad X61. This model does not have a DVD drive and while there's a docking station somewhere that has a DVD drive, that docking station cannot be found, Oops. Not a big deal, next idea was to do a network install where I setup my machine with DHCP & HTTP server to provision the X61 via PXE-boot. Unfortunately, I do not have sufficient time and the network setup at that place was new to me so I thought the risk is rather high.

Next idea was to use my 8GB USB thumbdrive and make it into a SUSE install stick. Yes, this might work (it did eventually) and I recall seeing some documentation on opensuse.org before. I backed up the existing data on my thumbdrive and ensured that I've installed syslinux onto my system so as to make the USB stick bootable... that's all that I can recall off hand.

Now comes my rant:

I cannot find that document on how to make a USB stick into a bootable SUSE installer. First, opensuse.org has gone through a facelife (and its a truly nice visual upgrade). While the structure of the site has improved in terms of content organization, that particular document did not survive the website upgrade. After spending more time with Google, I realize that the older opensuse.org site is still accessible by prepending "old-" to the URL = http://old-en.opensuse.org

Eventually, I found the documentation/article at http://old-en.opensuse.org/SuSE_install_from_USB_drive

Finally, the steps are pretty straightforward except for the little bump in the road where I have to download a script called mksusebootdisk from here. Murphy's law kicked into high gear and I had trouble downloading this little file. Aargh!

From the documentation, it states that the mkbootdisk script that ships with SUSE does not really work in this scenario as it doesn't work with FAT32 on USB stick (and you can't use Fat16 as SUSE DVD image is greater than 2GB). Therefore, you'll need the modified version mentioned above. Great!

This document has been around for about 2 years and in that time, this little script is still not shipped with the latest SUSE. I'm sure there is a good engineering reason to this but I was too upset to even consider it. LOL! :)

Anyway, after clicking on the link one last time (hoping the same action will yield a different result), I was able to download that mksusebootdisk script. Ha! Everything was smooth sailing thereafter and I installed SLED 11 SP1 on the Thinkpad X61 from my 8GB USB Stick.

Onwards and upwards... keeping on carrying on... :)

Tuesday, August 10, 2010

Windows Virus/Trojan busting with SUSE and ClamAV

Not once but on two separate occasions over the course of last week, I was called upon to help do some virus & trojan busting on badly infected laptops. It was so bad that traditional anti-virus software just could not seem to completely eradicate them. It would appear that these viruses and trojans could hide and re-create/spawn instances upon shutdown and reboot of Windows XP.

Honestly, I'm "new" to this as this is not my day job or something I do on a regular basis. Since using the installed anti-virus program route did not work, I opted to physically remove the infected 2.5" hard disk drive from these laptops and put them in my secondary hard disk bay of my Thinkpad running SUSE Linux Enterprise Desktop 11 SP1 (SLED 11 SP1 for short).

Tip: If you do not have nor want to spend money on a secondary hard disk bay for your laptop, there are many more affordable adapters in the market where you can connect a SATA or IDE 2.5" hard disk drive and connect them to your laptop via USB. SUSE Linux Enterprise (Desktop/Server) and openSUSE will automatically mount them under the /media directory.

My idea/solution was simple, boot up my Thinkpad with SLED 11 SP1 with the infected hard disk mounted as a secondary drive (ie no programs are executed on boot). Further, its unlikely these nasty viruses/trojans will execute since I'm using a different operating system. Next, use ClamAV (anti-virus scanner that comes with SLED 11 SP1) to scan for known Windows viruses & trojans on the mounted secondary drive (which is the Windows hard disk from the infected laptops).

Note, if you are using clamscan for the first time, ensure that your virus database is up-to-date or it will not work. To do that, ensure you've got Internet access and execute freshclam. Thereafter, you can execute clamscan -ri . The "r" flag means recursively through the directories and "i" flag is to only print infected files detected to the screen. In my case, I mounted the infected disk via mount -t ntfs /dev/sdb1 /mnt/temp and so I executed clamscan -ri /mnt/temp/ for my virus/trojan busting.

Its IMPORTANT to note that clamscan does not have virus/trojan quarantine or disinfecting capabilities. To remove the virus, it would delete the infected file. Hence, I did not specify the --remove=yes parameter as I wanted clamscan to detect the infected files first and leave it to me to decide if these files should be removed permanently.

Using this method, I managed to detect and selectively remove infected files (some of them made to look like Windows system files). The first instance, I detected and removed over 25 trojans. In the second instance, I detected and removed 2 trojans.

Finally, I believe (please correct me if I'm mistaken) the original intent of packaging ClamAV with SUSE Linux Enterprise is to have the ClamAV daemon work with email server software in scanning emails that may contain Windows viruses and actively block or remove them before it reaches end user machines running Windows.

Thursday, May 27, 2010

KVM in SUSE Linux Enterprise Server 11 SP 1

At Novell BrainShare Amsterdam last week, the Geekos were handing out SUSE Linux Enterprise Server 11 SP1 (RC4) at IT Central. So off came my DVD drive and I installed it on a separate partition on my Thinkpad.

Since its a Release Candidate (RC4) and not the final GA version due on 2nd June, I wanted to have a quick look at how KVM works since its an officially supported hypervisor in SP1 (other than the very established Xen shipped and supported since SLES 10 back in 2006).

I've been using Xen and helping partners & customers implement it for a few years, without any knowledge of KVM, I wanted to dive right in and see how far I'd go. I am very impressed with the engineering and thought put into how KVM is packaged with SLES 11 SP1. This is truly a fine example of an "Enterprise" grade product. I was able to virtualize an instance of SLES 11 SP1 and MS Windows 7 with no assistance. The KEY is the tools (libvirt & virt-manager) for Xen, which I'm familiar since SLES 10, is now capable of managing both Xen and KVM in SLES 11 SP1. Depending if you boot into the Xen kernel or the default kernel with KVM module loaded, these same tools can be used, thus providing a consistent user interface. This is just brilliant! senyum

For existing users of Xen, should they decide that KVM is a better alternative as it matures further down the road, they could easily switch without much hassle. More importantly, its conceivable that any custom scripts (automation, failover or whatever) developed for Xen can be easily applied to KVM. This is much better than RIP-n-REPLACE in so many other "Enterprise" grade products.

Here are a few screenshots:


Cheers! senyum

Sunday, May 16, 2010

Why is SUSE Studio so Addictive?

Simply put, its all about creativity and productivity. If you have never heard of SUSE Studio, please go and check it out at http://susestudio.com... and while you wait for your account creation to complete, check out the screencast and read the many credible IT information sources that have reported/blogged about it (via Google).

However, you will never truly appreciate it until you log in and try to create your first software appliance. As a famous chain of Indian restaurants here in Singapore says: "The proof is in the eating..." senyum

This is my personal take on why I keep going back to SUSE Studio and leveraging its many features. A portion of time spent in my work goes into the creation and setting up of relevant product demos. This is both a repetitive and iterative process. Repetitive because I have to go and show this to multiple business partners and customers. Iterative because with each demonstration, with constructive feedback from my audience, I will enhance the demo (customization). Further, I have regional responsibilities across a few countries (across 5 timezones and many more languages).

Before SUSE Studio, we have tried a few strategies to varying degrees of success:
1. We could create a document that describes how to setup and showcase the demo, emailed it to all the local engineers to replicate.
2. Alternatively, if time is short, we create demos on hard disks and shipped them out.
3. We also tried creating demos in a virtual machine and either ship it or host it on an FTP site for download.

With method (1), there is a lot of duplication of work as each engineer in every country will spend time setting up the demo which consists of hardware, operating system, application and sample data. With method (2), it is slightly more productive because we create the demo once and clone it across 5-10 hard disks and ship them out. However, it is not cost-effective due to the need to purchase hard disk and courier charges... for the next iterative demo, we need the field engineers to ship the hard disk back for updates, and then shipping them off again...

With virtualization as described in method (3), we are able to create portable demos across a variety of hardware (laptop to servers). We overcome the time consuming & duplication of work in (1) and the resource & shipping costs in (2). The only challenge is the network download bandwidth available in different countries.

SUSE Studio is the next step in productivity in this direction, here are the key advantages:
a) We create/design the demo workload (software appliance) within a web browser! There are a decent amount of templates, online repositories with latest versions of software and Web 2.0 wizards that progressively advises you on software version compatibility and related hints.

b) We can simultaneously target different output formats (ie VMware, VirtualBox, Xen, Disk Image/USB key and live CD/DVD iso), all generated online on someone else's infrastructure. sengihnampakgigi

c) We can "testdrive" the generated demo online via a web browser and eliminate the need to download the images until we are happy with our creation.

d) We can share these demos (software appliance) to a wider audience*

I do not need the constant availability of powerful machines with virtualization capabilities and loads of hard disk space for creating many different demos with even more snapshots. As long as I got a web browser and Internet access, I can use SUSE Studio to create new demos or improve on existing ones. Once I reach a milestone in my demo, I version it and make the link to download the image available to our engineers.

For (d), while not officially available at this time, I am fortunate to be eligible to beta-test the "marketplace" feature where you can share your appliance to all members (beta testers) of SUSE Studio. I can browse or search for software appliances, try them out, clone their configuration as a base template for additional work/customizations, rate them (5 star system) etc.

All these little things add up in improving productivity and giving me more time to engage my brain for creativity in designing the next iteration or new demo.

That is why SUSE Studio is so Addictive for me. peace

PS: For ISVs who signed up with Novell for the SUSE Appliance Toolkit, you get to deploy an enhanced SUSE Studio onsite, thus having a software appliance workbench service in your private network, I mean, Cloud. encem

Friday, April 9, 2010

SUSE Engineering Quality: ASP.NET on IBM Mainframe

I experienced, first-hand, the Outstanding quality of SUSE Engineering today. Common Code-base has always been touted as a key differentiator with SUSE Linux Enterprise, where the same operating system is compiled (AutoBuild) and ready for a number of different hardware chipsets/platforms. The implication is that the latest & greatest code/patches will be simultaneously available for SUSE Linux Enterprise on x86 (32 & 64 bit) as well as IBM POWER, IBM System z etc.

With IBM System z (aka the Mainframe), its been said that SUSE Linux Enterprise runs natively & without any emulation layer. Further, there is approximately 1% of code change in the kernel due to the fact that the System z uses a different chipset.

All the above is true and I am personally convinced today. Why? Because I had the opportunity to work on a small virtual instance (512Mb RAM) of SUSE Linux Enterprise Server 11 (SLES 11) running on the legendary IBM System z10 BC this week. The machine is also hosting a number of other SLES 11 instances and traditional mainframe workloads (ie z/OS).

Previously, I wrote an entry on setting up mojoPortal (ASP.NET web app) on SUSE Linux Enterprise with the Mono extension (link). Using the exact same steps that I described, written & tested against my Lenovo Thinkpad (x86), I can achieve the same result on the IBM System z10 BC! encem

That's right folks, the only difference is I needed to install SLES 11 DVD for System z (s390x). Next, I used the exact same mojoportal rpm (noarch) & SLES-11-Mono-GM-DVD1.iso (noticed its hardware platform independent) that worked on my Lenovo Thinkpad. In less than an hour (the speed and throughput of System z is amazing), I've got everything up and running on SLES 11 on System z.

Interesting how we now have the option of running traditional LAMP stacks, Java workloads and .NET applications on SLES 11 on System z. Further, with database options of PostgreSQL, MySQL, IBM DB2, Oracle DB added to the mix... Wow, this opens up more options for server consolidation and the type of applications that can now be hosted on System z to achieve unrivaled uptime, vertical scalability, security and I/O throughput. sembah

Sweeeeeet!! senyum

Thursday, March 25, 2010

MojoPortal on SLES 11 with Mono Extension

MojoPortal (http://www.mojoportal.com) is an open source, cross-platform*, content management system (CMS) using ASP.NET as the web development language. Its intended for personal and commercial use and license under the Common Public License 1.0. You can read more on the motivations of the author here.

* - With Mono, cross-platform is a truer statement now. senyumkenyit

On the Windows platform, you would require IIS (web server) with ASP.NET 3.5 SP1 and a database (usually MS SQL Server). With SUSE Linux Enterprise Server 11 and the Mono Extension, we have Apache2 (web server) with Mono 2.4 runtime and PostgresQL database as the counterparts.

This blog entry will show you in rather painless fashion on how to install MojoPortal on SUSE Linux Enterprise Server 11 (with the Mono Extension) and start using it. To help with reading efficiency, I have 2 sections, the first section is the Expressed version where I assumed the reader is skilled and proficient with SUSE whereas the second is the Expanded version where it will include more details and screenshots. Finally, a little more info/detail, my setup has SLES 11 with Mono Extension virtualized on top of SLES 11 Xen hypervisor.

As a next step, I would consider leveraging SUSE Studio to build a small MojoPortal appliance (thus eliminating the need for this journal) and users can simply download the entire workload (OS, App & Data) without doing any "wiring". Tempting... stay tuned... senyum

Pre-requisite: You already have a "vanilla" SLES 11 installed with basic network access and software repositories setup (ie DVD or online through NCC).

Expressed/Summarized (aka for SUSE admins) instructions:

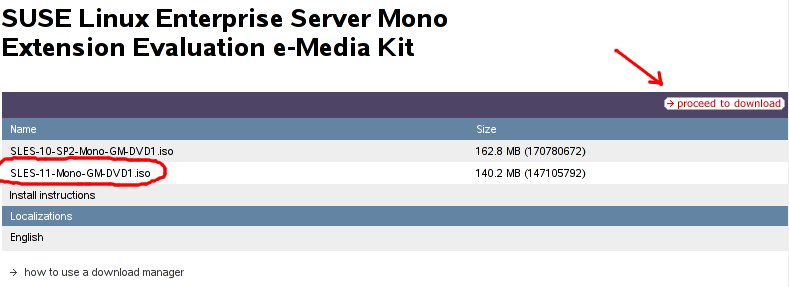
1) Download SUSE Linux Enterprise Mono Extension from this LINK. You only require the SLES-11-Mono-GM-DVD1.iso (140Mb). The other ISO (162Mb) is meant for the older SLES 10 SP2.

2) Download MojoPortal already packaged as an RPM from openSUSE.org. At the time of this entry, I downloaded and used mojoportal-2.3.3.1-3.6.noarch.rpm (12Mb) from this LINK. If link does not work, surf to http://software.opensuse.org/search and search for "mojo" with SLES/SLED 11 selected in the listbox.

3) Install (if not already) Apache2 web server: < zypper in apache2 >

4) Install PostgresQL database: < zypper in postgresql-server >

5) Install Mono Extension/runtime on top of SLES 11. Use YaST -> Software -> Add-On Products or < yast2 add-on > to install the Mono Extension, ISO you downloaded in step (1).

6) Install MojoPortal web application: < rpm -ivh --nodeps mojoportal-2.3.3.1-3.4.noarch.rpm >. The nodeps flag is required as the mojoportal RPM is still looking for the older version 2.0 of Mono. The official SLE 11 Mono Extension is at version 2.4.

7) Ensure PostgreSQL server is running < rcpostgresql start >, and proceed to configure PostgreSQL database for MojoPortal: < /usr/share/mono/asp.net/data/mojoportal-2.3.3.1/init >

8) Configure Apache2 web server for MojoPortal: < cp /usr/share/mono/asp.net/conf/mojoportal-2.3.3.1/mojoportal.conf /etc/apache2/conf.d/ > and edit the mojoportal.conf file in the /etc/apache2/conf.d/ directory < vi /etc/apache2/conf.d/mojoportal.conf >, put a # in front of the line < MonoServerPath mojoportal "/usr/bin/mod-mono-server2" > and remove the # in the following line < #MonoServerPath mojoportal "/opt/novell/mono/bin/mod-mono-server2" >. Restart Apache2 to have these configuration changes in effect < rcapache2 restart >.

9) Open a web browser and point to http://[hostname Or IP addr]/mojoportal . The initial startup will take awhile as MojoPortal initializes for the first time. Login as MojoPortal Administrator with ID admin@admin.com and Password admin.

10) To ensure Apache2 web server and PostgreSQL database server is always auto-started on reboot: < chkconfig -s apache2 on > and < chkconfig -s postgresql on >

For more usage knowledge, please see MojoPortal.com for details at http://www.mojoportal.com/documentation.aspx
Link

Expanded/Detailed (aka for those new to SUSE) instructions:

1) Download SUSE Linux Enterprise Mono Extension from this LINK. You only require the SLES-11-Mono-GM-DVD1.iso (140Mb). The other ISO (162Mb) is meant for the older SLES 10 SP2.


2) Download MojoPortal already packaged as an RPM from openSUSE.org. At the time of this entry, I downloaded and used mojoportal-2.3.3.1-3.6.noarch.rpm (12Mb) from this LINK. If link does not work, surf to http://software.opensuse.org/search and search for "mojo" with SLES/SLED 11 selected in the listbox.


3) Install (if not already) Apache2 web server via YaST -> Software -> Software Management.


4) Install PostgresQL database via YaST -> Software -> Software Management.


5) Install Mono Extension/runtime on top of SLES 11. Use YaST -> Software -> Add-On Products or < yast2 add-on > to install the Mono Extension, ISO you downloaded in step (1).


6) Install MojoPortal web application downloaded in step (2) with the following command executed as root: < rpm -ivh --nodeps mojoportal-2.3.3.1-3.4.noarch.rpm >. The nodeps flag is required as the mojoportal RPM is still looking for the older version 2.0 of Mono. The official SLE 11 Mono Extension is at version 2.4.

7) Ensure PostgreSQL server is running < rcpostgresql start >, and proceed to configure PostgreSQL database for MojoPortal: < /usr/share/mono/asp.net/data/mojoportal-2.3.3.1/init >

8) Configure Apache2 web server for MojoPortal: < cp /usr/share/mono/asp.net/conf/mojoportal-2.3.3.1/mojoportal.conf /etc/apache2/conf.d/ > and edit the mojoportal.conf file in the /etc/apache2/conf.d/ directory < gedit /etc/apache2/conf.d/mojoportal.conf >, put a # in front of the line < MonoServerPath mojoportal "/usr/bin/mod-mono-server2" > and remove the # in the following line < #MonoServerPath mojoportal "/opt/novell/mono/bin/mod-mono-server2" >.

Restart Apache2 to have these configuration changes in effect < rcapache2 restart >.

9) Open a web browser and point to http://[hostname Or IP addr]/mojoportal. The initial startup will take awhile as MojoPortal initializes for the first time. Login as MojoPortal Administrator with ID admin@admin.com and Password admin.


10) To ensure Apache2 web server and PostgreSQL database server is always auto-started on reboot, use YaST -> System -> System Services (Runlevel)


For more usage knowledge, please see MojoPortal.com for details at http://www.mojoportal.com/documentation.aspx
Go to http://software.opensuse.org/search and enter "mojoportal" in the text field and ensure you select SLES/SLED 11 in the drop-down box and click Search.

Cheers!
peace