This blog post is long overdued and I apologized to those who had encouraged me to do so earlier and I procrastinated.
With SLES 11 SP1, officially available earlier in June 2010, KVM (Kernel-based Virtual Machine) is officially supported in addition to the more mature Xen virtualization (since 2006). You can install both hypervisors on the same installation of SLES 11 SP1 but you can only choose to use one or the other and not both at the same time (reboot required to switch).
Pre-requisites:This is an important and usually overlooked step, I'm guilty of this... twice (Ouch!), but KVM requires x86 CPUs that supports hardware level virtualization. For Intel chips, the Intel-VT feature and for AMD chips, the equivalent AMD-V feature must be available.
Question: How do I know my CPU supports hardware level virtualization?
Answer 1: If you have your CPU model number, you can google or just visit the support pages at Intel or AMD.
Answer 2: If you already have SLES 11 SP1 installed, execute this command as root via the Terminal:
cat /proc/cpuinfo and your CPU Model name will show up.
More importantly, this feature
must be turned ON. I've noticed that they (Intel-VT and AMD-V) are usually disabled by default. To turn them on, you'll need to go into the BIOS and, under some CPU configuration, toggle it ON.
Question: How do I know if Intel-VT or AMD-V is available with SLES 11 SP1 already booted up?
Answer: Execute
egrep "vmx|svm" /proc/cpuinfo and if this command returns empty, you're out of luck.

For Intel-VT,
vmx is present under the CPU flag. For AMD-V,
svm is present.
The consequence of not checking, while not catastrophic, does cause disappointments especially when that particular CPU does not support this feature and you'll have to find other means to virtualize. On such a machine and if you're only virtualizing SLES 10 or 11, you can install Xen and it will work since Xen supports para-virtualization. However, if you intend to virtualize other Linux and Windows, you'll need to look at VMWare (eg VMWare Server coz its free) and/or any other hypervisor that provides full hardware emulation for virtualization.
Installation:SLES 11 SP1 does not install Xen or KVM by default (if you keep clicking Next and do not modify the Software Selection during installation). Fortunately, SUSE Engineering made it real easy to install either Xen or KVM (or both) via YaST.
In YaST, under the Virtualization section, click on
Install Hypervisor and Tools. You will be presented with a simple dialog with 2 checkboxes. You may checked both boxes to install both Xen and KVM or just the checkbox for KVM.
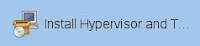
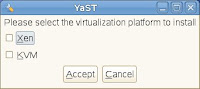
Click Accept and YaST will take care of installing all the required packages (including management tools) for KVM and/or Xen.
Its
important that you know that, virt-manager, the GUI to manage virtual machines and configurations can be used to administer both Xen and KVM in SLES 11 SP1. This is a great feature because users who are already familiar with Xen on SLES can start using KVM quickly. Another great example of engineering thought put into releasing a quality Linux distribution for the enterprise.

Once installation is complete, you are ready to use KVM (without rebooting). Just to be sure that KVM is ready for action, you can execute (as root)
lsmod | grep kvm and see if the kvm module has been loaded. You can find the KVM release notes/support statements under the
/usr/share/doc/packages/kvm directory.
Using KVM for the first time:Bring up the Virtual Machine Manager (aka virt-manager) either via
YaST -> Virtualization -> Virtual Machine Manager OR the command (as root)
virt-manager.
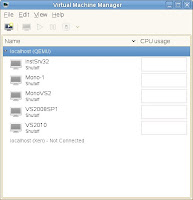
For the Virtual Machine Manager (VMM) GUI screenshot above, you should have an empty list of virtual machines under localhost(QEMU) since you're using KVM for the first time.
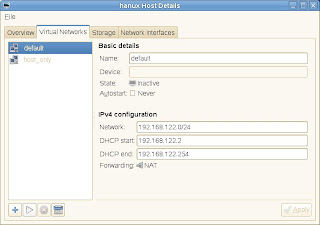
At this point, before you create your first virtual machine, I would advise you define the virtual network settings. By default, there is a "default" virtual network (it may not be activated however) that is configured to NAT (Network Address Translation). This means that your virtual machine will pick up, via DHCP, an IP address that is local to your machine but capable of accessing the Internet via your host network card (or WiFi). If this setting works for you, great. Otherwise, you have the option of creating other virtual network (host-only or bridged) via the VMM GUI.
To administer these virtual networks,
double-click on
localhost (QEMU) in the VMM. Alternatively, you can click on
Edit -> Host Details on the VMM menubar. Click on the Virtual Networks Tab when another window appears. I won't bother going into details here because the GUI is rather straight-forward. Only thing that is worth pointing out is NOT to forget clicking on the "play" button to start your virtual network.
Good, you are all set to create your first virtual machine with KVM. If you are familiar with the virtual machine creation wizard for Xen since SLES 10 SP2, it will be plain sailing for you since SLES re-use the same GUI interfaces. For those who are not familiar, well, its really not that tough clicking Next, modifying preferences and clicking Finish to create a virtual machine and start it up.
Finally, for the more hardcore users reading this blog, here are the directories that will be of interests to you:
VM disk images -
/var/lib/kvm/images/VM meta-data -
/etc/kvm/vm/Logs -
/var/log/kvm/ and
/var/log/libvirt/ Configurations -
/etc/libvirt/ and
/etc/libvirt/qemu/networks/Enjoy!


