Thursday, March 25, 2010

MojoPortal on SLES 11 with Mono Extension

MojoPortal (http://www.mojoportal.com) is an open source, cross-platform*, content management system (CMS) using ASP.NET as the web development language. Its intended for personal and commercial use and license under the Common Public License 1.0. You can read more on the motivations of the author here.

* - With Mono, cross-platform is a truer statement now. senyumkenyit

On the Windows platform, you would require IIS (web server) with ASP.NET 3.5 SP1 and a database (usually MS SQL Server). With SUSE Linux Enterprise Server 11 and the Mono Extension, we have Apache2 (web server) with Mono 2.4 runtime and PostgresQL database as the counterparts.

This blog entry will show you in rather painless fashion on how to install MojoPortal on SUSE Linux Enterprise Server 11 (with the Mono Extension) and start using it. To help with reading efficiency, I have 2 sections, the first section is the Expressed version where I assumed the reader is skilled and proficient with SUSE whereas the second is the Expanded version where it will include more details and screenshots. Finally, a little more info/detail, my setup has SLES 11 with Mono Extension virtualized on top of SLES 11 Xen hypervisor.

As a next step, I would consider leveraging SUSE Studio to build a small MojoPortal appliance (thus eliminating the need for this journal) and users can simply download the entire workload (OS, App & Data) without doing any "wiring". Tempting... stay tuned... senyum

Pre-requisite: You already have a "vanilla" SLES 11 installed with basic network access and software repositories setup (ie DVD or online through NCC).

Expressed/Summarized (aka for SUSE admins) instructions:

1) Download SUSE Linux Enterprise Mono Extension from this LINK. You only require the SLES-11-Mono-GM-DVD1.iso (140Mb). The other ISO (162Mb) is meant for the older SLES 10 SP2.

2) Download MojoPortal already packaged as an RPM from openSUSE.org. At the time of this entry, I downloaded and used mojoportal-2.3.3.1-3.6.noarch.rpm (12Mb) from this LINK. If link does not work, surf to http://software.opensuse.org/search and search for "mojo" with SLES/SLED 11 selected in the listbox.

3) Install (if not already) Apache2 web server: < zypper in apache2 >

4) Install PostgresQL database: < zypper in postgresql-server >

5) Install Mono Extension/runtime on top of SLES 11. Use YaST -> Software -> Add-On Products or < yast2 add-on > to install the Mono Extension, ISO you downloaded in step (1).

6) Install MojoPortal web application: < rpm -ivh --nodeps mojoportal-2.3.3.1-3.4.noarch.rpm >. The nodeps flag is required as the mojoportal RPM is still looking for the older version 2.0 of Mono. The official SLE 11 Mono Extension is at version 2.4.

7) Ensure PostgreSQL server is running < rcpostgresql start >, and proceed to configure PostgreSQL database for MojoPortal: < /usr/share/mono/asp.net/data/mojoportal-2.3.3.1/init >

8) Configure Apache2 web server for MojoPortal: < cp /usr/share/mono/asp.net/conf/mojoportal-2.3.3.1/mojoportal.conf /etc/apache2/conf.d/ > and edit the mojoportal.conf file in the /etc/apache2/conf.d/ directory < vi /etc/apache2/conf.d/mojoportal.conf >, put a # in front of the line < MonoServerPath mojoportal "/usr/bin/mod-mono-server2" > and remove the # in the following line < #MonoServerPath mojoportal "/opt/novell/mono/bin/mod-mono-server2" >. Restart Apache2 to have these configuration changes in effect < rcapache2 restart >.

9) Open a web browser and point to http://[hostname Or IP addr]/mojoportal . The initial startup will take awhile as MojoPortal initializes for the first time. Login as MojoPortal Administrator with ID admin@admin.com and Password admin.

10) To ensure Apache2 web server and PostgreSQL database server is always auto-started on reboot: < chkconfig -s apache2 on > and < chkconfig -s postgresql on >

For more usage knowledge, please see MojoPortal.com for details at http://www.mojoportal.com/documentation.aspx
Link

Expanded/Detailed (aka for those new to SUSE) instructions:
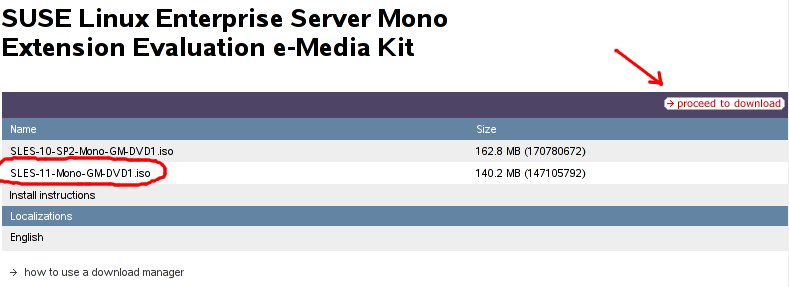
1) Download SUSE Linux Enterprise Mono Extension from this LINK. You only require the SLES-11-Mono-GM-DVD1.iso (140Mb). The other ISO (162Mb) is meant for the older SLES 10 SP2.


2) Download MojoPortal already packaged as an RPM from openSUSE.org. At the time of this entry, I downloaded and used mojoportal-2.3.3.1-3.6.noarch.rpm (12Mb) from this LINK. If link does not work, surf to http://software.opensuse.org/search and search for "mojo" with SLES/SLED 11 selected in the listbox.


3) Install (if not already) Apache2 web server via YaST -> Software -> Software Management.


4) Install PostgresQL database via YaST -> Software -> Software Management.


5) Install Mono Extension/runtime on top of SLES 11. Use YaST -> Software -> Add-On Products or < yast2 add-on > to install the Mono Extension, ISO you downloaded in step (1).


6) Install MojoPortal web application downloaded in step (2) with the following command executed as root: < rpm -ivh --nodeps mojoportal-2.3.3.1-3.4.noarch.rpm >. The nodeps flag is required as the mojoportal RPM is still looking for the older version 2.0 of Mono. The official SLE 11 Mono Extension is at version 2.4.

7) Ensure PostgreSQL server is running < rcpostgresql start >, and proceed to configure PostgreSQL database for MojoPortal: < /usr/share/mono/asp.net/data/mojoportal-2.3.3.1/init >

8) Configure Apache2 web server for MojoPortal: < cp /usr/share/mono/asp.net/conf/mojoportal-2.3.3.1/mojoportal.conf /etc/apache2/conf.d/ > and edit the mojoportal.conf file in the /etc/apache2/conf.d/ directory < gedit /etc/apache2/conf.d/mojoportal.conf >, put a # in front of the line < MonoServerPath mojoportal "/usr/bin/mod-mono-server2" > and remove the # in the following line < #MonoServerPath mojoportal "/opt/novell/mono/bin/mod-mono-server2" >.

Restart Apache2 to have these configuration changes in effect < rcapache2 restart >.

9) Open a web browser and point to http://[hostname Or IP addr]/mojoportal. The initial startup will take awhile as MojoPortal initializes for the first time. Login as MojoPortal Administrator with ID admin@admin.com and Password admin.


10) To ensure Apache2 web server and PostgreSQL database server is always auto-started on reboot, use YaST -> System -> System Services (Runlevel)


For more usage knowledge, please see MojoPortal.com for details at http://www.mojoportal.com/documentation.aspx
Go to http://software.opensuse.org/search and enter "mojoportal" in the text field and ensure you select SLES/SLED 11 in the drop-down box and click Search.

Cheers!
peace

Wednesday, December 30, 2009

The YoLD is Dead; Long Live the YoLD!

Twas the first day of Christmas 2009 and my true love gave to me... a Linux-ready USB WebCam!menari

First, YoLD = Year of the Linux Desktop. This proclamation has been ringing in my ears since 2004... for some of you, even earlier. I think, collectively, we've come to realize that its an evolution and not a revolution... hence my proclamation:

The YoLD is Dead (2009); Long Live the YoLD (2010)!

Much Thanks and Gratitude to the French for inventing the original. See Wikipedia for details here.

Back to my Christmas gift from my wife. She recalled my frustrations 2 years back in getting a brand-new USB WebCam to work with Linux (openSUSE, SLED, Ubuntu etc). She, a non-IT person, went shopping this Christmas and found a WebCam that explicitly supports Linux! Wow! sembah

And it WORKED! No driver installation/compilation required, true plug and play. Worked with Kopete and also with Skype. It worked on openSUSE 11.2 and SLED 11. Pretty sure it will work on many of the current Linux distributions. The box did say Kernel 2.6.21 & above. Here are a few pictures of the box.


Yes, I'm helping to advertise for this vendor because they deserve my support for their explicit Linux support. senyum

Finally, I credit this Blog entry to my wife. Thanks dear, you're the best! love

Saturday, December 12, 2009

ATI 3D Desktop Effects on SLED 11

This week, I find myself in Colombo, Sri Lanka. This is my first trip to Sri Lanka so its exciting for me to visit new places and people. The event is Novell's India Partner Academy where we see hundreds of partners from Pakistan, India and Sri Lanka converge in Colombo to hear Novell's commitment, roadmaps and sharing of experiences so as to be more effective.

Anyway, I never wrote how to enable 3D Dekstop Effects with ATI graphics card as my personal Thinkpad uses nVidia. However, I had the opportunity to help Henry, our India Partner Executive, setup his Thinkpad T60p (with ATI Mobility FireGL V5250) with 3D Effects. As usual, the 3D Effects are already installed on his SUSE Linux Enterprise Desktop 11. Its the graphics driver that is not 3D capable as Novell does not ship proprietary drivers with the base SLED 11.

Usually, the recommended and easy way is to use YaST Novell Customer Center Configuration. Upon successful registration, you will get an ATI repository setup in your YaST Software Repositories. All you need to do next is to install x11-video-fglrxG01 from YaST Software Management.

However, using the recommended method above failed to work for me for this particular Thinkpad T60p. The drivers installed successfully but X refuse to start and after a few flickers we are left with a blank black screen. Thus, I'm forced to go down the manual path where I download the latest ATI Catalyst driver and compiled a driver.

Here's a brief journal of what I did. NOTE that this is the manual method and should only be used if the recommended/easy/painless method described above does not work. The disadvantage of using this method is that you will need to repeat these steps (recompiling the driver) everytime you upgrade your SLE kernel. Here goes:

1) Go to http://support.amd.com/us/gpudownload/Pages/index.aspx and select Linux (x86 for 32-bit and x86_64 for 64-bit of SLED 11), followed by FireGL and Mobility FireGL V5000 and click GO. Scroll to the bottom and click to download the ATI Catalyst Proprietary Linux Driver (version 9.3 at the time of this writing).

2) Once downloaded, as root, make the file executable < chmod +x ati-driver-installer-9-3-x86.x86_64.run >

3) Next, to list the driver build options (for different Linux Distro) via < ./ati-driver-installer-9-3-x86.x86_64.run --listpkg >. You should see SuSE/SLE11-IA32 amongst the many other SuSE entries.

4) Next, to build the driver for SLED 11, execute < ./ati-driver-installer-9-3-x86.x86_64.run --buildpkg SuSE/SLE11-IA32 > (since the installed SLED 11 is 32-bit)

5) The result is a generated RPM called fglrx_7_4_0_SLE11-8.593-1.i386.rpm. Before you install this RPM, please get to runlevel 3 via the command < init 3 >

6) Install the RPM via < rpm -ivh fglrx_7_4_0_SLE11-8.593-1.i386.rpm >

7) Finally, execute SaX2 tool to configure this puppy via < sax2 -r -m 0=fglrx >

8) With SaX2 configuration completed, go back to runlevel 5 via < init 5 > and enable Desktop Effects via the Computer -> Control Center -> Desktop Effects.
Link
A good brief reference is also available at "ATI Installer HOWTO for SUSE/Novell Users" at http://www.suse.de/~sndirsch/ati-installer-HOWTO.html

Done. senyum

Tuesday, November 24, 2009

openSUSE 11.2 on EeePC 701: Wifi works!? Voodoo?

Luv openSUSE 11.2 so much, especially the default KDE 4.3 GUI... I find myself staring and admiring at it... this is big for me as I've not stopped and marvel at GUI for quite a while now... senyum ...

That was all the motivation I needed to install it onto my ASUS EeePC 701 (remember the very 1st netbook?) with 4GB SSD and 1GB RAM. Good news is everything works! Well, when I say 'everything', I meant things that matter to me like KDE GUI with compositing (ie 3D eye-candy), Firefox, OpenOffice and other apps, embedded webcam worked on Kopete and .... *drum roll*, Wireless! What's a netbook if wifi doesn't work yeah?

So, why am I so excited that wifi worked out of the box...? Apparently, wifi should not work with the default ath5k driver as its been reported at OpenSUSE on EeePC page and its true... until, by chance, I got it to work... and I'm going to described it here in very non-technical terms as I still have not figured out how/why it worked... hoping readers will have some good input and theories... maybe even a good technical answer. senyum Here goes:

1) Original challenge: Wifi appears to be available, can scan for SSIDs. However, it failed to connect with my home SSID.

2) Plugged in a Ethernet cable on my home network, just to test if physical network connection would work, I am able to surf the web. Hurray!

3) When I unplugged the Ethernet cable, it suddenly is able to automagically connect with my home wifi. While its a step forward, I am still unable to surf the web. However, I am able to ping all IPs in my home network.

4) Added a network route via route add and I can surf the web! So happy.
route add default gw 192.xxx.xxx.xxx metric 0 dev wlan0 (where 192.xxx.xxx.xxx is my home internal IP range)

Hope this will help those with the same itch/challenge. Would definitely appreciate your inputs on this behaviour. Thanks in advance.

PS: hwinfo | grep -i atheros returns:
info.vendor = 'Atheros Communications Inc.'
pci.vendor = 'Atheros Communications Inc.'
info.vendor = 'Atheros Communications Inc.'
E: ID_VENDOR_FROM_DATABASE=Atheros Communications
<6>[ 4.942343] Atheros(R) L2 Ethernet Driver - version 2.2.3
<6>[ 4.942355] Copyright (c) 2007 Atheros Corporation.
<6>[ 7.105539] ath5k phy0: Atheros AR2425 chip found (MAC: 0xe2, PHY: 0x70)
Model: "Atheros AR5001 Wireless Network Adapter"
Vendor: pci 0x168c "Atheros Communications Inc."