Going on the road again... after a year of life's transitions and pursuing other interests, I am privileged to have the opportunity to speak at MYGOSSCON 2011 next week.
The title of my paper is "Key Trends: Challenges, Opportunities and Leverage for Linux/OSS Ecosystem". I look forward to the discussions it will generate. :)
Personally, I am looking forward to this with excitement as I have been granted the latitude in content creation. I will be approaching the topic from another angle and with, what I hope to be, a fresh perspective.
Saturday, November 26, 2011
Friday, November 25, 2011
My openSUSE 12 Journal - 3: Lotus Notes 8.5.3
Lotus Notes is what I use at work and the latest v8.5.3 works well on openSUSE 11.4. Although it installed without a hitch on 12.1, things goes awry when I start using it. Here are my observations and how I managed to get it working again. :)
For starters, Lotus Notes 8.5.3 only managed to render about half of its interface. For example, I could see my inbox but email preview pane is blank. Integrated SameTime worked but workspaces and replication tabs were blank too. I suspect it could be some incompatibility or confusion with the GTK libs and I was right... Google is my friend and I discovered a brilliant soul who had the same challenge, created a bug report against openSUSE and even created a workaround/fix.
[Update on 27 Nov 2011]: Oops, it occurred to me that Lotus Notes 8.5.3 is actually 32-bit running on 64-bit openSUSE 12.1. That means the RPM created by Stefan Lijewski should have worked. I cannot recall why I came to the previous conclusion. I have just tried the 32-bit RPM and it worked for me. Therefore, I am correcting my entry below.
Unfortunately for me, I could not use his nicely packaged RPM and online repository because I am using 64-bit openSUSE 12.1.
The easy way is to use a 1-click install via Stefan Lijewski's online repository.
The easy but manual way is to download the RPM before you manually execute a zypper in lotus-notes-gnome3-1-1.1.i586.rpm
In both cases, you will need to verify that your Lotus Notes launch icon has been updated to use the new notes-wrapper script instead of the original notes script in /opt/ibm/lotus/notes/ directory.
Finally, the hard way (if you're so inclined to experience compiling your own code) is the original method I used below.
Below is how I got Lotus Notes 8.5.3 working on openSUSE 12.1 (64-bit).
1. Download the workaround fix from https://github.com/sgh/lotus-notes_gtk2.23.3/downloads
2. Un-tar the fix, tar zxvf sgh-lotus-notes_gtk2.23.3-2028e8e.tar.gz
3. You will need to install additional packages before you can compile the fix. As root, zypper in make gcc gtk2-devel glibc-devel-32bit gcc-32bit
4. In the sgh-lotus-notes_gtk2.23.3-2028e8e subdirectory, compile the fix with make
5. If make completed with success, you should have a new file libnotesgtkfix.so in the directory. Copy it and notes-wrapper to installed Lotus Notes directory /opt/ibm/lotus/notes/.
6. Last and final step, edit your Lotus Notes icons (kmenuedit if using KDE4) and change the default launch script to execute notes-wrapper instead.
That's it. Lotus Notes 8.5.3 should function normally... and its all good for the last 3 days for me.
I hear this would not be a challenge with the newer Lotus Notes 8.5.4 (yet to be officially released). We shall see when we get there. :)
For starters, Lotus Notes 8.5.3 only managed to render about half of its interface. For example, I could see my inbox but email preview pane is blank. Integrated SameTime worked but workspaces and replication tabs were blank too. I suspect it could be some incompatibility or confusion with the GTK libs and I was right... Google is my friend and I discovered a brilliant soul who had the same challenge, created a bug report against openSUSE and even created a workaround/fix.
[Update on 27 Nov 2011]: Oops, it occurred to me that Lotus Notes 8.5.3 is actually 32-bit running on 64-bit openSUSE 12.1. That means the RPM created by Stefan Lijewski should have worked. I cannot recall why I came to the previous conclusion. I have just tried the 32-bit RPM and it worked for me. Therefore, I am correcting my entry below.
The easy way is to use a 1-click install via Stefan Lijewski's online repository.
The easy but manual way is to download the RPM before you manually execute a zypper in lotus-notes-gnome3-1-1.1.i586.rpm
In both cases, you will need to verify that your Lotus Notes launch icon has been updated to use the new notes-wrapper script instead of the original notes script in /opt/ibm/lotus/notes/ directory.
Finally, the hard way (if you're so inclined to experience compiling your own code) is the original method I used below.
1. Download the workaround fix from https://github.com/sgh/lotus-notes_gtk2.23.3/downloads
2. Un-tar the fix, tar zxvf sgh-lotus-notes_gtk2.23.3-2028e8e.tar.gz
3. You will need to install additional packages before you can compile the fix. As root, zypper in make gcc gtk2-devel glibc-devel-32bit gcc-32bit
4. In the sgh-lotus-notes_gtk2.23.3-2028e8e subdirectory, compile the fix with make
5. If make completed with success, you should have a new file libnotesgtkfix.so in the directory. Copy it and notes-wrapper to installed Lotus Notes directory /opt/ibm/lotus/notes/.
6. Last and final step, edit your Lotus Notes icons (kmenuedit if using KDE4) and change the default launch script to execute notes-wrapper instead.
That's it. Lotus Notes 8.5.3 should function normally... and its all good for the last 3 days for me.
I hear this would not be a challenge with the newer Lotus Notes 8.5.4 (yet to be officially released). We shall see when we get there. :)
Thursday, November 24, 2011
openSUSE 12.1 gets positive review on LAS
Nice and positive review of openSUSE 12.1 on the Linux Action Show on 20th Nov 2011. The YouTube video is embedded below... you may fast-forward to 30:10 where they finally got down to the review of openSUSE 12.1.
Most interesting (the best) comment on that YouTube page was from Jos Poortvliet (our openSUSE Community Manager), "VERY nice review guys! Fun to see how opinions on openSUSE have changed in the last year - from 'meh, yeah, is that distro still alive?' to the awesomeness now :D
As with most things in life, its all about perception and goodwill. openSUSE 12.1 is polished and enjoyable but a number of the great features mentioned, including SUSE Studio and openSUSE Build Service, have been around for a while... anyway, I'm just happy & enjoying the goodwill towards openSUSE. :)
Most interesting (the best) comment on that YouTube page was from Jos Poortvliet (our openSUSE Community Manager), "VERY nice review guys! Fun to see how opinions on openSUSE have changed in the last year - from 'meh, yeah, is that distro still alive?' to the awesomeness now :D
If you ever wanna talk about it with me - I'd be happy to be on the show..."
As with most things in life, its all about perception and goodwill. openSUSE 12.1 is polished and enjoyable but a number of the great features mentioned, including SUSE Studio and openSUSE Build Service, have been around for a while... anyway, I'm just happy & enjoying the goodwill towards openSUSE. :)
Sunday, November 20, 2011
My openSUSE 12 Journal - 2
Installed openSUSE 12.1 (64-bit) on both my home PC and my Thinkpad W520. The best part was I did not have to burn any installation DVDs and speed of installation was at Gigabit speed on my home local network. 
Here is what I did in a nutshell:
For more details, please refer to my older posts:
Happy to report the steps I documented in the posts above worked for openSUSE 12.1. There were some minor differences, mainly to do with Systemd and how it changes the console output a little. The previously observed SuSEFirewall bug for TFTP server is still present, so remember to add port 69 to UDP as previously documented.
Here is what I did in a nutshell:
- Download openSUSE 12.1 64-bit ISO and verified integrity with md5sum
- Configured my Thinkpad, running openSUSE 11.4, as the network installation server.
- Boot up my home PC in PXE-boot mode and installed openSUSE 12.1 from my Thinkpad.
- Once my PC is installed and running openSUSE 12.1, I configured it as the network installation server and boot up my Thinkpad in PXE-boot mode and installed openSUSE 12.1 onto it.
For more details, please refer to my older posts:
Happy to report the steps I documented in the posts above worked for openSUSE 12.1. There were some minor differences, mainly to do with Systemd and how it changes the console output a little. The previously observed SuSEFirewall bug for TFTP server is still present, so remember to add port 69 to UDP as previously documented.
My openSUSE 12 Journal - 1
openSUSE 12.1 was released earlier this week. Although I had to wait more than 24 hours before I got my hands on the the ISO binaries (4.4Gb of both 32-bit and 64-bit), it was well worth it. The lesson learnt was to use more than one download method concurrently in the event something fails. More importantly, its imperative to verify (ie md5sum) the downloaded binaries or risks having to abort an installation when the integrity of the packages are in question. 
For this release of openSUSE, everything has been incredibly smooth from installation to productive use of my home system. In fact, I have just completed another installation on my Thinkpad W520. I am sure there are some who have encountered challenges (no software is perfect); however, at least for me, this has been the smoothest experience ever since the days of SLES 8!
To all involved with openSUSE 12.1, please accept my congratulations on a job well done!
One little quirk, minor annoyance
From a usage scenario, I have to report something that made me panic on the first-boot of openSUSE 12.1, to the extent that I voluntarily hit the physical reset button on my PC.
The cause, as it turns out, is the new Systemd that replaces the old System-V init. Whenever I boot up a newly installed Linux for the first time, I always hit the ESC key on boot to see the boot messages. This helps me identify any problems early and gives me an indication of how quickly and smoothly Linux boots up. When I did the same with openSUSE 12.1 on first-boot, I observed some initial messages but suddenly everything seems to just stop. I panicked after 20 seconds and hit the physical reset button (thinking I may have messed up).
Apparently, the new Systemd is not very "chatty". I only had to wait 40 seconds more and the entire system booted up and I am automatically logged into KDE4.
If anyone could share how one might re-enable the same level of "chattiness" when the system boots up, appreciate if you could use the comments section below.
Gnome 3.2
Post-installation, I used YaST - Software Management and installed both the "Gnome Base System" and the "Gnome Desktop Environment" patterns. Finally, I got to try out Gnome 3 for the first time ever.
I have been a Gnome 2.x user for quite a number of years until I switched over to KDE4 when it became the default in openSUSE 11.2. KDE4 is great but I do miss the simplicity of Gnome 2.x from time to time.
Happy to report I'm using Gnome 3.2 rather productively on my home PC. However, I am not fully convinced it would be my default environment just yet. Gnome 3.2 is major re-design and it's as different to Gnome 2.32 as KDE4 is to KDE3. Here are some of my thoughts at this time:
- I liked the idea of integrating my online identity (Google & Twitter only at this time) into my desktop; but, this means I have to use Evolution... not something I liked due to past experiences (3 years ago).
- I really liked the concept of workspace on demand. I can drag an app & move it to the next available workspace & a new empty one is created. I am ready to move on from the 4-sided (or n-sided) cube paradigm.
- The font size and window title-bars takes up too much screen estate. It seems to run contrary to my initial impression that Gnome Shell gives me lots of screen estate since there is only one bar at the top.
- A good buddy of mine explained that its design was geared towards mobile devices (ie tablets with touchscreens) and I start to appreciate it more; however, I think this approach seems a tad too early at best? Given how mobile devices are dominated by Apple, Android & others, I don't see any hardware vendor officially supporting (hard-bundling) Gnome as the de-facto GUI. Feels more like a spill over from Meego & netbook UI era (only 2-3 years ago).
Thursday, November 10, 2011
Every-Packet's Changing... my Keane Parody
This is for all my friends, colleagues & fellow human-beings who ended up working in IT... and loving it.
Every-Packet's Changing (sung to the tune of Everybody's Changing by Keane)
You say you wonder your own LAN
When I think about it, I don't see how you can
You route add, you netstat
And I can't see the Ping that you tried
Says Every-Packet's changing and I don't know why
So little time, try to understand that I...
Try to log a call just to stay in the game, I
Try to stay awake and remember my frame-rate
Every-Packet's changing and I start to go insane
You're gone from here, soon you will disappear
Fading into tri-colored light
Cause Every-Packet's changing and I don't feel right
Every-Packet's changing and I start to go insane
Every-Packet's changing and I don't feel the same
Ooooh, Every-Packet's changing and I report abends...
Every-Packet's changing and I start to go insane
You're gone from here, soon you will disappear
Fading into tri-colored light
Cause Every-Packet's changing and I don't feel right
So little time, try to understand that I...
Try to log a call just to stay in the game, I
Try to stay awake and remember my frame-rateEvery-Packet's changing and I start to go insane
So little time, try to understand that I...
Try to make a patch just to stay in the game, I
Try to stay awake and not go init zeroEvery-Packet's changing and I don't feel the same
Ooooh, Every-Packet's changing and I report abends...
Monday, November 7, 2011
Network Installation of openSUSE
This will be my main blog entry discussing the best practices (mine anyway) on setting up a network installation server.
What is the Motivation for this setup?
1) Local Area Networks (LANs) are ubiquitous... even in homes where, chances are, you have a modem to the Internet and next to it is a wireless/ethernet router for multiple wifi and ethernet capable devices (PCs, Laptops, Smartphones, Tablets etc) to connect and surf the web.
2) If you are a Linux/OSS enthusiast, you would be constantly downloading the latest ISOs from the web, burning them onto a DVDs and installing them on physical/virtual machines. This is time/resource intensive... time to download, time to burn a DVD, time/money spent on blank DVDs etc. Of course, if you install openSUSE on virtual machines, you avoid the DVD part of the process but you would still have lots of ISOs on your filesystem... if you have a classroom of 20 machines... well, you get the idea.
3) Almost all PCs and Laptops these days have an ethernet port and are capable of booting up from the network (ie PXE-boot). This means you physically power them on, tell it to go into PXE-boot mode and it will go onto the network and seek out an installation server to download and install the openSUSE binaries.
4) This is an efficient way to install openSUSE onto both physical and virtual machines in a LAN environment where there is only one central place for your software binaries.
Pre-requisites:
i) You have a LAN environment connecting a few machines via the network cable. Although booting from wifi is possible but it is out of the scope of this discussion.
ii) You have a physical machine (preferably*) with openSUSE installed and this will be the designated network installation server.
*It is possible to set this up on a virtual machine but you need to ensure it is connected to the physical LAN in a Bridge networking mode and not the usual NAT networking mode for typical virtual machines.
3 Simple^ Steps to Success:
^Simple - it will become more simple as you do this more frequently.
Step 1: Install and configure Apache2 webserver to host and distribute openSUSE binaries.
Please refer to my other blog entry on this subject - Using Apache2 to deploy & maintain SUSE
Step 2: Install and configure tftpboot server to enable initial boot of target machines over the network.
Please refer to my other blog entry on this subject - Install and configure TFTP server for PXE boot environment
Step 3: Install and configure dhcpd server to provide an IP address for target machines and redirect them to the tftpboot server.
Please refer to my other blog entry on this subject - Install and configure DHCP server
Step 4: On the target physical machines, on boot and depending on the BIOS, activate the boot from LAN option and watch it get an IP address from the Installation Server (via Step 3), followed by connecting to the TFTP server and presenting an installation menu (via Step 2). Enter the choice of OS to install and your installation will commence over the LAN (via Step 1).
Additional points of note:
a) Everything discussed here applies to SLES, SLED and openSUSE. The steps documented are based on openSUSE 11.x and should work on older versions and even the enterprise editions of SUSE.
b) Software installation (apache2, tftpboot, syslinux, dhcpd etc) assumes your SLE or openSUSE server have access to their respective binaries, either in DVD (also ISO) or software repository on the web.
References:
Enjoy!
What is the Motivation for this setup?
1) Local Area Networks (LANs) are ubiquitous... even in homes where, chances are, you have a modem to the Internet and next to it is a wireless/ethernet router for multiple wifi and ethernet capable devices (PCs, Laptops, Smartphones, Tablets etc) to connect and surf the web.
2) If you are a Linux/OSS enthusiast, you would be constantly downloading the latest ISOs from the web, burning them onto a DVDs and installing them on physical/virtual machines. This is time/resource intensive... time to download, time to burn a DVD, time/money spent on blank DVDs etc. Of course, if you install openSUSE on virtual machines, you avoid the DVD part of the process but you would still have lots of ISOs on your filesystem... if you have a classroom of 20 machines... well, you get the idea.
3) Almost all PCs and Laptops these days have an ethernet port and are capable of booting up from the network (ie PXE-boot). This means you physically power them on, tell it to go into PXE-boot mode and it will go onto the network and seek out an installation server to download and install the openSUSE binaries.
4) This is an efficient way to install openSUSE onto both physical and virtual machines in a LAN environment where there is only one central place for your software binaries.
Pre-requisites:
i) You have a LAN environment connecting a few machines via the network cable. Although booting from wifi is possible but it is out of the scope of this discussion.
ii) You have a physical machine (preferably*) with openSUSE installed and this will be the designated network installation server.
*It is possible to set this up on a virtual machine but you need to ensure it is connected to the physical LAN in a Bridge networking mode and not the usual NAT networking mode for typical virtual machines.
3 Simple^ Steps to Success:
^Simple - it will become more simple as you do this more frequently.
Step 1: Install and configure Apache2 webserver to host and distribute openSUSE binaries.
Please refer to my other blog entry on this subject - Using Apache2 to deploy & maintain SUSE
Step 2: Install and configure tftpboot server to enable initial boot of target machines over the network.
Please refer to my other blog entry on this subject - Install and configure TFTP server for PXE boot environment
Step 3: Install and configure dhcpd server to provide an IP address for target machines and redirect them to the tftpboot server.
Please refer to my other blog entry on this subject - Install and configure DHCP server
Step 4: On the target physical machines, on boot and depending on the BIOS, activate the boot from LAN option and watch it get an IP address from the Installation Server (via Step 3), followed by connecting to the TFTP server and presenting an installation menu (via Step 2). Enter the choice of OS to install and your installation will commence over the LAN (via Step 1).
Additional points of note:
a) Everything discussed here applies to SLES, SLED and openSUSE. The steps documented are based on openSUSE 11.x and should work on older versions and even the enterprise editions of SUSE.
b) Software installation (apache2, tftpboot, syslinux, dhcpd etc) assumes your SLE or openSUSE server have access to their respective binaries, either in DVD (also ISO) or software repository on the web.
References:
- openSUSE.org - SDB:PXE boot installation
- Novell Cool Solutions - Setting Up a SUSE PXE Installation Server in an Existing NetWare Environment
- Novell Article - Setting up a PXE Boot Server
Enjoy!
Install and configure TFTP server for PXE boot environment
This blog entry describes how you would install and configure the TFTP (Trivial File Transfer Protocol) server for the purpose of building a PXE boot environment. The tftp server would transfer the syslinux binaries to boot up your physical machine. It will also present a text-based menu for the user to select what operating system to install.
Link to main entry on Network Installation of openSUSE.
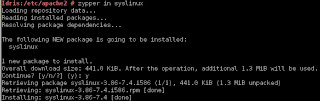
1) Install SysLinux (Bootloader for Linux)
Command-line (as root): zypper in syslinux
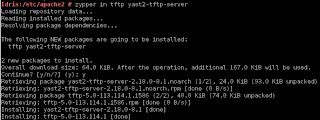
2) Install tftp
Command-line (as root): zypper in tftp yast2-tftp-server
3) Enable tftp
Command-line (as root): yast2 tftp-server
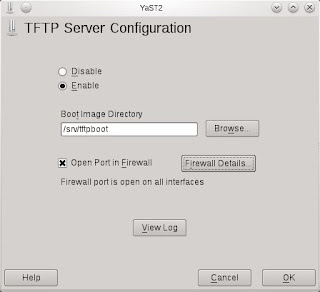
In TFTP Server Configuration dialog, check to Enable the service. Ensure the Boot Image Directory is set to /srv/tftpboot. Finally, check the Open Port in Firewall and click Ok.
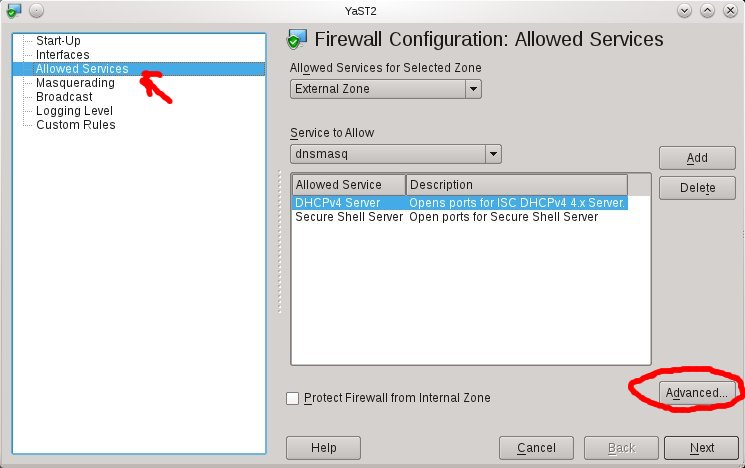
Note: Its been observed that the SUSE Firewall may still block incoming traffic to the TFTP boot server despite the Open Port in Firewall setting.

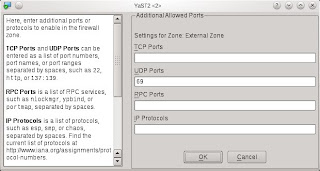
To ensure the Firewall is not blocking incoming TFTP traffic, open the Firewall setting via YaST (or command-line yast2 firewall). Navigate to the Allow Services section (left-hand pane) and click on Advanced button. Ensure that port 69 is listed in the UDP section and click OK to accept. Click Next and complete the settings change.
Next, create the sub-directory /srv/tftpboot/pxelinux.cfg via the command-line: mkdir -p /srv/tftpboot/pxelinux.cfg
4) Populating the /srv/tftpboot directory
Copy pxelinux.0 file (part of syslinux package installed earlier) to the /srv/tftpboot directory. Command-line: cp /usr/share/syslinux/pxelinux.0 /srv/tftpboot/
Copy the relevant Linux kernel and initrd boot files to /srv/tftpboot and provide meaning names (to avoid confusion later). This is best described by way of an example. Let's say I want to enable my installation server to provide an option to install both the 32-bit and 64-bit of openSUSE 11.4. Therefore, I would do the following:
a) Mount both 32-bit and 64-bit of openSUSE 11.4 ISO on the filesystem:
mount -t iso9660 -o ro,loop /directory/to/openSUSE-32-bit.iso /mnt/openSUSE-11.4-i586
mount -t iso9660 -o ro,loop /directory/to/openSUSE-64-bit.iso /mnt/openSUSE-11.4-x86_64/
b) Copy the relevant Linux kernel and initrd files to /srv/tftpboot and rename them with more meaning names:
cp /mnt/openSUSE-11.4-i586/boot/i386/loader/linux /srv/tftpboot/openSUSE-114-32bit.krnl
cp /mnt/openSUSE-11.4-i586/boot/i386/loader/initrd /srv/tftpboot/openSUSE-114-32bit.initrd
cp /mnt/openSUSE-11.4-x86_64/boot/x86_64/loader/linux /srv/tftpboot/openSUSE-114-64bit.krnl
cp /mnt/openSUSE-11.4-x86_64/boot/x86_64/loader/initrd /srv/tftpboot/openSUSE-114-64bit.initrd

c) Copy the message file from any openSUSE ISO to /srv/tftpboot:
cp /mnt/openSUSE-11.4-x86_64/boot/x86_64/loader/message /srv/tftpboot/
*You may unmount the ISOs as these copy are a one-time operation.
5) Prepare the text-based menu
[Update on 3 Dec 2011: added the directory where the file default should reside below]
Create a text-file (via your favourite editor as root), named default in the /srv/tftpboot/pxelinux.cfg directory with the following contents:
default harddisk
display message
prompt 1
timeout 600
# Install openSUSE 11.4 (32-bit)
label openSUSE-114-32
kernel openSUSE-114-32bit.krnl
append initrd=openSUSE-114-32bit.initrd splash=silent vga=0x314 showopts install=http://IP_ADDRESS_OF_SERVER/software/openSUSE-11.4-i586/
# Install openSUSE 11.4 (64-bit)
label openSUSE-114-64
kernel openSUSE-114-64bit.krnl
append initrd=openSUSE-114-64bit.initrd splash=silent vga=0x314 showopts install=http://IP_ADDRESS_OF_SERVER/software/openSUSE-11.4-x86_64/
Everything is self-explanatory above except for the install=http://IP_ADDRESS_OF_SERVER portion. Please refer to my other blog entry on using Apache2 webserver to host and serve up software binaries.
Finally, edit the message file in step 4c earlier to correspond with the example default file entries.
Welcome to openSUSE!
To start the installation, type one of the options below and press.
Available boot options:
openSUSE-114-32 - Installation of 11.4 32bit
openSUSE-114-64 - Installation of 11.4 64bit
Have a lot of fun...
Done.
1) Install SysLinux (Bootloader for Linux)
Command-line (as root): zypper in syslinux

2) Install tftp
Command-line (as root): zypper in tftp yast2-tftp-server

3) Enable tftp
Command-line (as root): yast2 tftp-server

In TFTP Server Configuration dialog, check to Enable the service. Ensure the Boot Image Directory is set to /srv/tftpboot. Finally, check the Open Port in Firewall and click Ok.
Note: Its been observed that the SUSE Firewall may still block incoming traffic to the TFTP boot server despite the Open Port in Firewall setting.

To ensure the Firewall is not blocking incoming TFTP traffic, open the Firewall setting via YaST (or command-line yast2 firewall). Navigate to the Allow Services section (left-hand pane) and click on Advanced button. Ensure that port 69 is listed in the UDP section and click OK to accept. Click Next and complete the settings change.
Next, create the sub-directory /srv/tftpboot/pxelinux.cfg via the command-line: mkdir -p /srv/tftpboot/pxelinux.cfg
4) Populating the /srv/tftpboot directory
Copy pxelinux.0 file (part of syslinux package installed earlier) to the /srv/tftpboot directory. Command-line: cp /usr/share/syslinux/pxelinux.0 /srv/tftpboot/
Copy the relevant Linux kernel and initrd boot files to /srv/tftpboot and provide meaning names (to avoid confusion later). This is best described by way of an example. Let's say I want to enable my installation server to provide an option to install both the 32-bit and 64-bit of openSUSE 11.4. Therefore, I would do the following:
a) Mount both 32-bit and 64-bit of openSUSE 11.4 ISO on the filesystem:
mount -t iso9660 -o ro,loop /directory/to/openSUSE-32-bit.iso /mnt/openSUSE-11.4-i586
mount -t iso9660 -o ro,loop /directory/to/openSUSE-64-bit.iso /mnt/openSUSE-11.4-x86_64/
b) Copy the relevant Linux kernel and initrd files to /srv/tftpboot and rename them with more meaning names:
cp /mnt/openSUSE-11.4-i586/boot/i386/loader/linux /srv/tftpboot/openSUSE-114-32bit.krnl
cp /mnt/openSUSE-11.4-i586/boot/i386/loader/initrd /srv/tftpboot/openSUSE-114-32bit.initrd
cp /mnt/openSUSE-11.4-x86_64/boot/x86_64/loader/linux /srv/tftpboot/openSUSE-114-64bit.krnl
cp /mnt/openSUSE-11.4-x86_64/boot/x86_64/loader/initrd /srv/tftpboot/openSUSE-114-64bit.initrd

c) Copy the message file from any openSUSE ISO to /srv/tftpboot:
cp /mnt/openSUSE-11.4-x86_64/boot/x86_64/loader/message /srv/tftpboot/
*You may unmount the ISOs as these copy are a one-time operation.
5) Prepare the text-based menu
[Update on 3 Dec 2011: added the directory where the file default should reside below]
Create a text-file (via your favourite editor as root), named default in the /srv/tftpboot/pxelinux.cfg directory with the following contents:
default harddisk
display message
prompt 1
timeout 600
# Install openSUSE 11.4 (32-bit)
label openSUSE-114-32
kernel openSUSE-114-32bit.krnl
append initrd=openSUSE-114-32bit.initrd splash=silent vga=0x314 showopts install=http://IP_ADDRESS_OF_SERVER/software/openSUSE-11.4-i586/
# Install openSUSE 11.4 (64-bit)
label openSUSE-114-64
kernel openSUSE-114-64bit.krnl
append initrd=openSUSE-114-64bit.initrd splash=silent vga=0x314 showopts install=http://IP_ADDRESS_OF_SERVER/software/openSUSE-11.4-x86_64/
Everything is self-explanatory above except for the install=http://IP_ADDRESS_OF_SERVER portion. Please refer to my other blog entry on using Apache2 webserver to host and serve up software binaries.
Finally, edit the message file in step 4c earlier to correspond with the example default file entries.
Welcome to openSUSE!
To start the installation, type one of the options below and press
Available boot options:
openSUSE-114-32 - Installation of 11.4 32bit
openSUSE-114-64 - Installation of 11.4 64bit
Have a lot of fun...
Done.
Install and configure DHCP server
This blog entry describes how you would install and configure the dhcpd (DHCP) server for the purpose of assigning an IP address to machines booting up via the network and pointing these machines to the PXE boot environment.
The PXE boot environment (TFTP server) is documented in another blog entry Install and configure tftp server for PXE boot environment and the main entry discussion on Network Installation of openSUSE.
1) Install DHCP Server (dhcpd)
Command-line (as root): zypper in dhcp-server yast2-dhcp-server

2) Configure DHCP
Make a backup of the dhcpd.conf file to start afresh: mv /etc/dhcpd.conf /etc/dhcpd.org.conf
Create a new dhcpd.conf file, using your favourite text editor as root, from scratch with the following content:
option rfc3442-classless-static-routes code 121 = array of unsigned integer 8;
option domain-name "example.org";
option routers 192.168.11.1;
max-lease-time 7200;
ddns-updates off;
ddns-update-style none;
log-facility local7;
default-lease-time 600;
# define rules to identify DHCP Requests from PXE and Etherboot clients.
class "pxe" {
match if substring (option vendor-class-identifier, 0, 9) = "PXEClient";
}
class "etherboot" {
match if substring (option vendor-class-identifier, 0, 9) = "Etherboot";
}
subnet 192.168.11.0 netmask 255.255.255.0 {
range 192.168.11.51 192.168.11.60;
default-lease-time 14400;
max-lease-time 172800;
server-name "192.168.11.200";
next-server 192.168.11.200;
filename "pxelinux.0";
# allow members of "pxe";
}
Using the sample dhcpd.conf above, you can see that
Alternatively, if you would like a GUI interface, you may try yast2 dhcp-server. Below are screenshots of the 4 step wizard.


3) Starting and Stopping the DHCP Server
Its best to manually start and stop the DHCP Server as required... as most LANs already have some DHCP service running... doubly so if your machine is portable (ie Laptop), you wouldn't want your Laptop to start dishing out IP addresses on boot.
To start the DHCP server, command-line (as root): rcdhcpd start
To stop the DHCP server, command-line (as root): rcdhcpd stop
The PXE boot environment (TFTP server) is documented in another blog entry Install and configure tftp server for PXE boot environment and the main entry discussion on Network Installation of openSUSE.
1) Install DHCP Server (dhcpd)
Command-line (as root): zypper in dhcp-server yast2-dhcp-server

2) Configure DHCP
Make a backup of the dhcpd.conf file to start afresh: mv /etc/dhcpd.conf /etc/dhcpd.org.conf
Create a new dhcpd.conf file, using your favourite text editor as root, from scratch with the following content:
option rfc3442-classless-static-routes code 121 = array of unsigned integer 8;
option domain-name "example.org";
option routers 192.168.11.1;
max-lease-time 7200;
ddns-updates off;
ddns-update-style none;
log-facility local7;
default-lease-time 600;
# define rules to identify DHCP Requests from PXE and Etherboot clients.
class "pxe" {
match if substring (option vendor-class-identifier, 0, 9) = "PXEClient";
}
class "etherboot" {
match if substring (option vendor-class-identifier, 0, 9) = "Etherboot";
}
subnet 192.168.11.0 netmask 255.255.255.0 {
range 192.168.11.51 192.168.11.60;
default-lease-time 14400;
max-lease-time 172800;
server-name "192.168.11.200";
next-server 192.168.11.200;
filename "pxelinux.0";
# allow members of "pxe";
}
Using the sample dhcpd.conf above, you can see that
- My router IP is 192.168.11.1
- DHCP daemon is giving out IP address starting from 192.168.11.51 to 192.168.11.60. You can adjust this setting to provide more IP addresses. The important part is to assign IP addresses outside the range of any other existing DHCP server (either in the router or in another environment where you do not have access to the official DHCP server).
- server-name and next-server points to the IP address of the network installation server (ie pointing back to the openSUSE server that is running DHCP server, TFTP server, Apache2 server with binaries)
Alternatively, if you would like a GUI interface, you may try yast2 dhcp-server. Below are screenshots of the 4 step wizard.


3) Starting and Stopping the DHCP Server
Its best to manually start and stop the DHCP Server as required... as most LANs already have some DHCP service running... doubly so if your machine is portable (ie Laptop), you wouldn't want your Laptop to start dishing out IP addresses on boot.
To start the DHCP server, command-line (as root): rcdhcpd start
To stop the DHCP server, command-line (as root): rcdhcpd stop
Sunday, November 6, 2011
12.1 RC1 installfest at SLUGS on 1st Nov 2011
The SUSE Linux User Group Singapore (SLUGS) had an informal installfest of openSUSE 12.1 Release Candidate 1 (RC1) just this week...


although, at the time of writing this entry, RC2 has just been released and it looks like 12.1 will be available on time as indicated by the countdown graphic on the right of this blog page.
Special Thanks to Mike Veltman for the VMWare ESXi environment across his Lab for us to play with 12.1 RC1.
During the installfest, I opted to use VirtualBox on Windows 7 to simultaneously install both openSUSE 11.4 and 12.1 RC1. I wanted to see the differences (if any) between the current stable openSUSE and the new major version change (11 to 12).
Here are the side-by-side installation screenshots between 11.4 and 12.1 RC1:

On boot, you'll see a general darker green versus lighter green theme between 11.4 & 12.1.


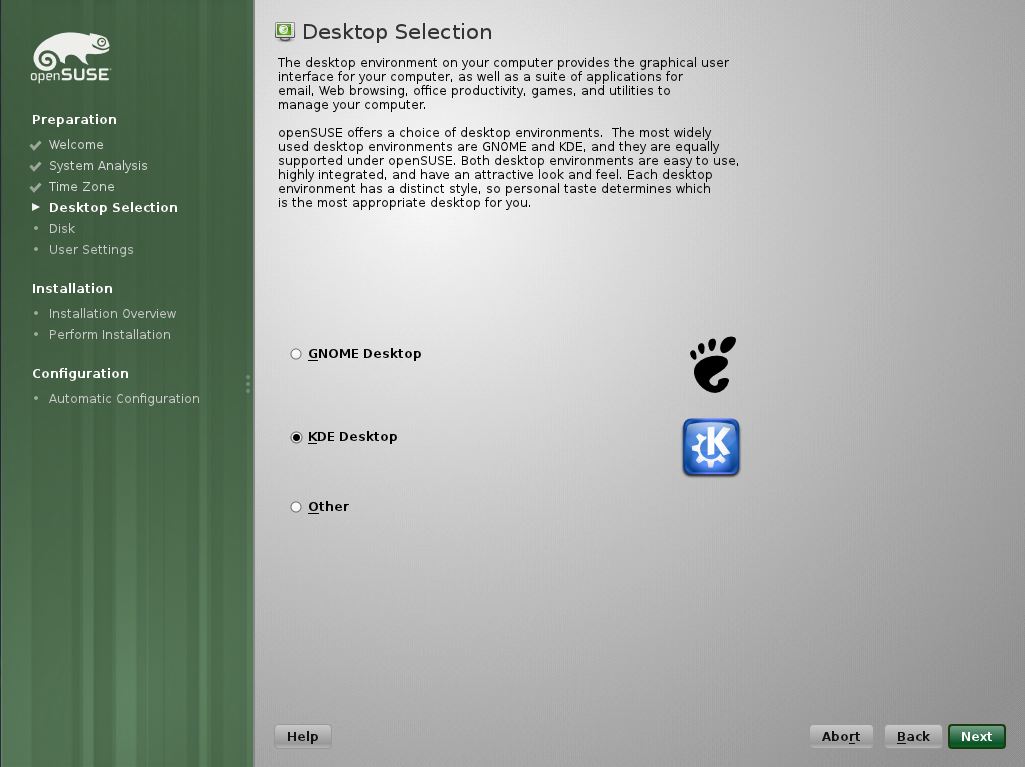

By default, KDE is the preferred graphical desktop environment for both 11.4 and 12.1 RC1. I also wanted to give the new Gnome 3.x a try/shot/go. However, I only added the Gnome post-installation. It was described in the list of annoying bugs that the installer would hang if we go into the Software Selection and made some changes. Perhaps, the installer could offer one more option of installing both KDE4 and Gnome3 upfront at this stage (allowing multi-selection)?


Minor change here at partition setup. The 11.x design seems to indicate users have to choose between a partition based or LVM based partitioning scheme. The 12.1 design doesn't give that "choose-between-the-camps" feeling and still provide the partition based scheme by default with also additional options of having a separate partition for user home.
Most notable, of course, is the ability to use Btrfs (pronounced "butter-f-s") as the default filesystem. I have heard alot about it but have yet to fully tried it out. I am sure it will be covered in a much later blog entry.


openSUSE 11.4 and 12.1 RC1 installed, booted up into the default KDE4 graphical desktop environment.

One more minor thing, I bring up YaST-Software Management, select the Patterns view and chose to install both "GNOME Desktop Environment" and "GNOME Base System" pattern (as seen in screenshot above). Click Accept and you will have the opportunity to explore the GNOME 3, in addition to the default KDE4 desktop environment.

To switch between the two, simply log off and at the login screen, choose either GNOME or KDE4 (via the little green stripped button) before providing your user password to login.
Below is a few screenshots of the GNOME3 desktop environment.


Personally, I have not decided which will be my "production" desktop environment. I've been using GNOME for quite a while before switching to KDE4 when 11.x came around and preferred it. With the new major version of GNOME, I am willing to give it a try and decide which is my preferred desktop environment. For now, on my 11.4 systems, my choice is KDE4.
Subscribe to:
Posts (Atom)