Link to main entry on Network Installation of openSUSE.
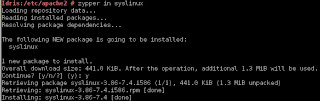
1) Install SysLinux (Bootloader for Linux)
Command-line (as root): zypper in syslinux
2) Install tftp
Command-line (as root): zypper in tftp yast2-tftp-server
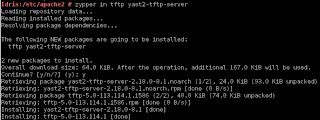
3) Enable tftp
Command-line (as root): yast2 tftp-server
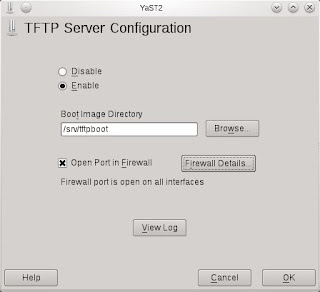
In TFTP Server Configuration dialog, check to Enable the service. Ensure the Boot Image Directory is set to /srv/tftpboot. Finally, check the Open Port in Firewall and click Ok.
Note: Its been observed that the SUSE Firewall may still block incoming traffic to the TFTP boot server despite the Open Port in Firewall setting.
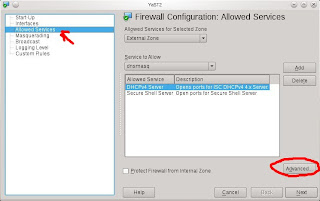
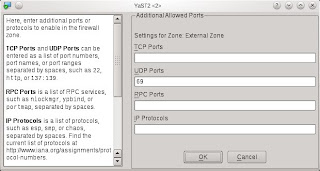
To ensure the Firewall is not blocking incoming TFTP traffic, open the Firewall setting via YaST (or command-line yast2 firewall). Navigate to the Allow Services section (left-hand pane) and click on Advanced button. Ensure that port 69 is listed in the UDP section and click OK to accept. Click Next and complete the settings change.
Next, create the sub-directory /srv/tftpboot/pxelinux.cfg via the command-line: mkdir -p /srv/tftpboot/pxelinux.cfg
4) Populating the /srv/tftpboot directory
Copy pxelinux.0 file (part of syslinux package installed earlier) to the /srv/tftpboot directory. Command-line: cp /usr/share/syslinux/pxelinux.0 /srv/tftpboot/
Copy the relevant Linux kernel and initrd boot files to /srv/tftpboot and provide meaning names (to avoid confusion later). This is best described by way of an example. Let's say I want to enable my installation server to provide an option to install both the 32-bit and 64-bit of openSUSE 11.4. Therefore, I would do the following:
a) Mount both 32-bit and 64-bit of openSUSE 11.4 ISO on the filesystem:
mount -t iso9660 -o ro,loop /directory/to/openSUSE-32-bit.iso /mnt/openSUSE-11.4-i586
mount -t iso9660 -o ro,loop /directory/to/openSUSE-64-bit.iso /mnt/openSUSE-11.4-x86_64/
b) Copy the relevant Linux kernel and initrd files to /srv/tftpboot and rename them with more meaning names:
cp /mnt/openSUSE-11.4-i586/boot/i386/loader/linux /srv/tftpboot/openSUSE-114-32bit.krnl
cp /mnt/openSUSE-11.4-i586/boot/i386/loader/initrd /srv/tftpboot/openSUSE-114-32bit.initrd
cp /mnt/openSUSE-11.4-x86_64/boot/x86_64/loader/linux /srv/tftpboot/openSUSE-114-64bit.krnl
cp /mnt/openSUSE-11.4-x86_64/boot/x86_64/loader/initrd /srv/tftpboot/openSUSE-114-64bit.initrd
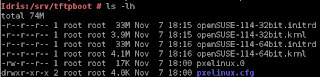
c) Copy the message file from any openSUSE ISO to /srv/tftpboot:
cp /mnt/openSUSE-11.4-x86_64/boot/x86_64/loader/message /srv/tftpboot/
*You may unmount the ISOs as these copy are a one-time operation.
5) Prepare the text-based menu
[Update on 3 Dec 2011: added the directory where the file default should reside below]
Create a text-file (via your favourite editor as root), named default in the /srv/tftpboot/pxelinux.cfg directory with the following contents:
default harddisk
display message
prompt 1
timeout 600
# Install openSUSE 11.4 (32-bit)
label openSUSE-114-32
kernel openSUSE-114-32bit.krnl
append initrd=openSUSE-114-32bit.initrd splash=silent vga=0x314 showopts install=http://IP_ADDRESS_OF_SERVER/software/openSUSE-11.4-i586/
# Install openSUSE 11.4 (64-bit)
label openSUSE-114-64
kernel openSUSE-114-64bit.krnl
append initrd=openSUSE-114-64bit.initrd splash=silent vga=0x314 showopts install=http://IP_ADDRESS_OF_SERVER/software/openSUSE-11.4-x86_64/
Everything is self-explanatory above except for the install=http://IP_ADDRESS_OF_SERVER portion. Please refer to my other blog entry on using Apache2 webserver to host and serve up software binaries.
Finally, edit the message file in step 4c earlier to correspond with the example default file entries.
Welcome to openSUSE!
To start the installation, type one of the options below and press.
Available boot options:
openSUSE-114-32 - Installation of 11.4 32bit
openSUSE-114-64 - Installation of 11.4 64bit
Have a lot of fun...
Done.
1) Install SysLinux (Bootloader for Linux)
Command-line (as root): zypper in syslinux

2) Install tftp
Command-line (as root): zypper in tftp yast2-tftp-server

3) Enable tftp
Command-line (as root): yast2 tftp-server

In TFTP Server Configuration dialog, check to Enable the service. Ensure the Boot Image Directory is set to /srv/tftpboot. Finally, check the Open Port in Firewall and click Ok.
Note: Its been observed that the SUSE Firewall may still block incoming traffic to the TFTP boot server despite the Open Port in Firewall setting.
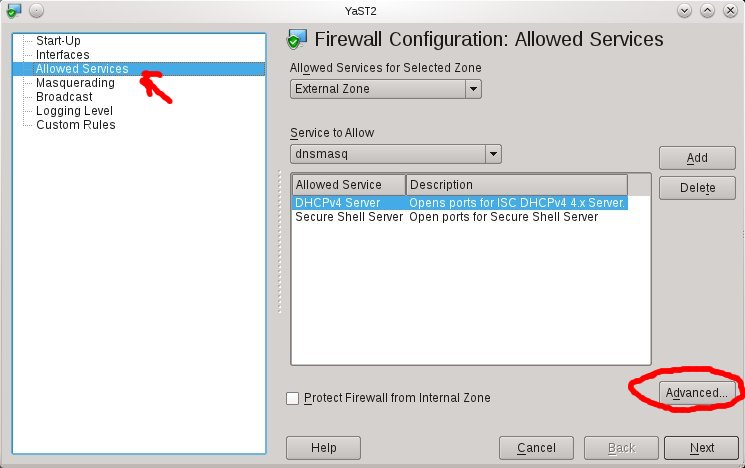

To ensure the Firewall is not blocking incoming TFTP traffic, open the Firewall setting via YaST (or command-line yast2 firewall). Navigate to the Allow Services section (left-hand pane) and click on Advanced button. Ensure that port 69 is listed in the UDP section and click OK to accept. Click Next and complete the settings change.
Next, create the sub-directory /srv/tftpboot/pxelinux.cfg via the command-line: mkdir -p /srv/tftpboot/pxelinux.cfg
4) Populating the /srv/tftpboot directory
Copy pxelinux.0 file (part of syslinux package installed earlier) to the /srv/tftpboot directory. Command-line: cp /usr/share/syslinux/pxelinux.0 /srv/tftpboot/
Copy the relevant Linux kernel and initrd boot files to /srv/tftpboot and provide meaning names (to avoid confusion later). This is best described by way of an example. Let's say I want to enable my installation server to provide an option to install both the 32-bit and 64-bit of openSUSE 11.4. Therefore, I would do the following:
a) Mount both 32-bit and 64-bit of openSUSE 11.4 ISO on the filesystem:
mount -t iso9660 -o ro,loop /directory/to/openSUSE-32-bit.iso /mnt/openSUSE-11.4-i586
mount -t iso9660 -o ro,loop /directory/to/openSUSE-64-bit.iso /mnt/openSUSE-11.4-x86_64/
b) Copy the relevant Linux kernel and initrd files to /srv/tftpboot and rename them with more meaning names:
cp /mnt/openSUSE-11.4-i586/boot/i386/loader/linux /srv/tftpboot/openSUSE-114-32bit.krnl
cp /mnt/openSUSE-11.4-i586/boot/i386/loader/initrd /srv/tftpboot/openSUSE-114-32bit.initrd
cp /mnt/openSUSE-11.4-x86_64/boot/x86_64/loader/linux /srv/tftpboot/openSUSE-114-64bit.krnl
cp /mnt/openSUSE-11.4-x86_64/boot/x86_64/loader/initrd /srv/tftpboot/openSUSE-114-64bit.initrd

c) Copy the message file from any openSUSE ISO to /srv/tftpboot:
cp /mnt/openSUSE-11.4-x86_64/boot/x86_64/loader/message /srv/tftpboot/
*You may unmount the ISOs as these copy are a one-time operation.
5) Prepare the text-based menu
[Update on 3 Dec 2011: added the directory where the file default should reside below]
Create a text-file (via your favourite editor as root), named default in the /srv/tftpboot/pxelinux.cfg directory with the following contents:
default harddisk
display message
prompt 1
timeout 600
# Install openSUSE 11.4 (32-bit)
label openSUSE-114-32
kernel openSUSE-114-32bit.krnl
append initrd=openSUSE-114-32bit.initrd splash=silent vga=0x314 showopts install=http://IP_ADDRESS_OF_SERVER/software/openSUSE-11.4-i586/
# Install openSUSE 11.4 (64-bit)
label openSUSE-114-64
kernel openSUSE-114-64bit.krnl
append initrd=openSUSE-114-64bit.initrd splash=silent vga=0x314 showopts install=http://IP_ADDRESS_OF_SERVER/software/openSUSE-11.4-x86_64/
Everything is self-explanatory above except for the install=http://IP_ADDRESS_OF_SERVER portion. Please refer to my other blog entry on using Apache2 webserver to host and serve up software binaries.
Finally, edit the message file in step 4c earlier to correspond with the example default file entries.
Welcome to openSUSE!
To start the installation, type one of the options below and press
Available boot options:
openSUSE-114-32 - Installation of 11.4 32bit
openSUSE-114-64 - Installation of 11.4 64bit
Have a lot of fun...
Done.